
How to Manage AI Chatbot Access with Purview DLP and Intune
Generative AI tools like ChatGPT, Google Gemini, and Microsoft Copilot have become part of everyday workflows. While they offer real productivity benefits, they also introduce a serious data loss risk: employees can paste confidential documents, customer data, or internal business information directly into an AI chatbot without any warning or restriction.
In this guide, I will show you how to build a two-layer control using Microsoft Purview Endpoint DLP and Microsoft Intune:
- Layer 1: Block unmanaged browsers (Chrome, Firefox, etc.) from accessing AI chatbot platforms entirely.
- Layer 2: Allow access through managed Microsoft Edge, but block users from pasting or uploading sensitive content into those platforms.
This approach gives your organisation the right balance between security and productivity. Users can still access AI tools through a controlled browser, but sensitive data stays protected.
Prerequisites
Before starting, make sure the following are in place:
| Requirement | Details |
|---|---|
| Licensing | Microsoft 365 E3 or E5 + Microsoft Purview add-on, or Microsoft 365 E5 Compliance |
| Intune enrollment | Devices must be Intune-managed (Hybrid Azure AD Join or Azure AD Join) |
| Microsoft Edge | Edge must be deployed and managed via Intune |
How the Two-Layer Approach Works
Rather than a blanket block, this setup lets you enforce different behaviours based on the browser being used:
| Scenario | Browser | Result |
|---|---|---|
| User opens ChatGPT in Chrome | Chrome (unmanaged) | Blocked entirely |
| User opens ChatGPT in Edge | Managed Edge | Access allowed |
| User pastes a source code into ChatGPT in Edge | Managed Edge | Paste blocked by DLP |
The key mechanism here is Purview’s Unallowed Browsers list. Any browser on that list is blocked from accessing URLs defined in your DLP policy. Edge, when configured as a managed browser, bypasses that block but remains subject to inline DLP enforcement.
Part 1 – Onboard Devices to Microsoft Purview via Intune
Before any DLP policy can act on endpoint activity, devices need to be onboarded to Purview. The recommended method for Intune-managed environments is the MDM/Intune deployment.
Step 1 – Download the Onboarding Package from Purview
In the Microsoft Purview portal, navigate to Settings > Device onboarding > Onboarding.
Set the operating system to Windows 10 and change the deployment method to Mobile Device Management / Microsoft Intune.
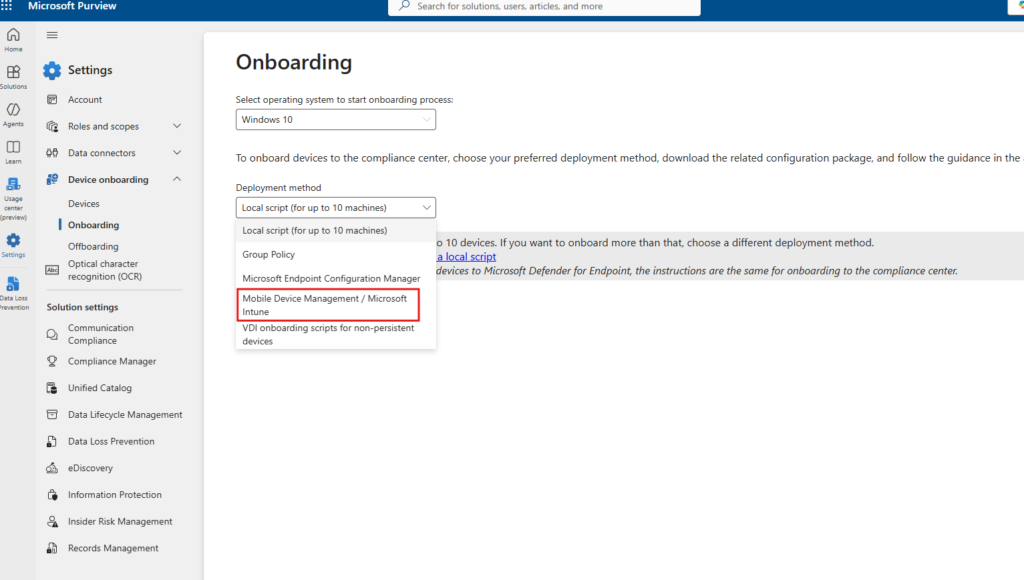
This generates the onboarding configuration package that Intune will push to your devices.
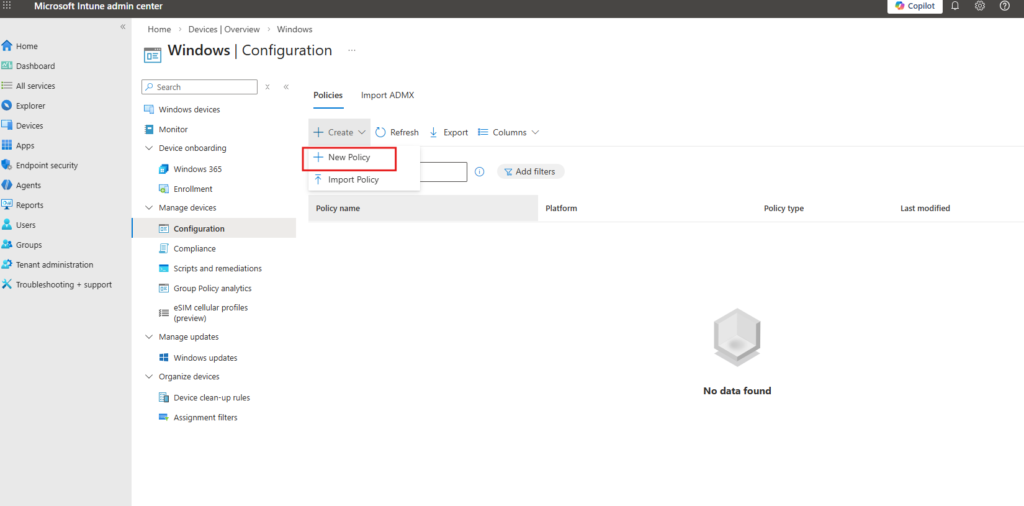
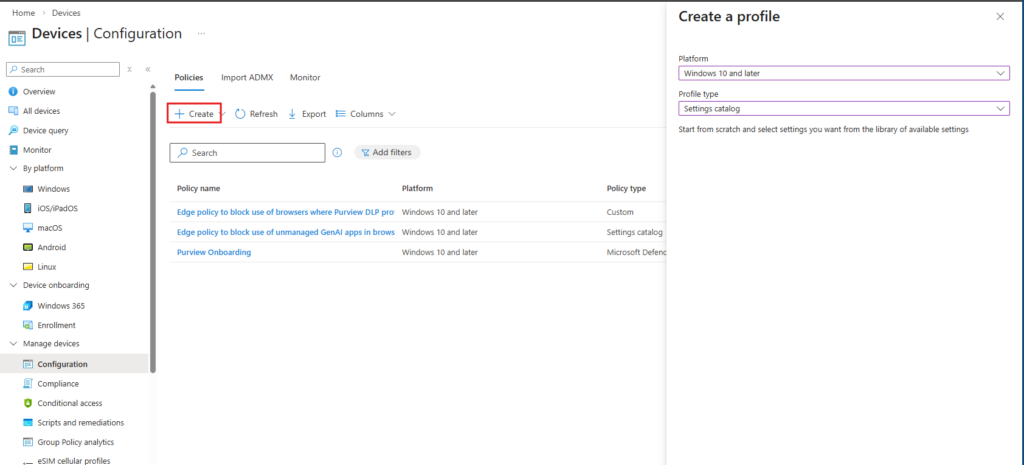
Step 2 – Create a New Configuration Policy in Intune
Open the Microsoft Intune admin center and go to Devices > Windows > Configuration.
Click Create > New Policy.
Step 3 – Select the Profile Type
In the Create a profile panel, set the following:
- Platform: Windows 10 and later
- Profile type: Templates
- Template name: Microsoft Defender for Endpoint (Desktop devices running Windows 10 or later)
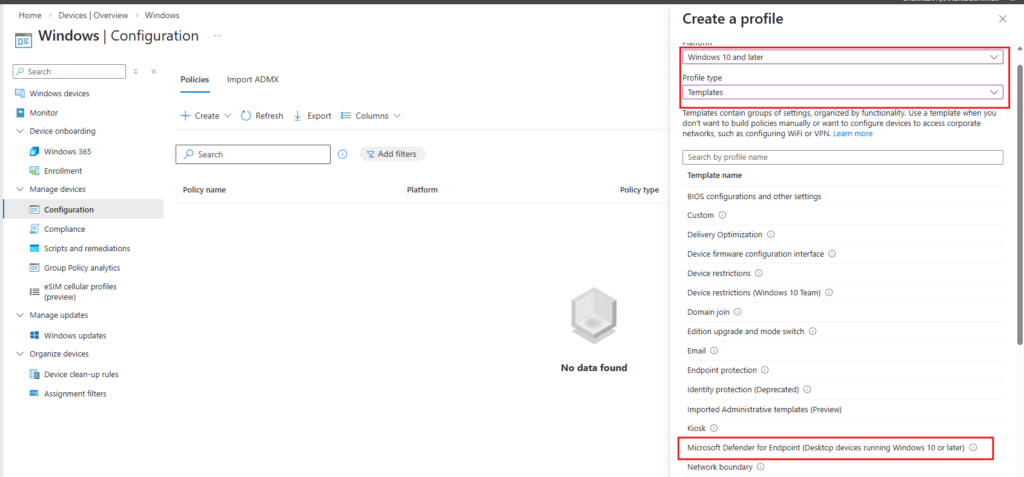
This template is the correct vehicle for pushing the Purview onboarding package. Despite the “Defender for Endpoint” label, it handles Purview compliance onboarding as well.
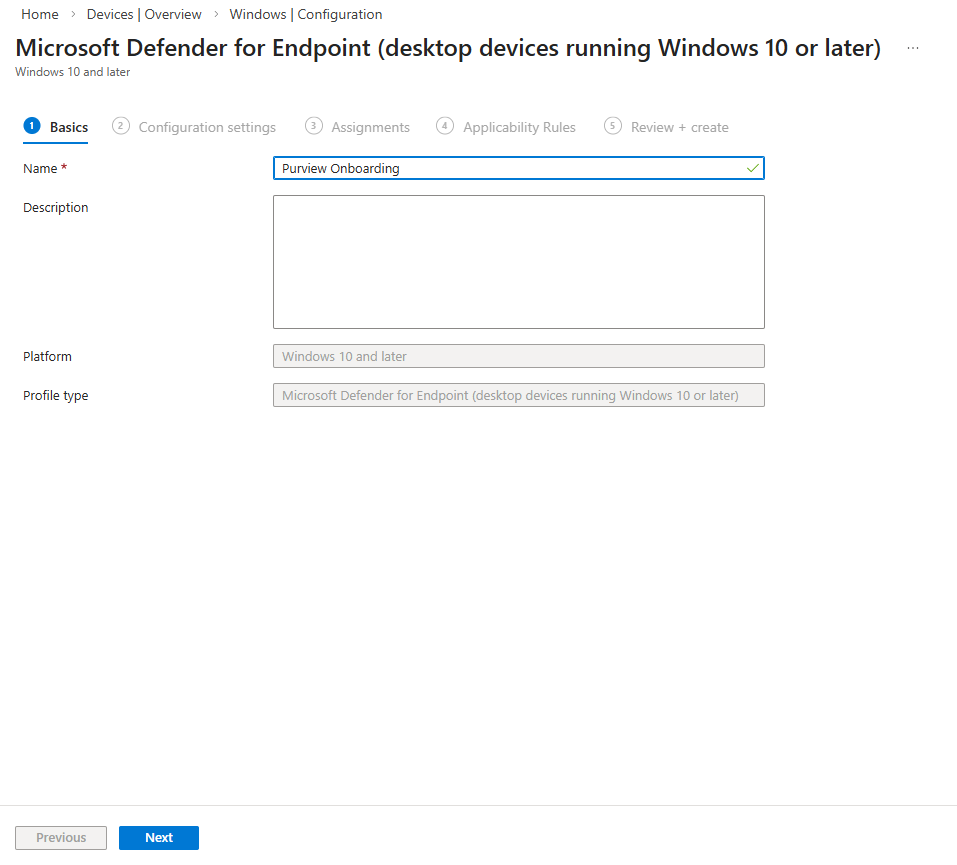
Step 4 – Configure the Basics
Give the policy a descriptive name. In this demo, the policy is named Purview Onboarding.
The platform and profile type fields are pre-filled based on your earlier selection.
Step 5 – Upload the Onboarding Package
On the Configuration settings tab, set the package type to Onboard and upload the DeviceCompliance.onboarding file you downloaded from Purview.
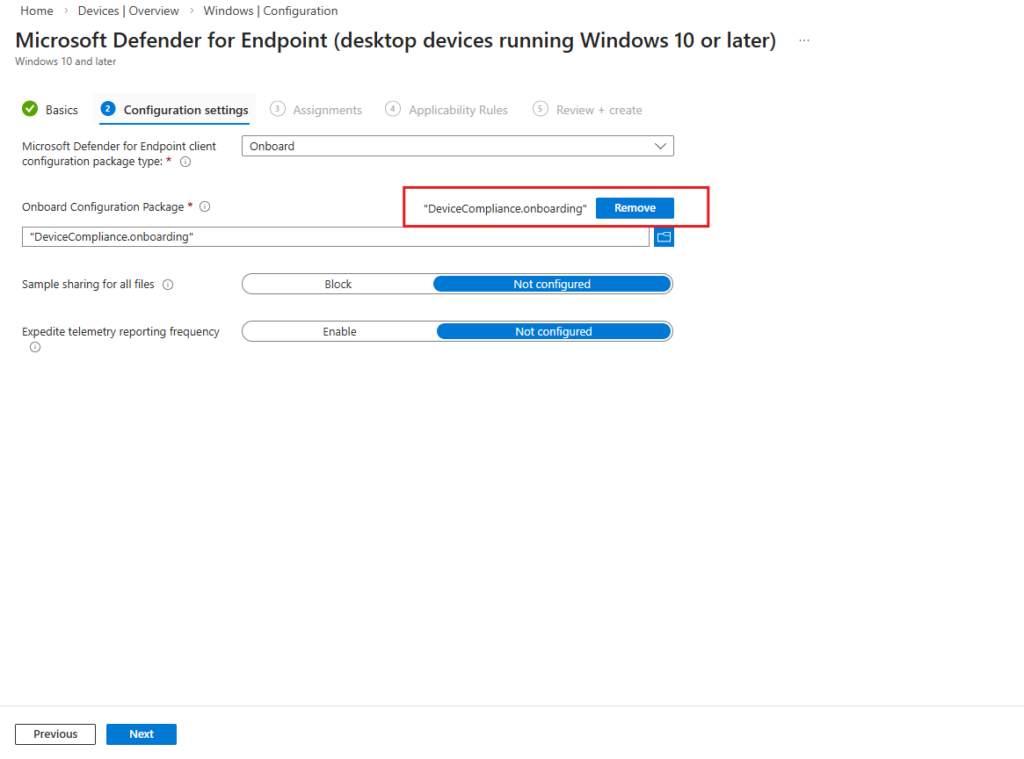
Leave Sample sharing and Expedite telemetry as Not configured unless your security team has specific requirements.
Step 6 – Assign the Policy
On the Assignments tab, add All devices and All users to the included groups.
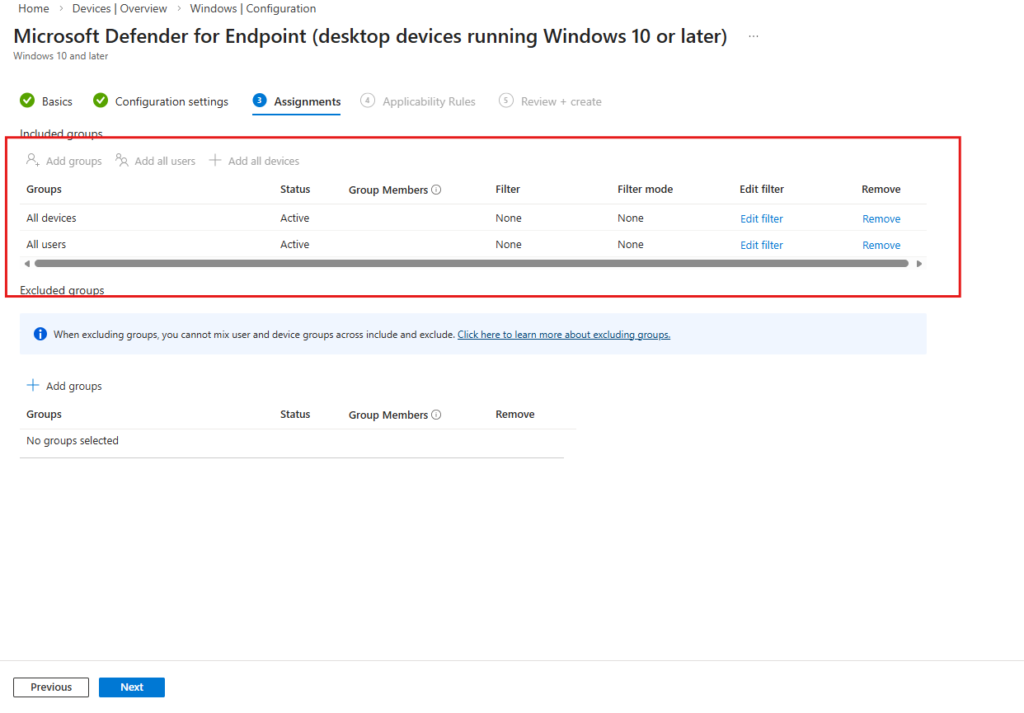
For a production rollout, scope this to a pilot device group first. In this demo environment, assigning to all devices is fine.
tep 7 – Verify the Device Appears in Purview
After the policy syncs (typically within 15–30 minutes), go back to Microsoft Purview portal > Settings > Device onboarding > Devices.
You should see your device listed with Configuration status: Updated.
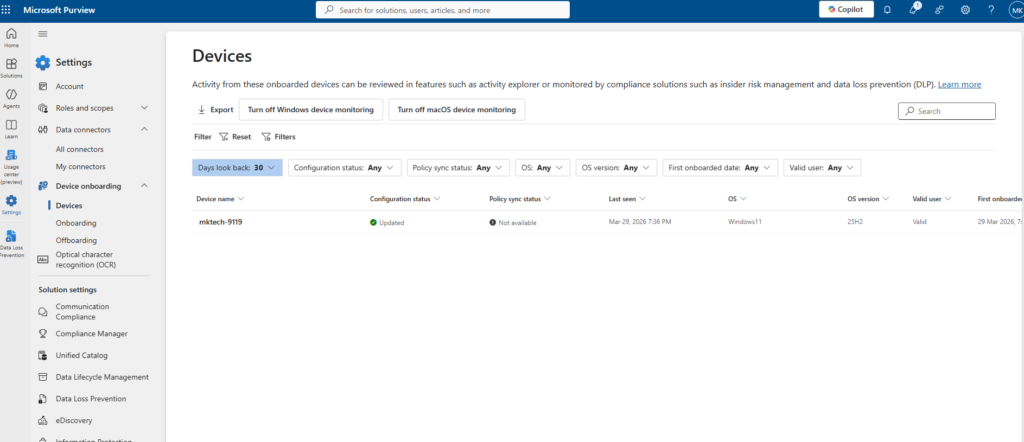
Once the device shows as Updated with a valid user, it is actively monitored by Purview and ready for DLP policy enforcement.
Part 2 – Configure Unallowed Browsers in Purview
The Unallowed Browsers list is the core mechanism behind Layer 1 of this setup. Any browser added to this list will be blocked from accessing files or URLs protected by your DLP policies. Edge is excluded from this list by design since it acts as the managed, policy-aware browser.
Step 8 – Add Chrome as an Unallowed Browser
In the Microsoft Purview portal, navigate to Settings > Data Loss Prevention.
Scroll down to the Browser and domain restrictions to sensitive data section and click Add or edit unallowed browsers.
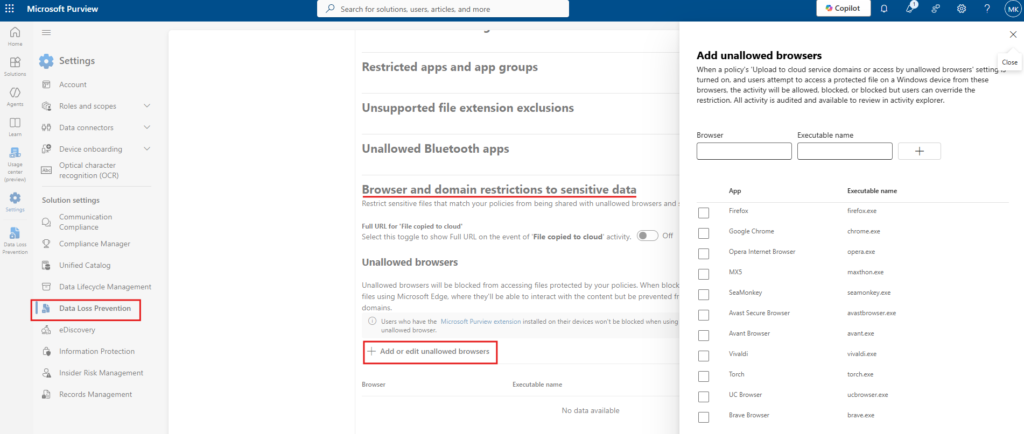
In the panel that opens, you will see a pre-populated list of common browsers. Select Google Chrome (chrome.exe) and save.
At minimum, add Chrome for this scenario. You can extend the list to include Firefox, Brave, or any other browser you want to block from accessing AI platforms.
Part 3 – Create a Custom Sensitive Info Type for Source Code
Purview ships with hundreds of built-in sensitive info types covering credit card numbers, passport numbers, medical data, and more. For source code, there is no built-in type, so we need to create a custom one.
In this demo, the goal is to prevent developers from pasting internal source code into AI chatbots. The custom SIT uses a keyword list to detect common programming patterns.
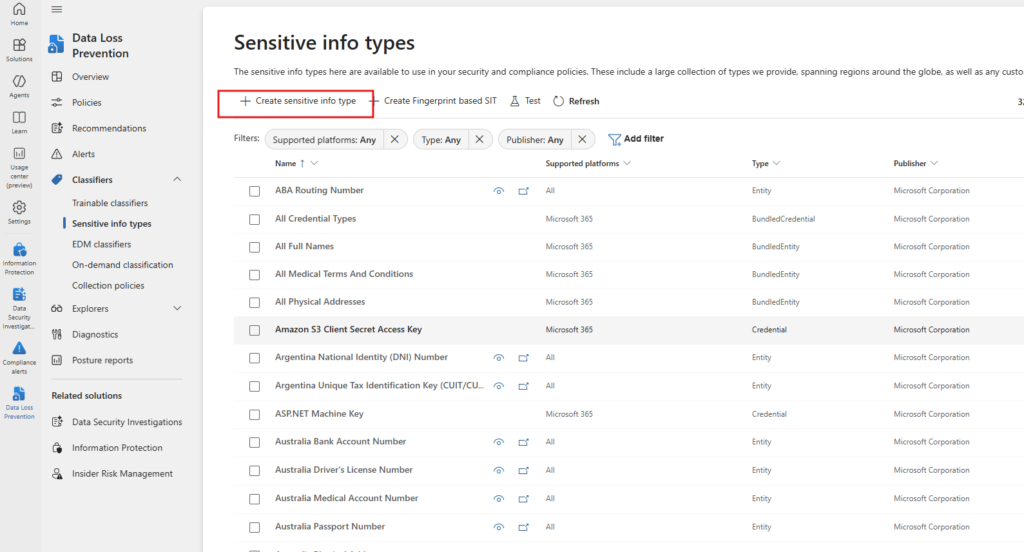
Step 9 – Open Sensitive Info Types
In the Microsoft Purview portal, go to Data Loss Prevention > Classifiers > Sensitive info types.
Click + Create sensitive info type.
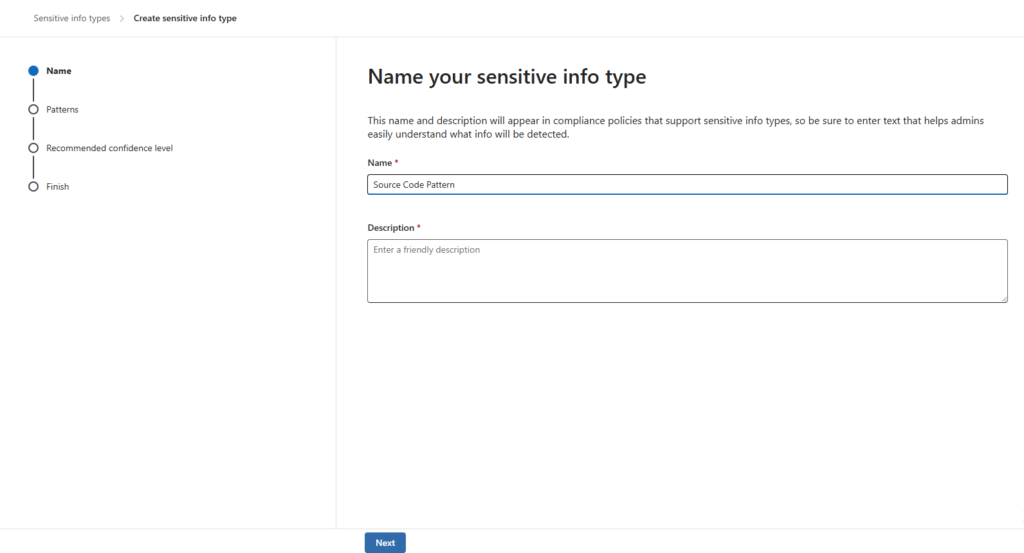
Step 10 – Name the Sensitive Info Type
Give the SIT a clear, descriptive name. In this demo it is named Source Code Pattern.
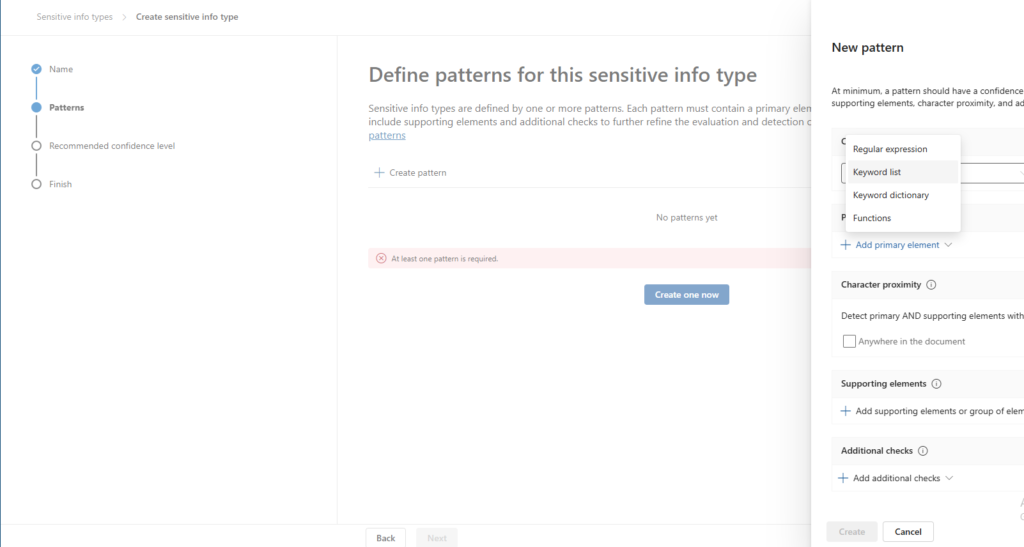
Step 11 – Define the Pattern
On the Patterns step, click Create one now to add a new pattern.
In the New pattern panel, click Add primary element and select Keyword list.
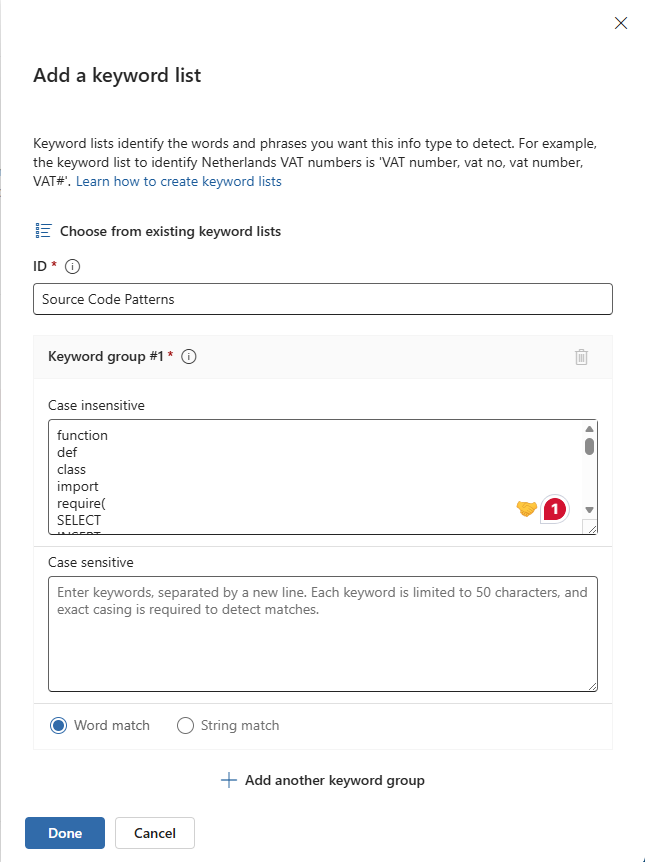
Step 12 – Configure the Keyword List
In the Add a keyword list dialog, set the ID to Source Code Patterns and add your keywords under Case insensitive. In this demo, the list includes:
function
def
class
import
require(
SELECT
INSERT
These cover the most common constructs across Python, JavaScript, SQL, and other languages. Set the match type to Word match.
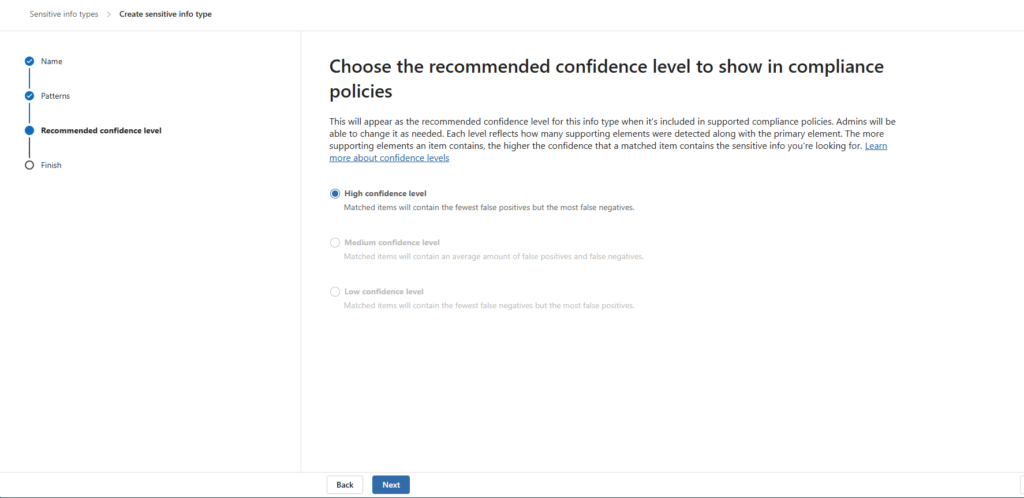
Step 13 – Set the Confidence Level
On the Recommended confidence level step, select High confidence level.
This minimises false positives. The policy will only trigger when the content closely matches the defined pattern.
Part 4 – Configure Managed Edge via Intune
For Layer 2 to work, Edge must be configured as a managed browser. The key requirement is that users are signed into Edge with their corporate account. Without this, Purview cannot identify the browser as managed and inline DLP enforcement will not apply.
This is done through a Settings catalog policy in Intune that forces browser sign-in.
Step 14 – Create a New Settings Catalog Policy
In the Microsoft Intune admin center, go to Devices > Windows > Configuration and click + Create > New Policy.
Set the following:
- Platform: Windows 10 and later
- Profile type: Settings catalog
Step 15 – Add the BrowserSignin Setting
On the Configuration settings tab, click + Add settings to open the Settings picker.
Search for BrowserSignin and select Microsoft Edge from the category results. Enable Browser sign-in settings and set the device value to Force users to sign-in to use the browser.
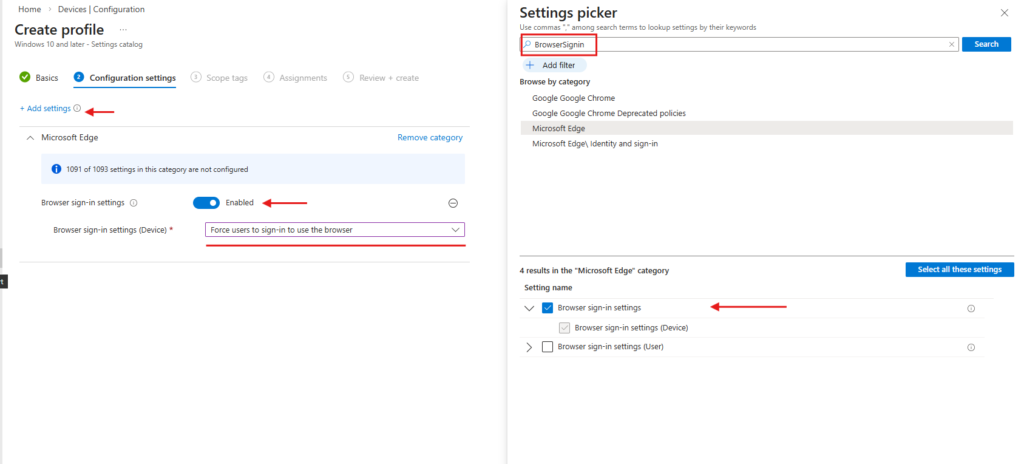
This setting ensures that every time a user opens Edge on a managed device, they are required to authenticate with their corporate account. Purview uses this identity context to apply the correct DLP policies inline.
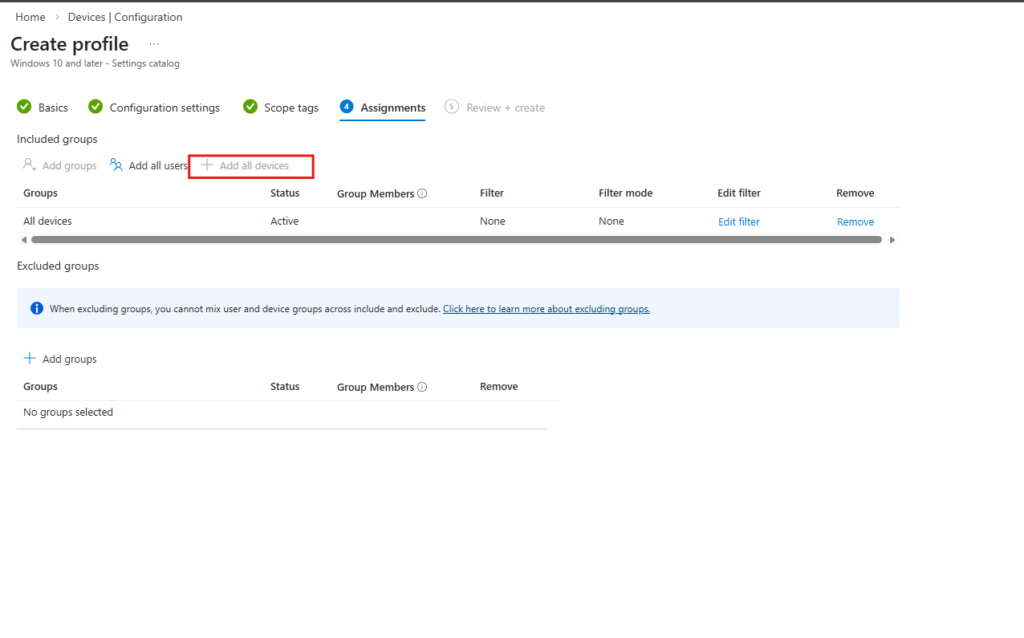
Step 16 – Assign the Policy
On the Assignments tab, add All devices as an included group.
Part 5 – Create the DLP Policy
With the browser configuration and custom sensitive info type in place, we can now create the DLP policy that ties everything together. This policy uses the Inline web traffic flow, which is specifically designed for protecting data shared through the Edge for Business browser and network integrations.
Step 17 – Start Policy Creation and Select Inline Web Traffic
In the Microsoft Purview portal, go to Data Loss Prevention > Policies and click + Create policy.
When prompted with “What info do you want to protect?”, select Inline web traffic.
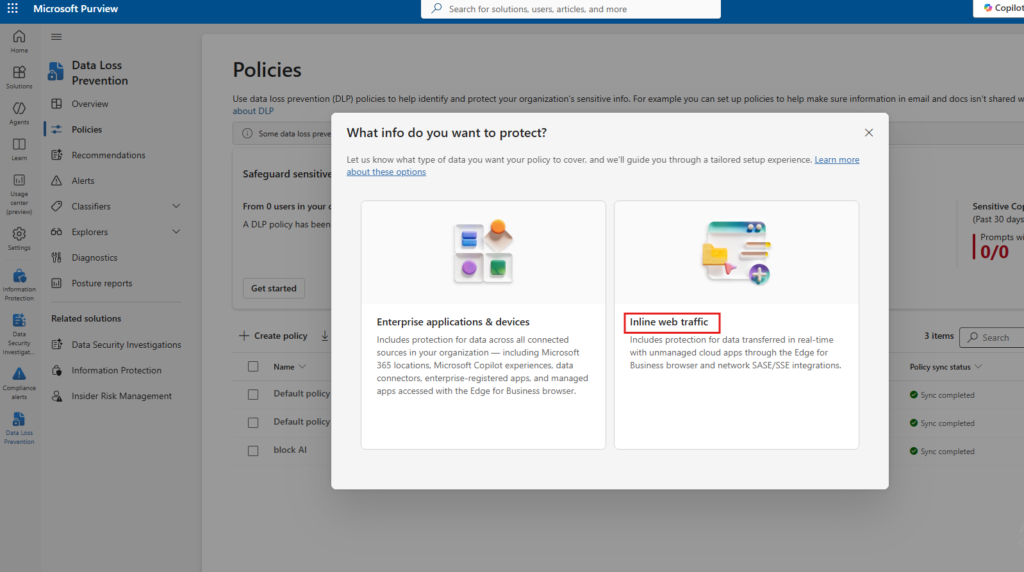
This policy type is built for real-time data protection across unmanaged cloud apps accessed through Edge for Business. It is different from the standard “Enterprise applications & devices” flow and is required for AI chatbot enforcement through the browser.
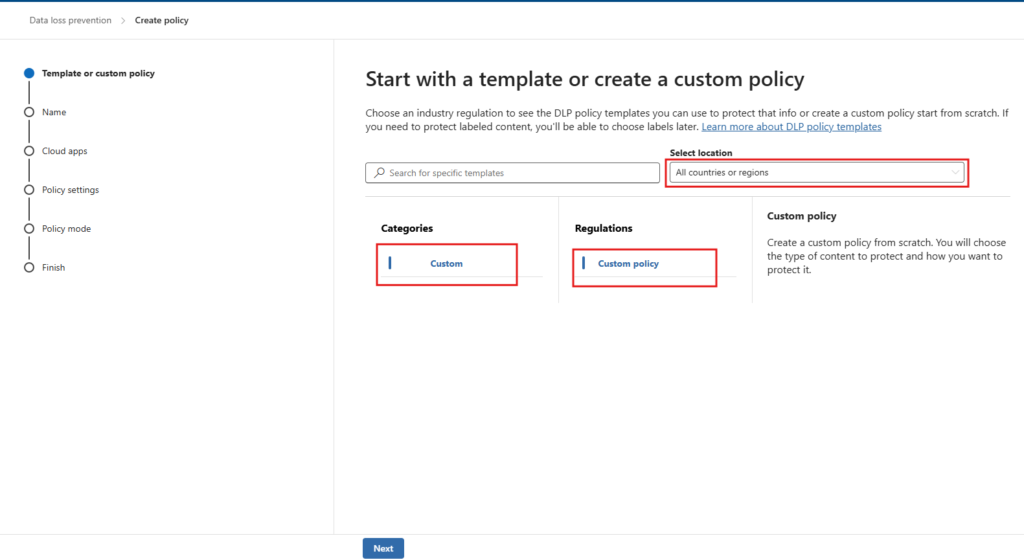
Step 18 – Select Custom Policy Template
On the Template or custom policy step, select Custom under Categories and Custom policy under Regulations. Set the location to All countries or regions.
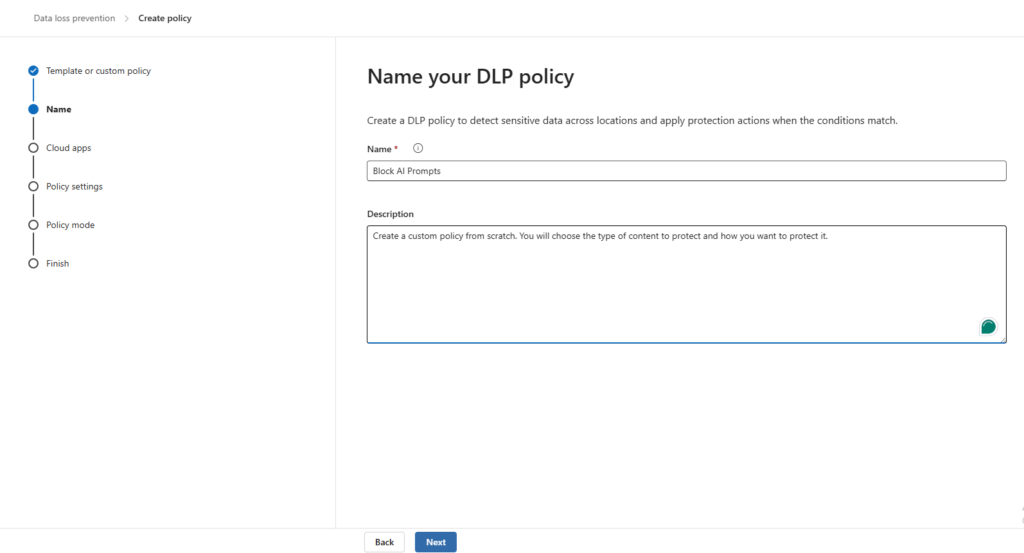
Step 19 – Name the Policy
Give the policy a clear name. In this demo it is Block AI Prompts.
Step 20 – Add Cloud Apps
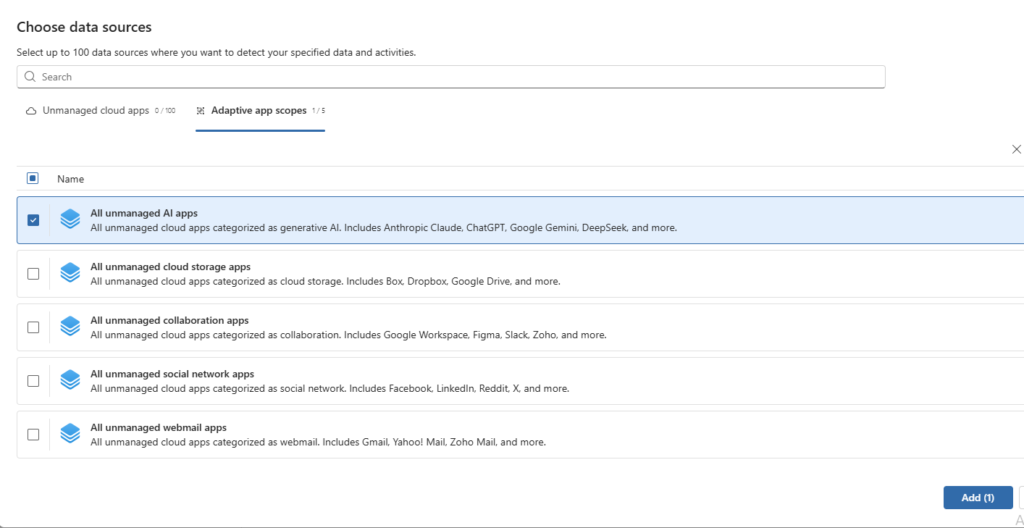
On the Cloud apps step, click + Add cloud apps.
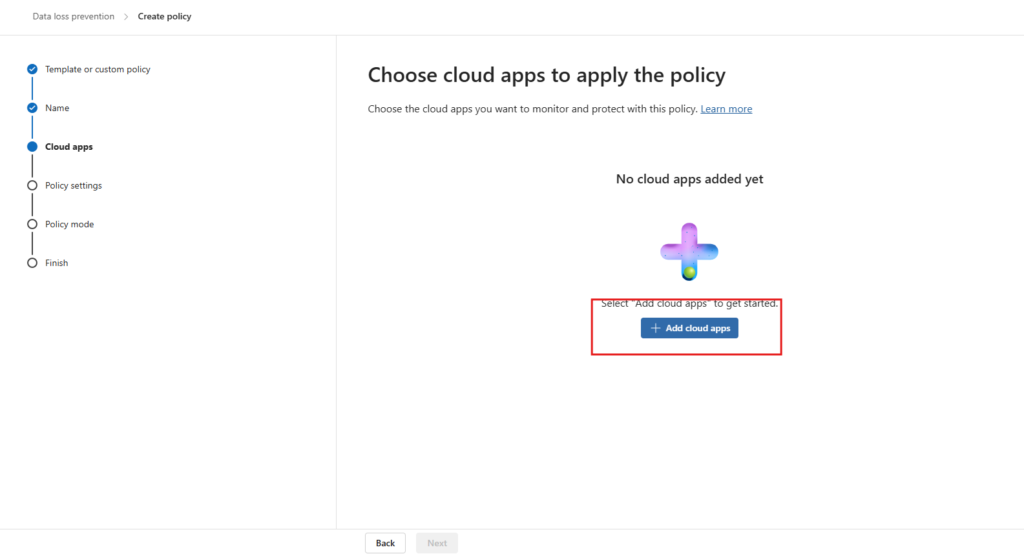
In the Choose data sources panel, go to the Adaptive app scopes tab and select All unmanaged AI apps.
This scope automatically covers ChatGPT, Google Gemini, Anthropic Claude, DeepSeek, and other generative AI platforms without requiring you to maintain a manual URL list.
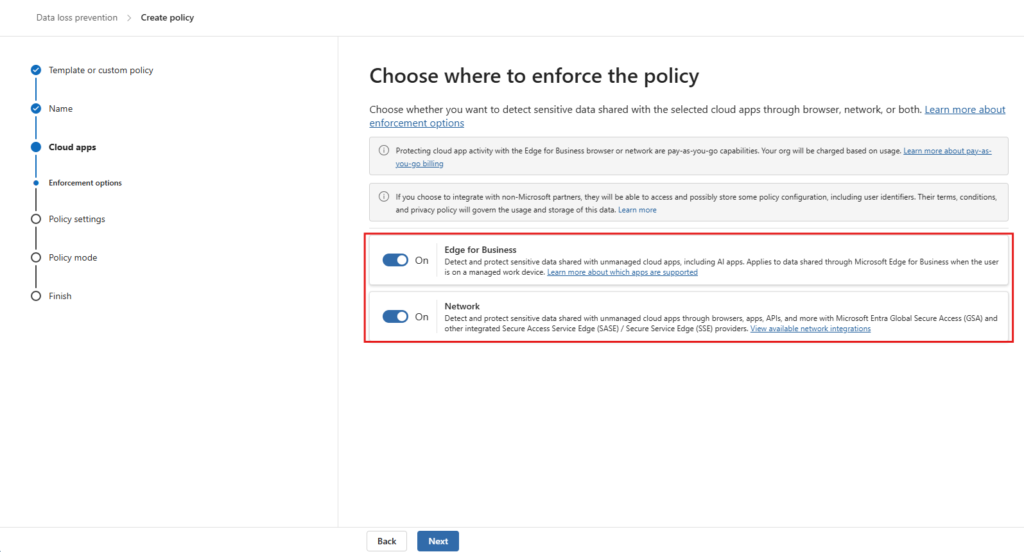
Step 21 – Configure Enforcement Options
On the Enforcement options step, enable both options:
- Edge for Business — enforces the policy inline when users access AI apps through managed Edge
- Network — extends enforcement to network-level integrations (SASE/SSE) if applicable
Step 22 – Select Advanced DLP Rules
On the Policy settings step, select Create or customize advanced DLP rules.
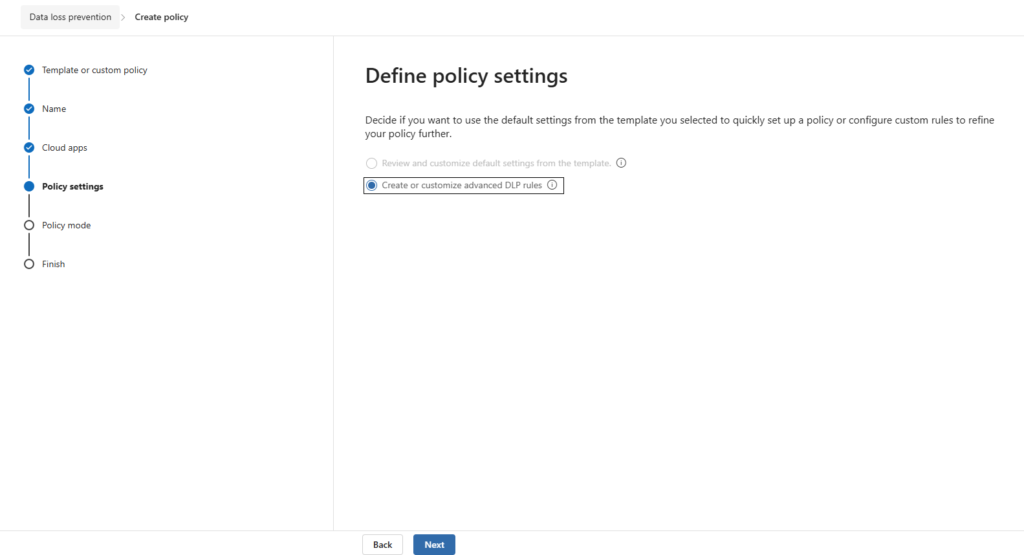
This gives you full control over conditions and actions, which is necessary for mapping the custom SIT to specific blocking behaviour.
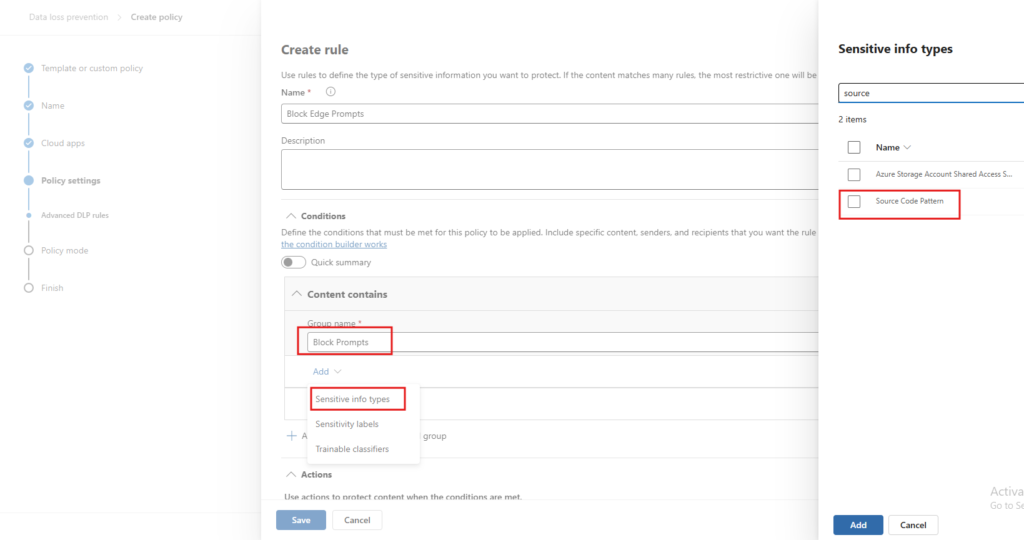
Step 23 – Create the Rule and Add the Sensitive Info Type
Click + Create rule and name it Block Edge Prompts. Under Conditions > Content contains, set the group name to Block Prompts.
Click Add > Sensitive info types and search for source. Select Source Code Pattern from the results.
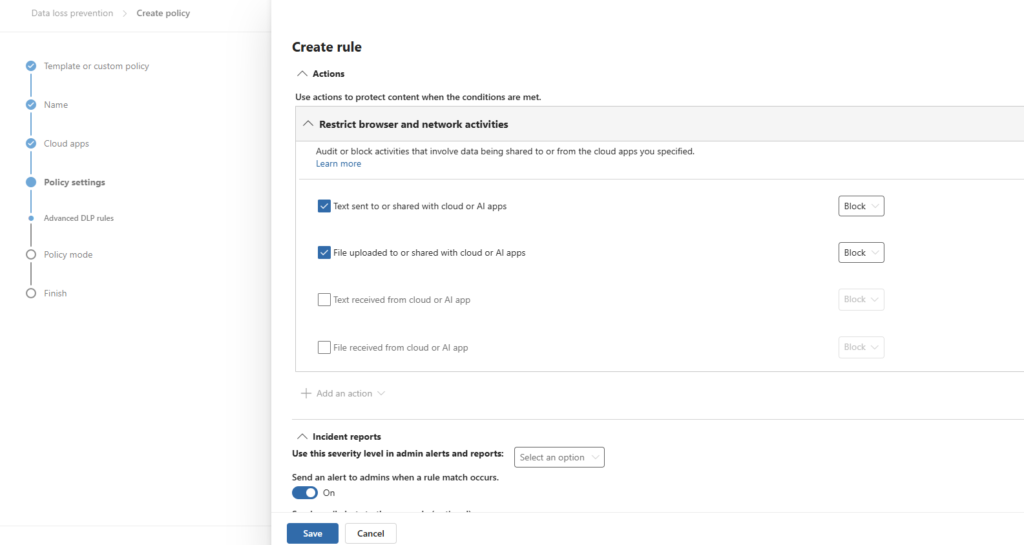
Step 24 – Configure the Actions
Scroll down to the Actions section. Under Restrict browser and network activities, enable and set to Block:
- Text sent to or shared with cloud or AI apps
- File uploaded to or shared with cloud or AI apps
Leave the receive actions unchecked the policy is focused on outbound data protection.
Also enable Send an alert to admins when a rule match occurs under Incident reports so you have visibility into policy hits.
Step 25 – Set Policy Mode
On the Policy mode step, select Turn the policy on immediately.
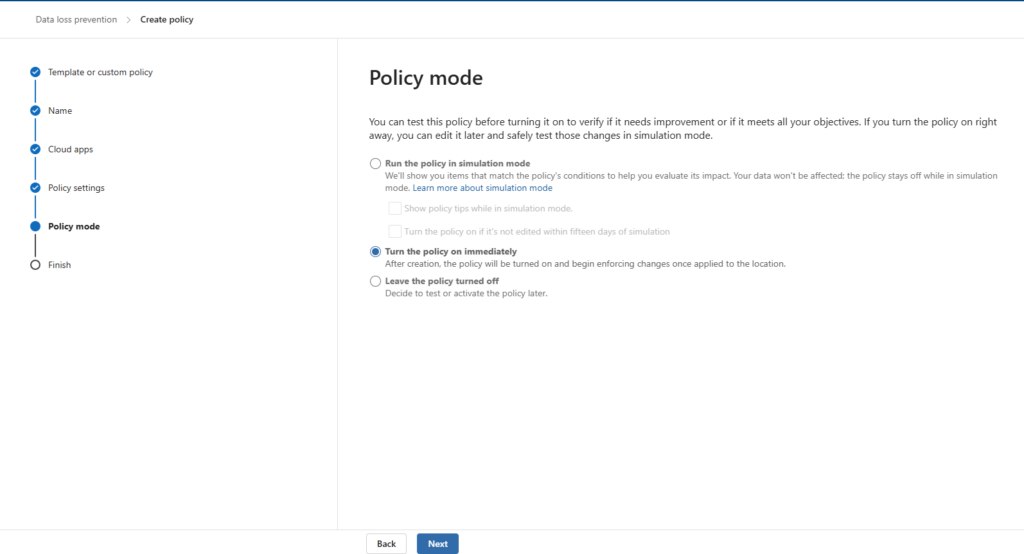
For production environments, consider running in simulation mode first to review matches before enforcement begins. In this demo, we are activating immediately to validate the end-to-end scenario.
Step 26 – Policy Created
Click through to finish. The confirmation screen shows New policy created with all steps completed.
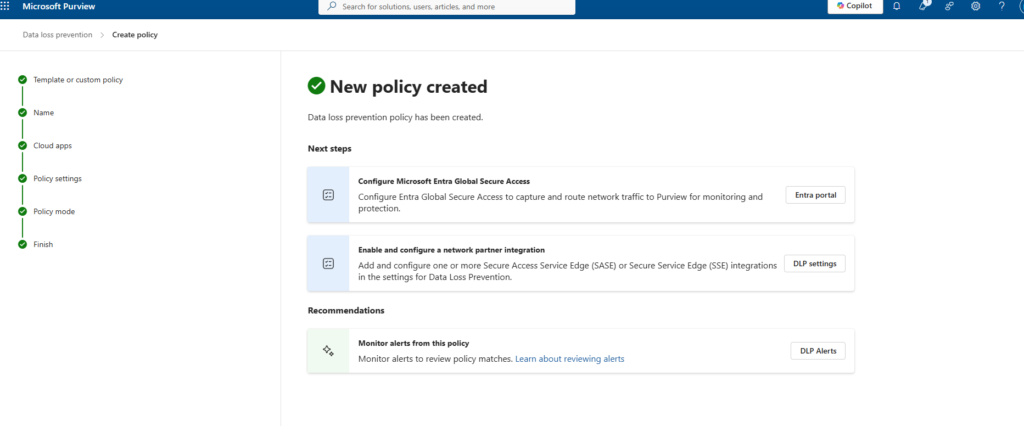
The policy is now active. Give it 15–30 minutes to propagate to your onboarded devices before testing.
Part 6 – Validation
With all components in place, it is time to verify that both layers of the policy are working as expected. The test device is mktech-9119, running Windows 11 25H2, with the Intune policies applied and Purview showing the device as Updated.
Test 1 – Chrome Blocked from Accessing ChatGPT (Layer 1)
Open Google Chrome on the managed device and navigate to chatgpt.com.
Chrome hits the Unallowed Browsers restriction immediately. The page does not load and displays:
chatgpt.com is blocked Your organization doesn’t allow you to view this site
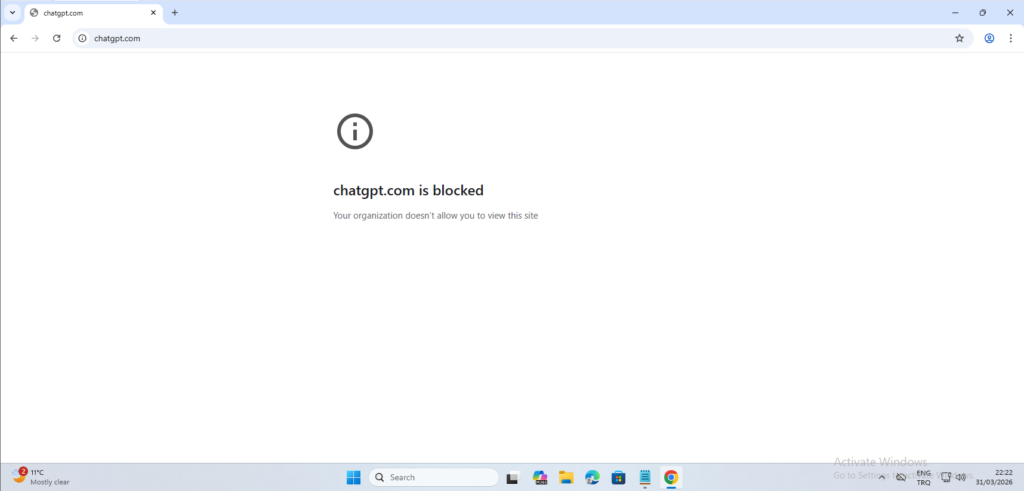
This confirms that the Unallowed Browsers configuration is enforced correctly. Chrome is not a managed browser in this setup, so it cannot reach any URL covered by the DLP policy. The same behaviour applies to any other browser on the Unallowed Browsers list.
Test 2 – Edge Blocks Sensitive Content Submission (Layer 2)
Open Microsoft Edge on the same device and navigate to chatgpt.com. The site loads normally — managed Edge is not on the Unallowed Browsers list and access is permitted.
Now paste source code containing keywords matched by the Source Code Pattern SIT. In this test, a SQL query containing SELECT and WHERE id = {user_id} is submitted.
The moment the content is sent, Microsoft Purview intercepts the request and displays an inline notification:
Microsoft Purview Your action has been blocked due to your organization’s policies.
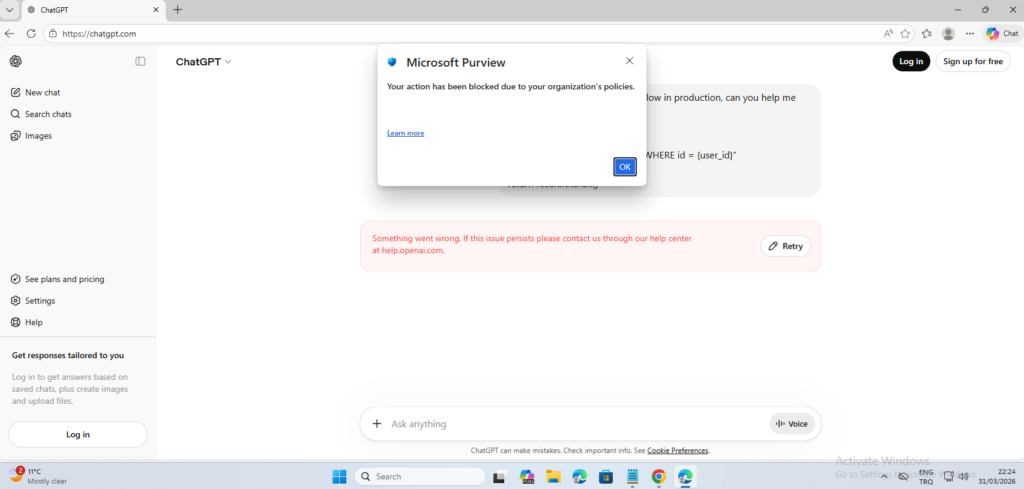
The content never reaches ChatGPT. ChatGPT interface itself shows an error because the request was blocked before it could be transmitted. The user sees the Purview notification and can click Learn more for policy context.
This confirms that Layer 2 is working correctly. Users can access AI tools through managed Edge, but any attempt to share content matching the sensitive info type is blocked inline before transmission.
Summary
Here is what you have built across this guide:
| Component | Purpose | Where Configured |
|---|---|---|
| Purview Device Onboarding | Enroll devices for Endpoint DLP monitoring | Purview + Intune |
| Unallowed Browsers | Block Chrome and other unmanaged browsers from AI sites | Purview > DLP Settings |
| Custom SIT – Source Code Pattern | Detect source code keywords in submitted content | Purview > Classifiers |
| Edge BrowserSignin Policy | Force corporate sign-in to make Edge managed | Intune > Settings catalog |
| DLP Policy – Block AI Prompts | Block text and file submissions to AI apps via Edge | Purview > DLP Policies |
The two-layer approach gives you meaningful control without an outright block on AI tools. Unmanaged browsers cannot reach AI platforms at all. Managed Edge users can access them but are prevented from submitting content that matches your sensitive data definitions. Both layers log activity to Purview, giving you visibility through Activity Explorer when you need to investigate incidents.
Tags: Microsoft Purview, Endpoint DLP, Microsoft Intune, AI Governance, Data Loss Prevention, Edge for Business, Unallowed Browsers, Sensitive Info Types, Block AI Chatbots, Source Code Protection