
How to Configure Intune User-Driven Autopilot: The Complete Guide
Windows Autopilot has revolutionized device provisioning in enterprise environments. Among its deployment models, User-Driven Autopilot stands out as the most flexible solution for organizations seeking to streamline the out-of-box experience (OOBE) while maintaining administrative control. This comprehensive guide walks you through implementing User-Driven Autopilot in Microsoft Intune, from hardware hash collection to successful device enrollment and profile application.
Whether you’re managing a fleet of 10 or 10,000 devices, this step-by-step technical approach ensures a seamless deployment process aligned with Microsoft best practices.
What is User-Driven Autopilot?
User-Driven Autopilot is a deployment method that allows end-users to set up their Windows devices with minimal intervention while automating configuration tasks in the background. Unlike traditional deployment methods, it combines user convenience with IT governance users see a simplified setup experience, while administrators maintain full control over device configuration, security policies, and compliance requirements.
Key advantages include:
- Reduced deployment time from hours to minutes
- Elimination of generic local administrator accounts
- Enhanced security through mandatory Windows Hello for Business enrollment
- Streamlined onboarding experience for new employees
- Reduced IT support burden and help desk calls
Phase 1: Device Hardware Hash Collection
Step 1.1: Understanding Device Hardware Hashes
The foundation of Autopilot deployment begins with the device hardware hash a unique identifier combining hardware components like SMBIOS data, TPM information, and serial numbers. This hash distinguishes each device in your Autopilot inventory.
Important note: While manufacturers like Dell, HP, Lenovo, and Surface can provide these hashes directly to Microsoft, collecting them via PowerShell offers greater flexibility and control over your deployment timeline.
Step 1.2: Collecting Hashes via PowerShell
The hash collection process involves executing a PowerShell script on the target device with administrator privileges:
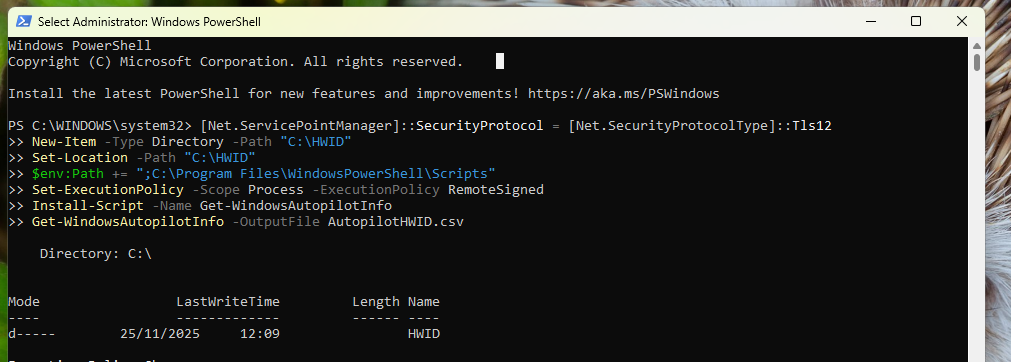
New-Item -Type Directory -Path "C:\HWID"
Set-Location -Path "C:\HWID"
$env:Path += ";C:\Program Files\WindowsPowerShell\Scripts"
Set-ExecutionPolicy -Scope Process -ExecutionPolicy RemoteSigned
Install-Script -Name Get-WindowsAutopilotInfo
Get-WindowsAutopilotInfo -OutputFile AutopilotHWID.csv
Phase 2: Importing Device Hardware Hashes into Intune
Step 2.1: Accessing Windows Autopilot Device Management
Navigate to the Microsoft Intune admin center and follow this path:
Devices > Enrollment > Windows enrollment > Devices (under Windows Autopilot)
This centralized location manages all aspects of your Autopilot infrastructure. The interface provides an overview of all registered devices, sync history, and enrollment statistics.
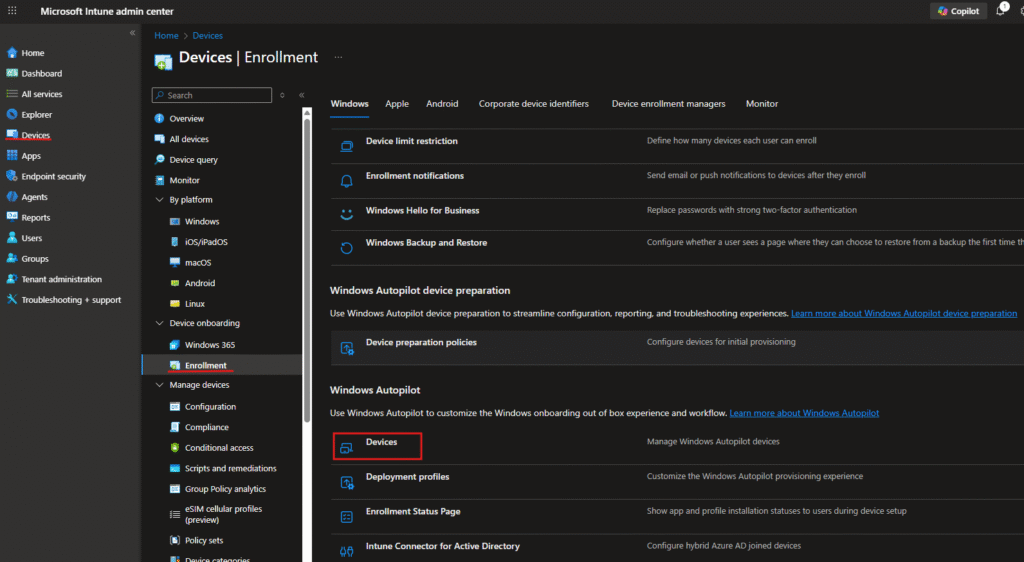
Step 2.2: Initiating the Import Process
Locate and click the Import button in the Windows Autopilot devices interface. This action opens the import wizard that validates and processes your hardware hash CSV file. The Import button is prominently displayed in the toolbar alongside other device management options like Refresh, Export, and Sync.
Key interface elements:
- Last successful sync timestamp showing when devices last synchronized with the service
- Last sync request time indicating the most recent synchronization attempt
- Device list table displaying serial numbers, manufacturers, models, and assignment status
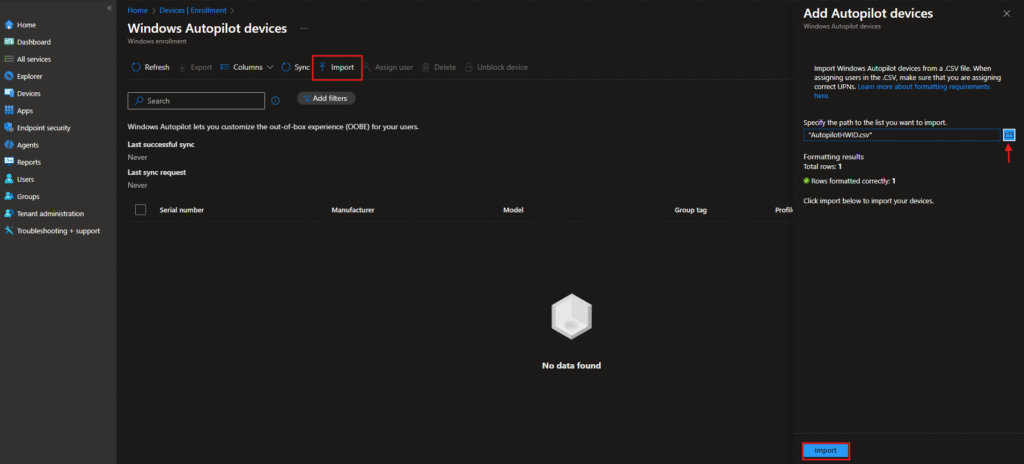
Step 2.3: Completing the Import
After selecting your file and confirming the formatting validation, click the Import button to complete the process. Intune processes the data and registers devices in the Autopilot service.
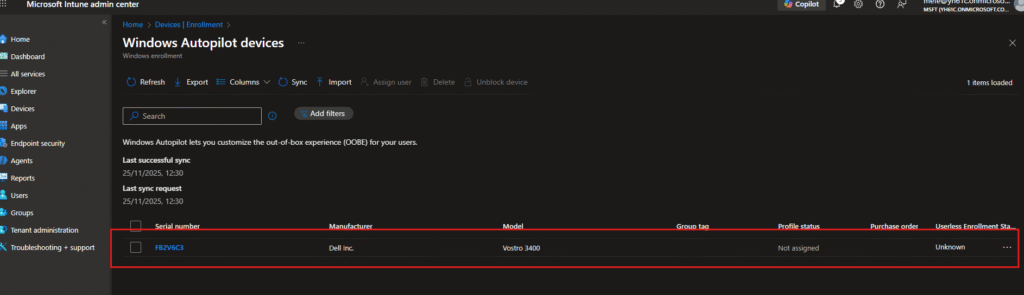
The successful import result displays your device in the Windows Autopilot devices list with the following information:
- Device status: Ready for provisioning
- Serial number: Unique identifier (F8ZV6C3 in this example)
- Manufacturer: Dell Inc., HP, Lenovo, or your device vendor
- Model: Specific device model for inventory tracking (Vostro 3400)
- Assignment status: Initially unassigned until a profile is applied
- Group tag: Optional identifier for device categorization
- Profile status: Indicates which deployment profile is assigned
Phase 3: Creating User-Driven Autopilot Deployment Profiles
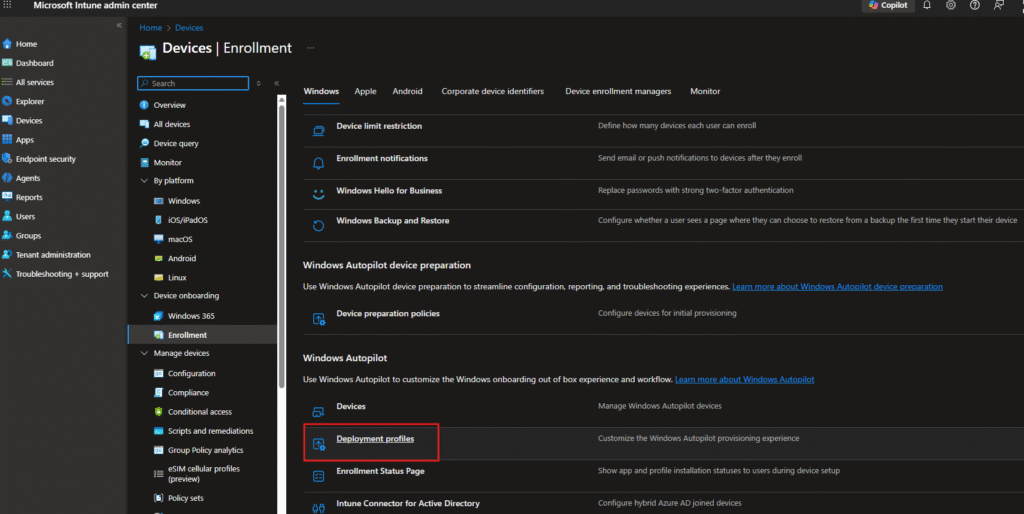
Step 3.1: Navigating to Deployment Profiles
Access the deployment profiles section through:
Devices > Enrollment > Windows Autopilot / Deployment profiles
This is where you define the out-of-box experience (OOBE) and device configuration behavior. The interface displays all existing profiles, their assignments, and deployment status.
Step 3.2: Profile Creation – Basics Tab
When creating a new profile, the initial configuration screen requires the following information:
Profile name: Provide a descriptive name reflecting your deployment strategy (e.g., “User Driven Profile,” “Employee Onboarding Profile”). This name appears throughout the admin center for easy identification.
Description: Document the purpose and target devices for this profile, such as “Corporate user onboarding for all employees” or “Engineering department deployment.”
Convert all targeted devices to Autopilot: Toggle this option based on your requirements:
- Select “No” if you’re piloting or targeting specific device groups
- Select “Yes” if all targeted devices should become Autopilot-managed
In this implementation, “No” was selected to allow gradual rollout and testing before organization-wide deployment.

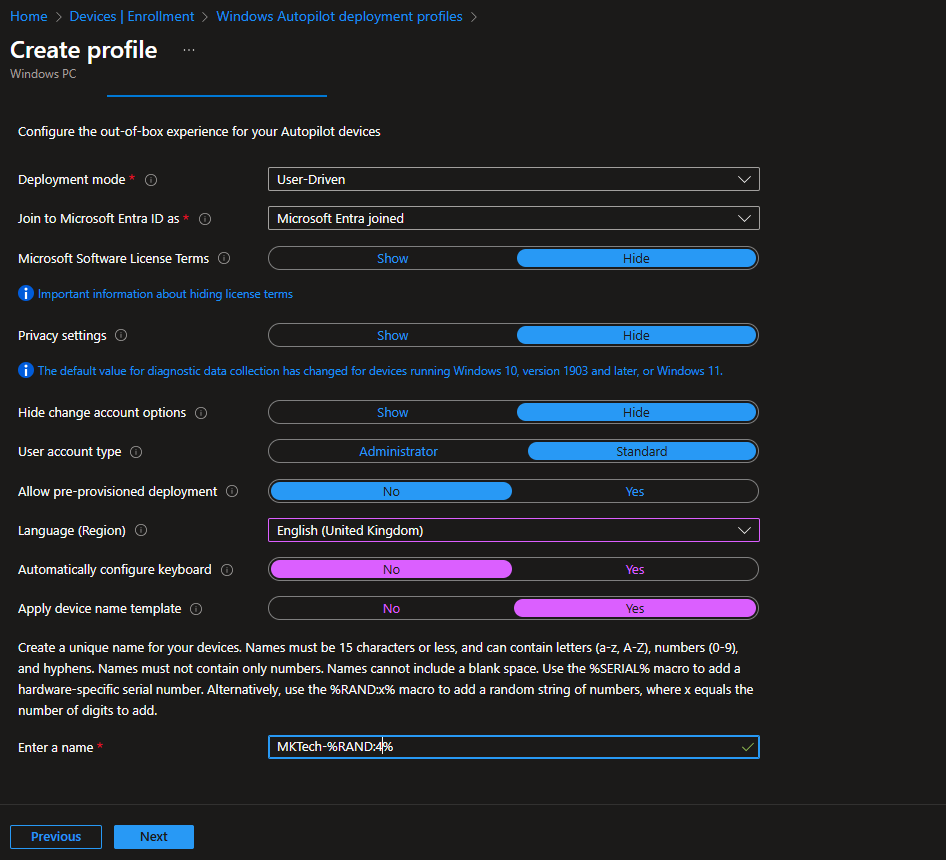
Step 3.3: Out-of-Box Experience (OOBE) Configuration
The Out-of-Box Experience tab contains the comprehensive OOBE settings that define how users interact with the device during initial setup. Configure the following parameters:
Deployment mode: Select “User-Driven”
- This enables users to complete setup independently while Autopilot handles backend configuration
- Unlike device-driven mode, users participate actively in the provisioning process
Join to Microsoft Entra ID as: Choose “Microsoft Entra joined”
- Creates a cloud-native identity without on-premises Active Directory dependency
- Optimal for modern, distributed workforces and hybrid cloud environments
Microsoft Software License Terms: Configure license term display
- Choose “Hide” to streamline the user experience and reduce OOBE complexity
- Terms are still accepted programmatically in the background
Privacy settings: Select your organizational preference
- “Hide” reduces privacy-related prompts during setup
- Diagnostic data collection policies apply regardless of this setting
Hide change account options: Toggle to “Yes”
- Prevents users from switching accounts mid-setup
- Ensures predictable provisioning flow and prevents configuration errors
User account type: Set to “Administrator”
- Grants enrolled users administrative privileges on their device
- Necessary for software installation and system configuration
- Consider organizational security requirements before enabling
Allow pre-provisioned deployment: Select “No” for user-driven scenarios
- Pre-provisioning is reserved for device-driven (kiosk) deployments
- User-driven mode requires user interaction, making pre-provisioning unnecessary
Language (Region): Set to “English (United Kingdom)” or your regional default
- Establishes regional preferences for OS localization
- Affects date/time formatting, currency display, and keyboard layouts
Automatically configure keyboard: Toggle to “Yes”
- Skips keyboard selection during OOBE
- Applies keyboard layout matching the selected region automatically
Apply device name template: Enable and configure naming convention
- Automatically generates unique device names using template variables
- Supported template variables:
%SERIAL%– Device serial number%RAND%– Random numeric string- Maximum 15 characters total
Device naming template example: MKTech-%RAND%#
- Generates device names like: MKTech-1847, MKTech-5623, MKTech-9231
- Each device receives a unique identifier for asset tracking and management
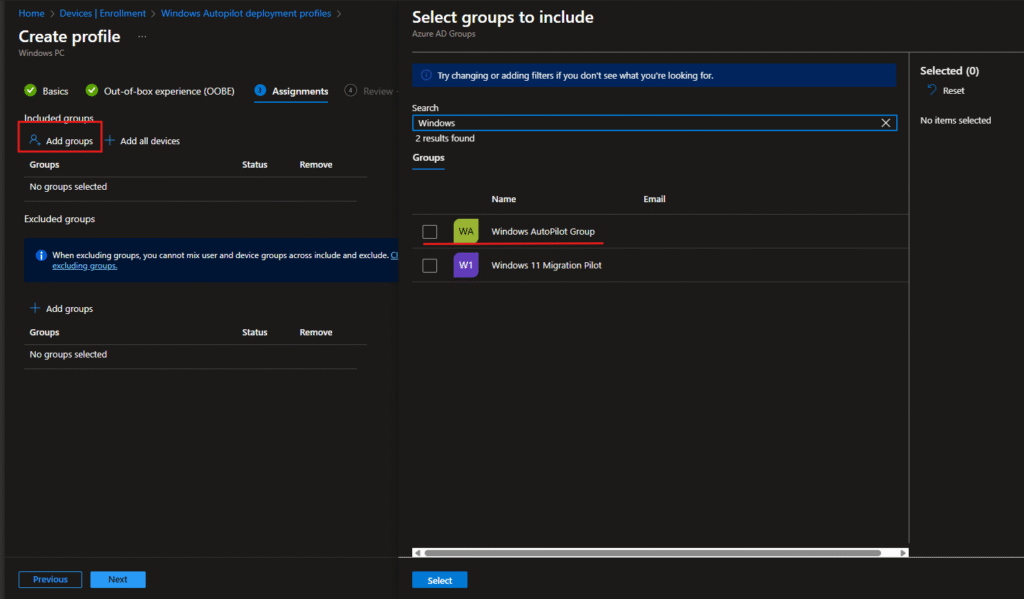
Step 3.4: Profile Assignment Configuration
The Assignments tab determines which users and groups receive this deployment profile. Configure the following:
Select groups to include :
- Click “Add groups” to select target organizational units
- In this example, “Windows Autopilot Group” was selected for testing
- Use search functionality to locate groups quickly by name or email
- Multiple groups can be selected for a single profile
Group selection best practices:
- Create dedicated Entra ID groups for Autopilot targeting
- Use descriptive naming (e.g., “Autopilot-North-America,” “Autopilot-Engineering”)
- Maintain separate groups for different deployment models or regions
- Keep groups updated as organizational structure changes
Excluded groups: Define security groups to exclude from this profile
- Useful for exempting test users, contractors, or pilot programs
- Exclusions take precedence over inclusions
After selecting groups, click “Select” to confirm your choices and save the assignments.
Phase 4: End-User Experience and Device Provisioning
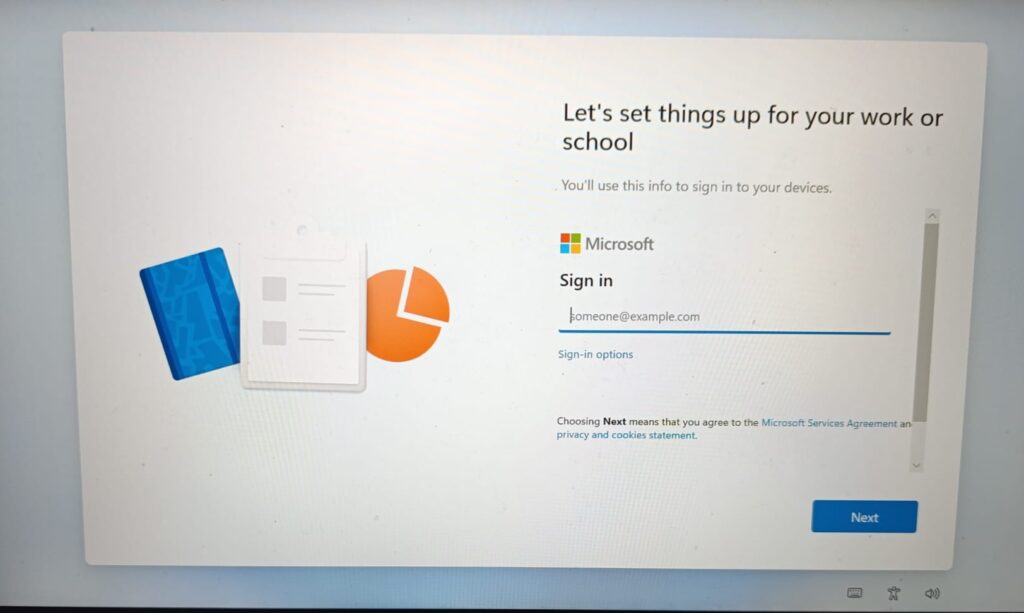
Step 4.1: User Sign-In and OOBE Initiation
When a user unboxes their new device and powers it on, they encounter the Microsoft sign-in screen. The device displays:
“Let’s set things up for your work or school”
The user is prompted to enter their organizational email address in the provided field. This is the initial touchpoint where the User-Driven Autopilot provisioning journey begins.
Key points for end-users:
- Enter corporate credentials in the format:
firstname.lastname@company.com - Ensure your account has been assigned to an Autopilot group in Intune
- Internet connectivity is required throughout the setup process
- The device connects to Microsoft cloud services to retrieve the deployment profile
User experience flow:
- Device boots to Windows setup screen
- User enters organizational email address
- System validates credentials against Entra ID
- Device retrieves the assigned Autopilot deployment profile
- Provisioning begins automatically
Step 4.2: Automated Background Configuration
During and after sign-in, Intune executes the following operations transparently to the end-user:
- Profile retrieval: Device downloads the User-Driven deployment profile from Intune cloud service
- Policy application: Security policies, configuration settings, and compliance rules are applied automatically
- App provisioning: Line-of-business applications and Microsoft 365 apps deploy without user interaction
- Device enrollment: Device registers in Intune for ongoing management and compliance tracking
- Conditional access: Device is evaluated against organizational security policies
- Security baseline: Windows security settings align with organizational standards
This process typically completes within 5-15 minutes, depending on the complexity of applications, network bandwidth, and cloud service responsiveness.
Behind-the-scenes provisioning includes:
- Installation of required Microsoft 365 applications (Teams, Outlook, etc.)
- Deployment of line-of-business applications
- Application of Mobile Device Management (MDM) policies
- Configuration of VPN and network settings
- Registration of security certificates
- Enrollment in compliance monitoring
Phase 5: Device Verification and Intune Management
Confirming Device Enrollment
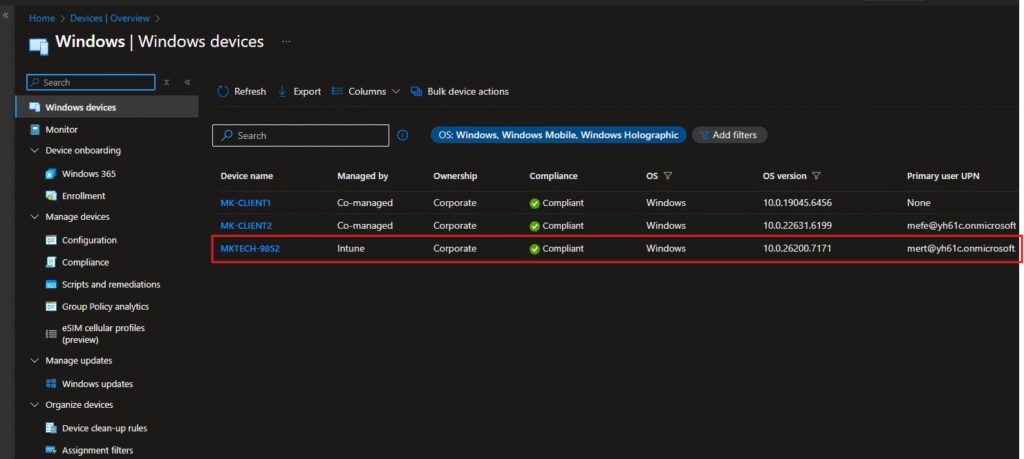
After the user completes setup, verify successful enrollment in the Intune admin center. Navigate to:
Devices > Overview > Windows devices
This view displays all enrolled Windows devices in your organization with their current status, compliance posture, and assignment information.
Device information displayed:
| Field | Value | Purpose |
|---|---|---|
| Device name | MKTECH-9852 | Device identifier matching your naming template |
| Managed by | Intune | Confirms cloud management status |
| Ownership | Corporate | Designates device ownership classification |
| Compliance | ✓ Compliant | Indicates device meets security requirements |
| OS | Windows | Operating system platform |
| OS version | 10.0.26200.7171 | Build information for patch management |
| Primary user UPN | mert@yh61c.onmicrosoft.com | Assigned user account |
Understanding each field:
- Managed by “Intune” confirms the device is under cloud management, not hybrid or on-premises management
- “Corporate” ownership indicates corporate-owned device subject to full IT policies
- Compliant status shows the device passes all compliance requirements
- OS version details enable precise update targeting and vulnerability assessment
Verification checklist:
- Device appears in Intune device inventory
- Compliance status shows green checkmark
- Device is assigned to the correct user
- OS version matches organizational standards
- No compliance violations are reported
- All required applications show as installed
User-Driven Autopilot represents a modern approach to device provisioning that balances administrative control with end-user convenience. By following this technical implementation guide, you’ve learned to:
- Collect and validate device hardware hashes using PowerShell automation
- Import devices into Intune’s Autopilot service through the admin console
- Create and configure User-Driven deployment profiles with organizational settings
- Enable end-users to provision devices independently without IT intervention
- Verify successful enrollment and compliance status through the Intune dashboard
Once you’ve gone through all these steps collecting hashes, importing devices, setting up your profile, and watching that first device enroll you’ll start seeing the real benefits pretty quickly.
The main thing you’ll notice is that your life gets easier. Users get their devices and just use them. No more help desk calls asking how to install software. No more sitting at someone’s desk for an hour getting their machine ready. No more wondering if all the security policies are actually applied. With User-Driven Autopilot, all of that just happens.
What I really like about this approach is how clean everything feels afterward. Your devices are properly named, organized in Entra AD, fully compliant, and ready to go.Because everything’s automated, the setup is consistent every single time. Whether it’s your first device or your hundredth, the process works the same way.
The time savings add up fast too. If you’re setting up even just a handful of devices a month, those 15-20 minutes per device instead of hours makes a huge difference.
The next article in the Autopilot series will cover Pre-provisioned Autopilot. Stay tuned! You can read my first post here: What Is Windows Autopilot? A Complete Guide to Modern Device Deployment