
How to Configure Android Enterprise Dedicated Kiosk Devices with Intune
What Is Android Enterprise Dedicated Device Mode?
In the previous posts of this series, we covered BYOD, COPE, and COBO enrollment scenarios each designed around a device tied to a specific user identity. Dedicated Device mode is a fundamentally different story.
A Dedicated Device has no user identity attached to it. There is no personal space, no work profile separation, no individual sign-in required. The device exists for a single purpose: to run a defined task or application, locked down and fully controlled by IT. This is what the industry calls Kiosk mode.
Think about the real-world scenarios where this matters: a barcode scanner on a warehouse floor, a self-service check-in tablet at a hotel reception, a digital signage screen in a retail store, or a field device mounted in a delivery truck. These devices are not carried around by named employees they serve a function, and they need to do exactly that function and nothing else. In Android Enterprise terms, this enrollment type is called Corporate-owned dedicated devices (COSU), and Microsoft Intune has robust support for it through the Fully Managed, Dedicated, and Corporate-Owned Work Profile policy framework
INTUNE CONFIGURATION
Step 1: Create the Enrollment Profile
Navigation: Devices › Android › Enrollment
In the Microsoft Intune admin center, navigate to the Android enrollment section. Under the Android Enterprise section, you will see several enrollment profile types. Select Corporate-owned dedicated devices.

This is the enrollment type that places the device into Device Owner mode without any user affinity. Unlike COBO (Fully Managed), which ties the device to a specific user account, Dedicated Device enrollment is completely userless policy applies at the device level, not the user level. Click into Corporate-owned dedicated devices and create a new profile.
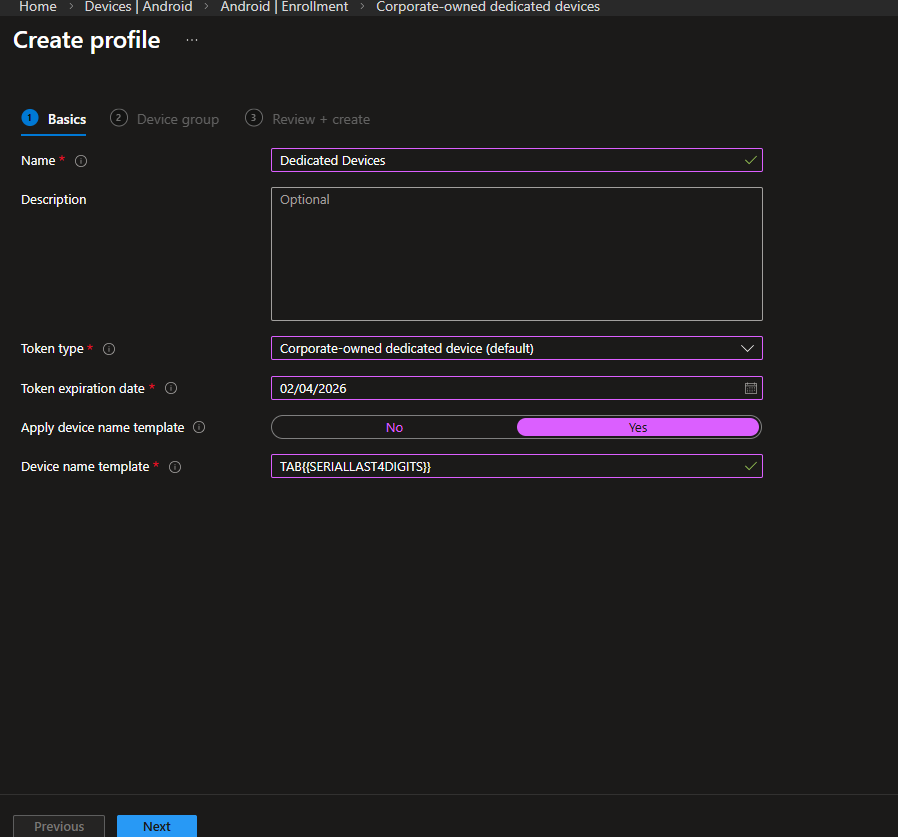
Basics Tab Settings
Configure the profile with the following settings:
| Setting | Configured Value | Rationale |
| Name | Dedicated Devices | This is the value referenced in every Assignment Filter throughout this guide. Use a clear, identifiable name. |
| Token type | Corporate-owned dedicated device (default) | Generates a QR code and enrollment token used during device provisioning. Leave unchanged. |
| Token expiration date | Set per deployment timeline | Tokens expire if devices enroll after the expiry date, enrollment fails. Plan ahead for bulk rollouts. |
| Apply device name template | Yes | Enables automatic device naming at enrollment time. |
| Device name template | TAB{{SERIALAST4DIGITS}} | Names each device using the last four digits of its serial number (e.g., TAB61JT). Invaluable for inventory tracking in large kiosk deployments where devices are not assigned to individual users. |
Choosing a naming convention that maps to physical asset labels pays dividends during troubleshooting. If warehouse tags use serial-based stickers, matching the Intune name template to that convention eliminates ambiguity at scale.
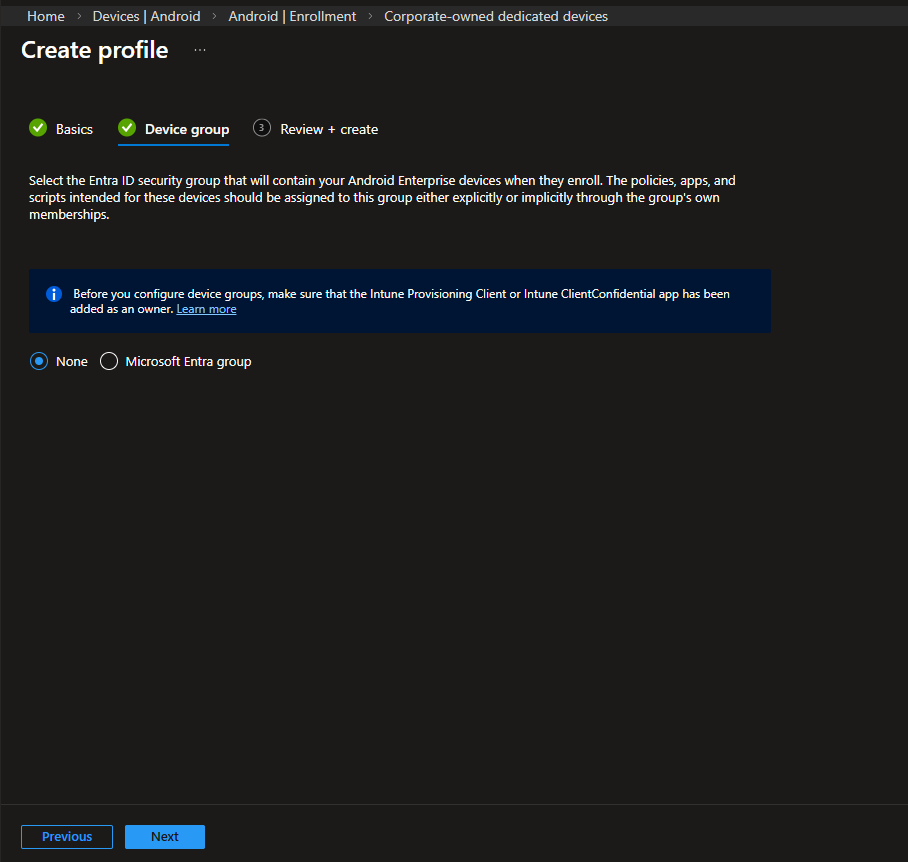
Device Group Tab
On the Device group tab, you have the option to assign an Entra ID security group that devices will automatically join upon enrollment. The informational note reminds you that the Intune Provisioning Client or Intune ClientConfidential app must be added as an owner of that group for dynamic membership to work correctly.
For this guide, leave this as None and rely on Assignment Filters for policy targeting a more flexible approach when multiple device types enroll through different profiles. Click Next, review your settings, and create the profile.
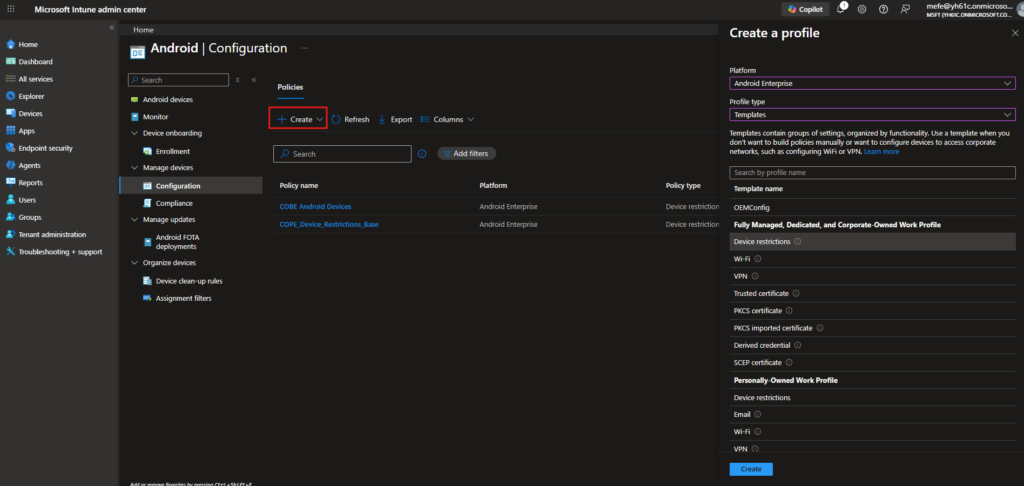
Step 2: Create the Device Configuration Profile
Navigation: Devices › Android › Configuration
With the enrollment profile in place, the next step is to define how the device actually behaves.
Navigate to Devices › Android › Configuration and click + Create. On the Create a profile flyout, set:
| Setting | Configured Value | Rationale |
| Platform | Android Enterprise | Targets the Android Enterprise management stack. |
| Profile type | Templates | Provides access to the built-in restriction templates. |
| Template name | Device restrictions | Located under the Fully Managed, Dedicated, and Corporate-Owned Work Profile section. |
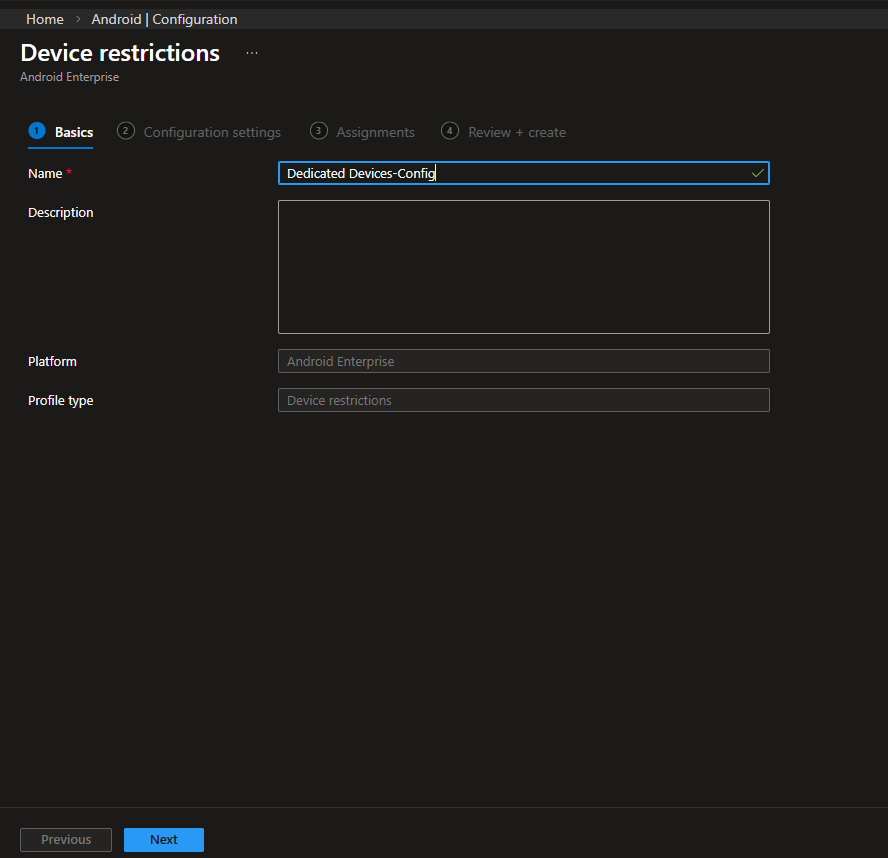
On the Basics tab, name this policy Dedicated Devices-Config. Using a consistent naming approach in Intune helps keep things organized, particularly if you’re working with multiple Android Enterprise enrollment types.
Step 3: Configure Device Restrictions Settings
The Configuration settings tab is divided into multiple sections. The following covers the settings most relevant to a Dedicated Device deployment.
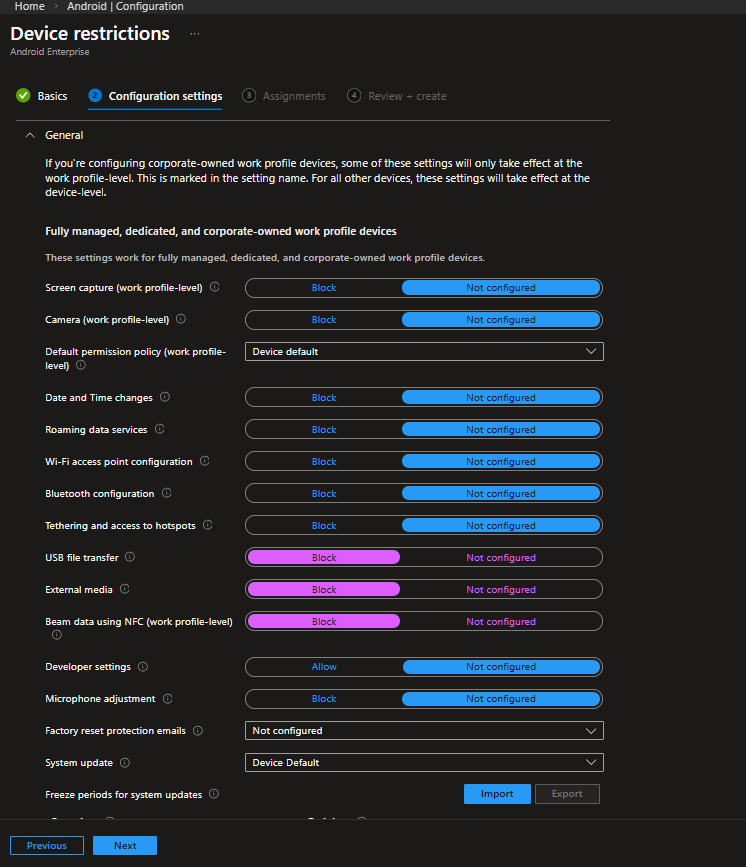
General Settings
The General section applies across all Fully managed, dedicated, and corporate-owned work profile devices. For a kiosk deployment, the key configurations are:
| Setting | Configured Value | Rationale |
| USB file transfer | Block | On a kiosk device, there is no legitimate reason to extract data via USB. Block this unconditionally. |
| External media | Block | SD cards and external storage are attack vectors on unattended devices. |
| Beam data using NFC | Block | NFC data transfer is another surface that should be closed, particularly in public-facing deployments. |
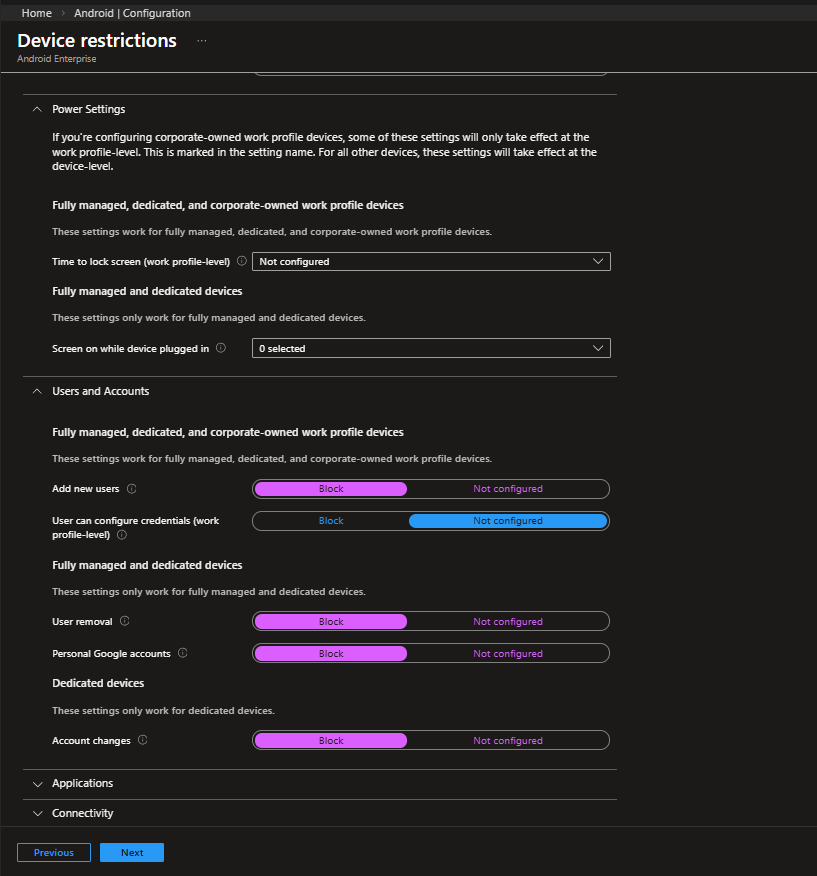
Fully Managed and Dedicated Devices – Kiosk Mode Settings
Scrolling down reveals settings specific to Fully managed and dedicated devices, including a subsection labeled Kiosk mode only. These settings only take effect when a kiosk policy is active:
| Setting | Configured Value | Rationale |
|---|---|---|
| Volume changes | Block | Prevents users from adjusting device volume. Useful for kiosk or shared environments. |
| Factory reset | Block | Prevents users from factory resetting the device and removing management. |
| Status bar | Block | Hides notification shade and quick settings access. |
| Wi-Fi settings changes | Block | Prevents users from modifying Wi-Fi configurations. |
| USB storage | Not configured | USB storage behavior follows the platform default. Adjust based on your security requirements. |
| Network escape hatch | Enable | Allows temporary network configuration during boot if connectivity is lost. |
| Notification windows | Disable | Prevents pop-up notifications from appearing on screen. |
| Skip first use hints | Enable | Suppresses Android setup hints for a cleaner provisioning experience. |
Fully managed and dedicated devices (Kiosk mode only)
| Setting | Configured Value | Rationale |
|---|---|---|
| Power button menu | Block | Prevents access to power options via long press. |
| System error warnings | Allow | Keeps system error dialogs visible for troubleshooting. |
| End-user access to device settings | Block | Fully blocks access to device settings while in kiosk mode. |
Dedicated devices
| Setting | Configured Value | Rationale |
|---|---|---|
| Locate device | Block | Prevents device location from being accessed via the device interface. |
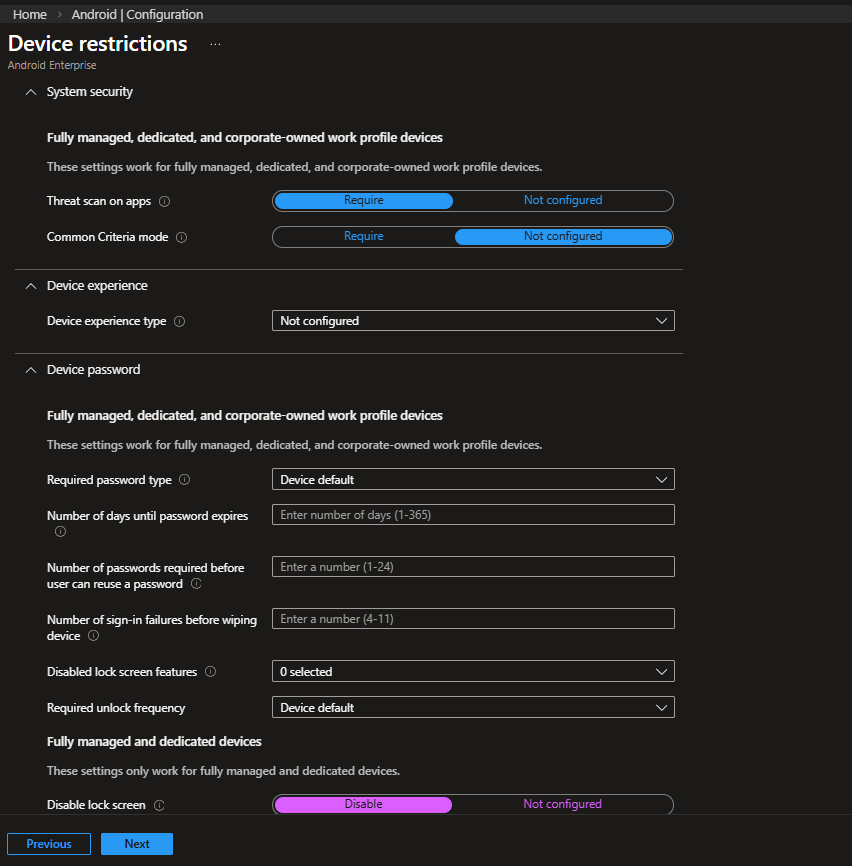
System Security and Device Password
| Setting | Configured Value | Rationale |
| Threat scan on apps | Require | Google Play Protect scanning should always be required on managed devices. Even in a locked-down kiosk scenario, this is a baseline security control. |
| Disable lock screen | Disable | On a kiosk device not tied to a user, requiring a PIN every time the screen turns off creates a poor experience and an operational headache. The security model for dedicated devices rests on device restrictions and management controls — not on a PIN protecting personal data. |
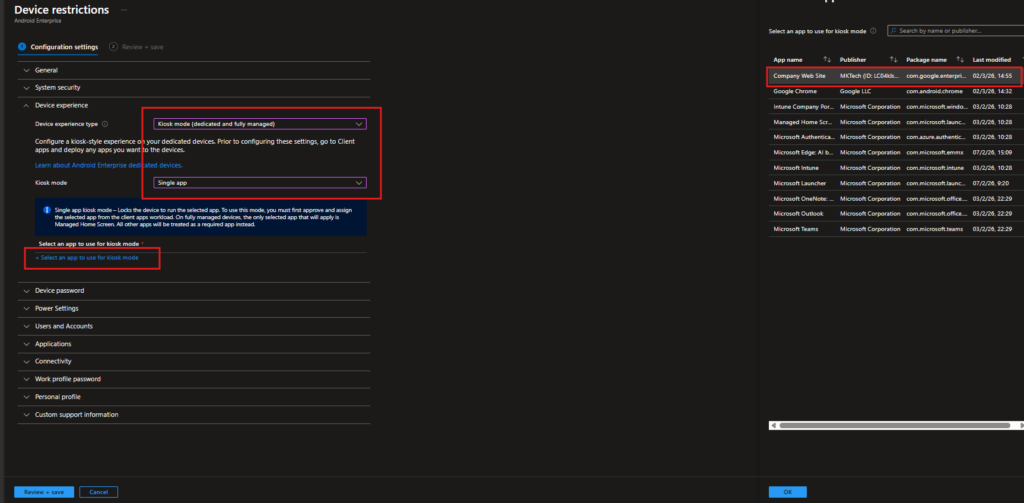
Configure the Kiosk (Device Experience) Settings
This is the heart of the Dedicated Device configuration. Within the Configuration settings, navigate to the Device experience section. Set Device experience type to Kiosk mode (dedicated and fully managed). Once selected, the Kiosk mode dropdown appears set it to Single app.
Single app kiosk locks the device to run exactly one application. The selected app becomes the entire user interface no home screen, no app drawer, no way to navigate elsewhere. The device boots directly into that app. Multi-app kiosk uses Microsoft Managed Home Screen as a launcher and allows a curated set of apps, which is covered in a separate post.
After selecting Single app, click + Select an app to use for kiosk mode. A panel opens listing all apps currently synced from Managed Google Play to Intune. In this example, Company Web Site / a web app created in Managed Google Play is selected. Only apps already approved and assigned to Intune will appear in this list. It is important to remember that the app must also be assigned as Required in your app assignment workload. The kiosk policy pins the app, but the app deployment is what actually installs it.
Power Settings and Users and Accounts
| Setting | Configured Value | Rationale |
|---|---|---|
| Add new users | Block | Prevents additional users from being created on the device. |
| User can configure credentials (work profile-level) | Not configured | Work profile credential configuration is not enforced in this deployment. |
Fully managed and dedicated devices
| Setting | Configured Value | Rationale |
|---|---|---|
| User removal | Block | Prevents removal of any enrolled account. |
| Personal Google accounts | Block | Ensures the device remains strictly business-only. |
Dedicated devices
| Setting | Configured Value | Rationale |
|---|---|---|
| Account changes | Block | Prevents modification of account settings on unattended task-based devices. |
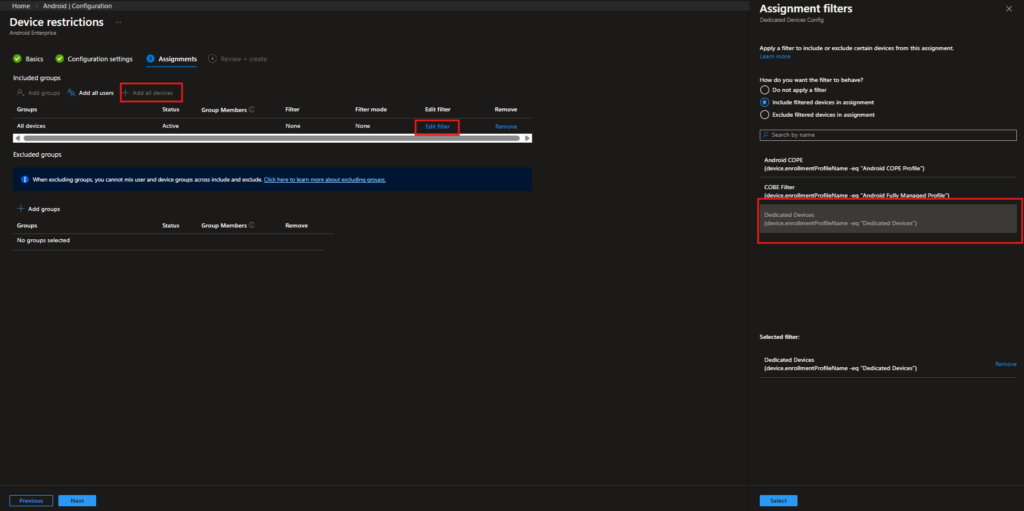
Step 4: Assign the Configuration Profile with an Assignment Filter
| Item | Value |
|---|---|
| Included group | All Devices |
| Filter behavior | Include filtered devices in assignment |
| Filter name | Dedicated Devices |
| Filter rule | device.enrollmentProfileName -eq "Dedicated Devices" |
This setup ensures the policy applies only to devices enrolled through the Dedicated Devices profile, even though the assignment target is set to All Devices. are evaluated dynamically at policy delivery time, without requiring manual group membership management. As new kiosk devices enroll, they automatically match the filter and receive the policy.
Step 6: Create a Compliance Policy for Dedicated Devices
Navigation: Devices › Android › Compliance
A compliance policy isn’t strictly required for Dedicated Devices. Since these devices don’t depend on user-based Conditional Access by default, you could technically run them without one.
That said, it’s still a good practice to create it.
Compliance gives you visibility into device health, OS versions, encryption status, and overall security posture across your kiosk fleet. It also keeps your options open. If you later decide to introduce Conditional Access or stricter enforcement, the groundwork is already there.
Go to Devices › Android › Compliance and click + Create policy.
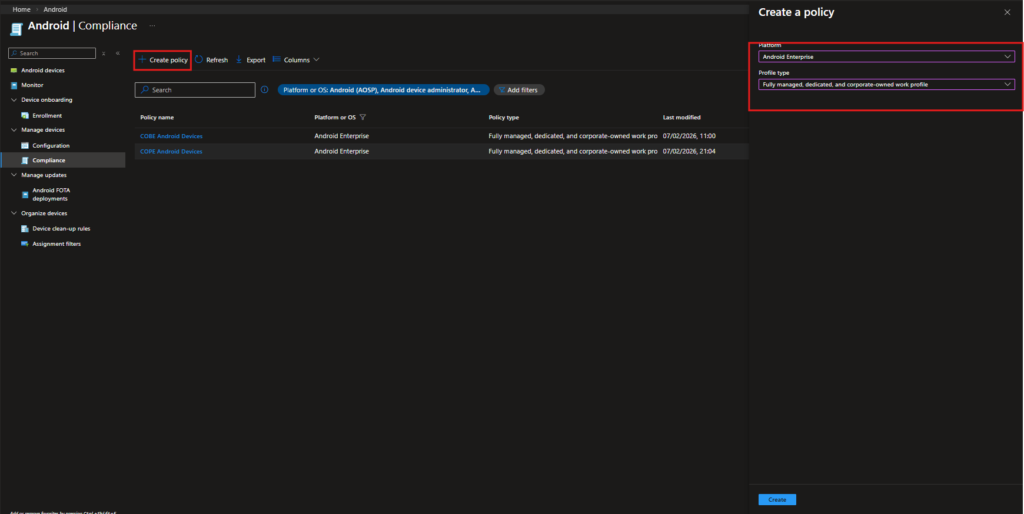
In the Create policy pane, configure the following:
- Platform: Android Enterprise
- Profile type: Fully managed, dedicated, and corporate-owned work profile
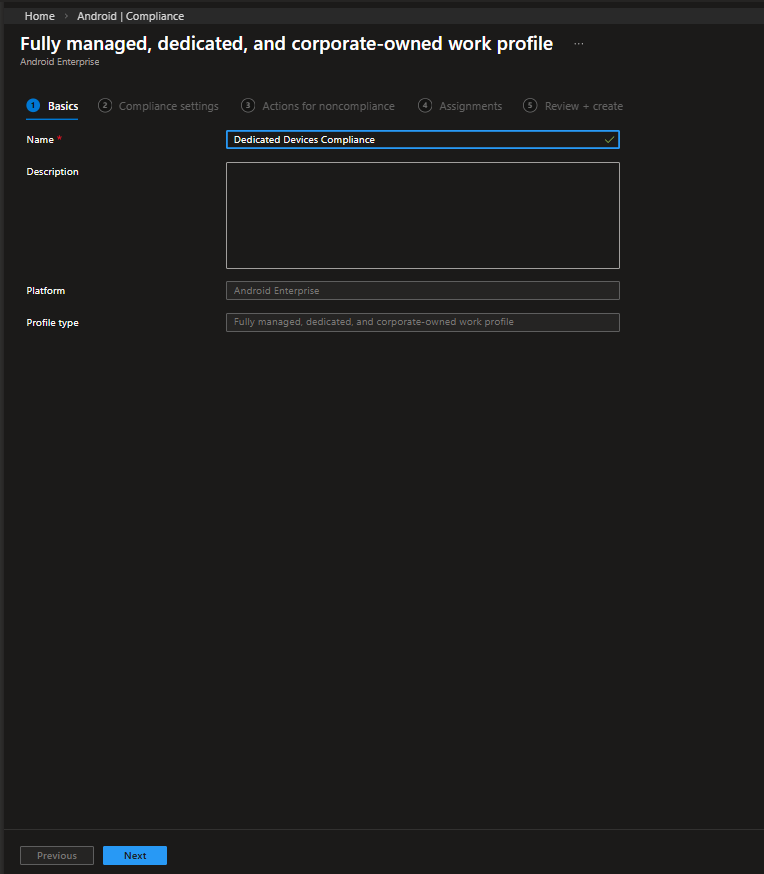
Give the policy a clear and consistent name, for example:
Dedicated Devices Compliance
Keeping compliance separate from configuration policies makes reporting and troubleshooting much easier later on, especially as your environment grows.
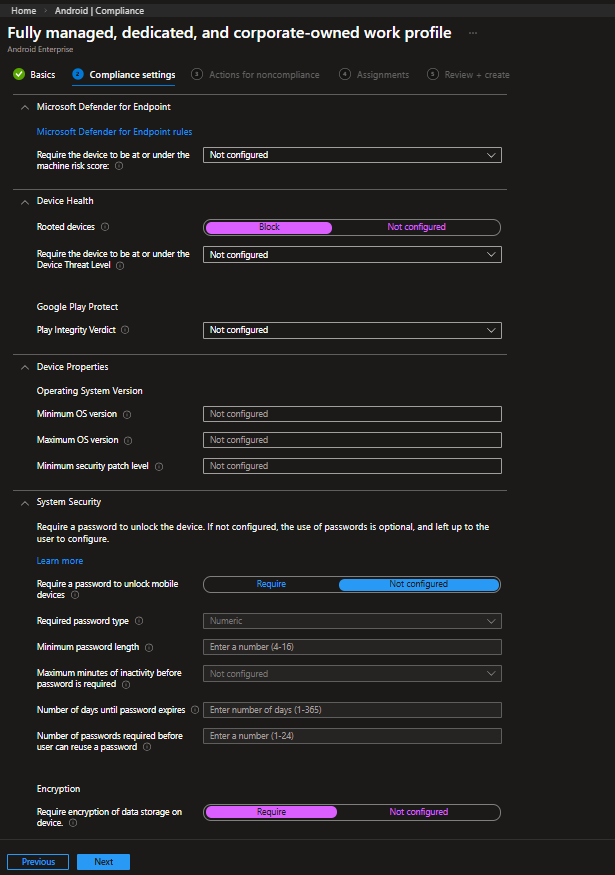
Compliance Settings
This section defines the security requirements the device must satisfy. These settings are evaluated continuously, and any violation marks the device as non-compliant.
| Setting | Configured Value | Rationale |
|---|---|---|
| Rooted devices | Block | A rooted device is considered compromised. If any kiosk device is rooted, it should immediately be marked as non-compliant. |
| Device Threat Level | Not configured | Microsoft Defender for Endpoint integration is not enforced in this configuration. This can be enabled in higher-security environments. |
| Minimum OS version | Not configured | No minimum OS baseline is enforced in this deployment. This can be defined later if version standardization becomes necessary. |
| Require encryption of data storage | Require | Ensures storage encryption is enforced. Although modern Android devices encrypt by default, explicitly requiring it guarantees compliance visibility. |
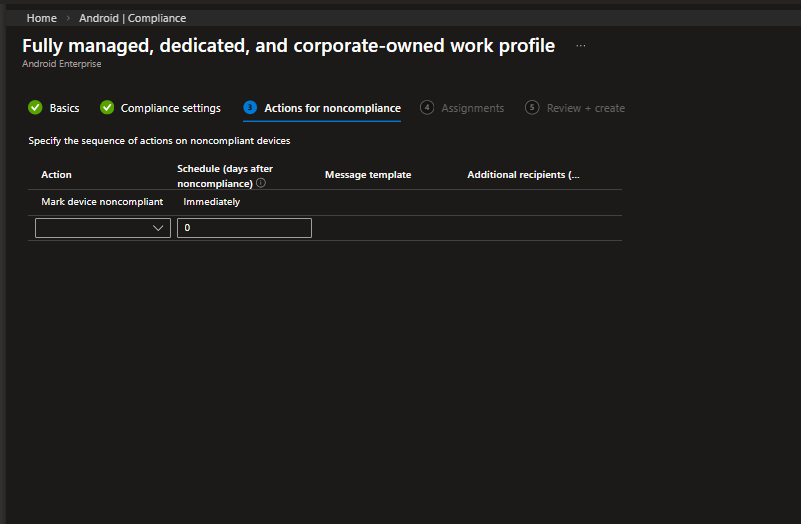
Actions for Noncompliance
Set the default action to Mark device noncompliant: Immediately. The moment a device violates any compliance setting, it is flagged in the Intune console. For dedicated devices, you may also add a Retire action after a prolonged period of noncompliance, depending on your security requirements.
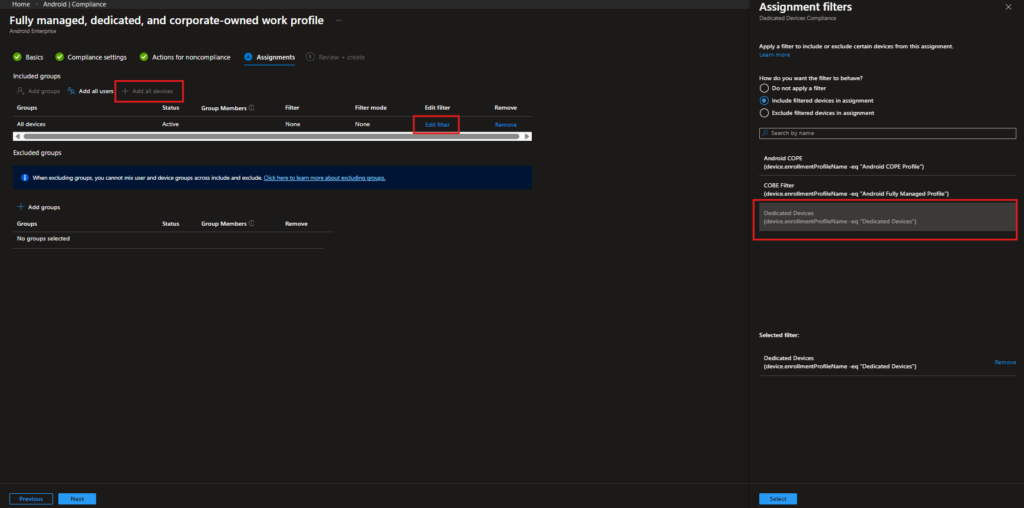
Assign the Compliance Policy
Assign this compliance policy to All devices, and apply the same Dedicated Devices assignment filter. This keeps the policy scoped only to your kiosk devices and avoids impacting other Android enrollments.
| Included group | All Devices |
| Filter behavior | Include filtered devices |
| Filter rule | device.enrollmentProfileName -eq “Dedicated Devices” |
Step 7: Deploy the Kiosk Application
Navigation: Apps › Android
The Intune configuration side is now complete. But a kiosk policy is only as good as the app it pins the device to. In this scenario, a company website is deployed as a kiosk app a common use case for customer-facing or internal information display devices.
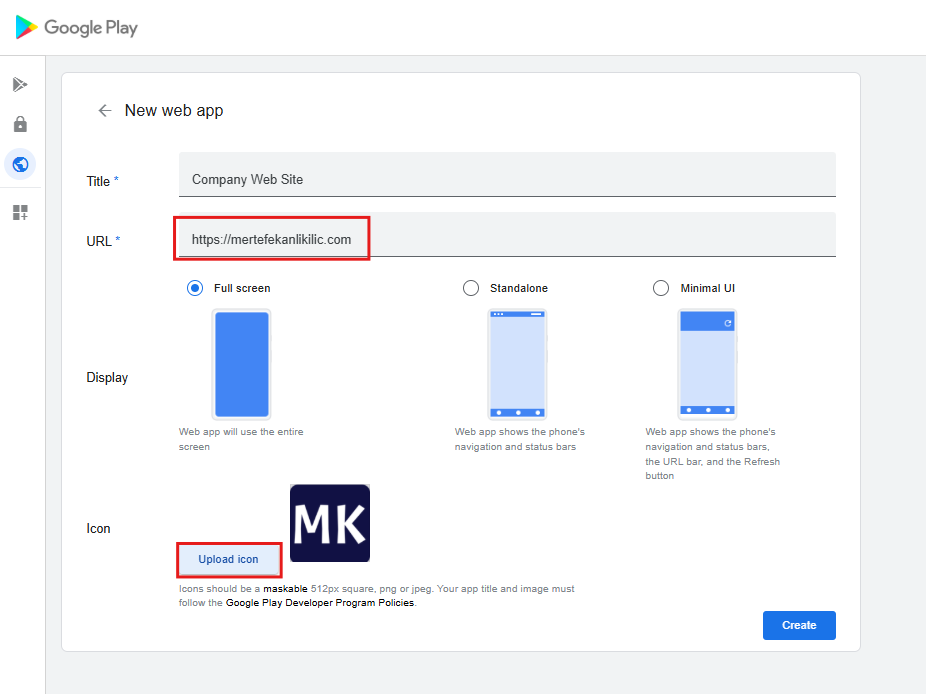
Navigate to Apps › Android and click + Create. In the Select app type flyout, select Managed Google Play app and click Select. This opens the embedded Managed Google Play console inside Intune.
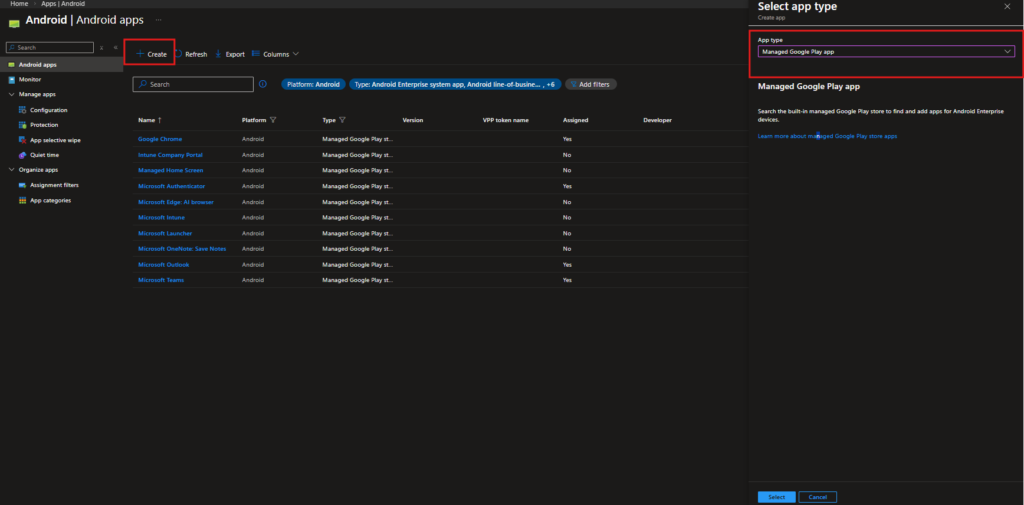
Inside the Managed Google Play console, navigate to Web apps in the left sidebar. This section lets you package any website as if it were a native Android app creating a managed shortcut that launches in a dedicated Chrome instance. Click the + button in the bottom right corner to create a new web app.
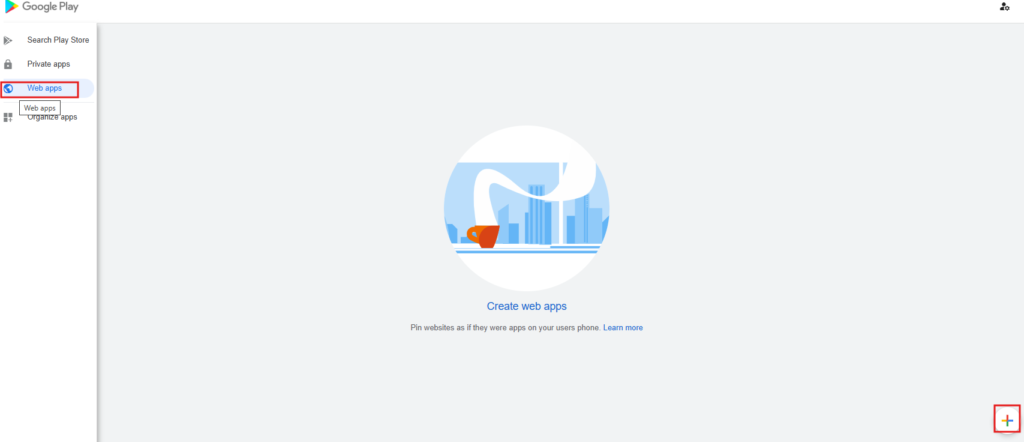
Web App Configuration
| Setting | Configured Value | Rationale |
| Title | Company Web Site | This appears in the Intune app list and on the device. |
| URL | Full target URL | The website the kiosk should display a company dashboard, product catalog, self-service portal, etc. |
| Display mode | Full screen | Critical for a kiosk experience. Launches the web app without any browser UI. The user sees only the website no address bar, no navigation buttons, no way to type a different URL. |
| Icon | 512px square PNG or JPEG | Branding with your company logo keeps things professional and identifiable in the Intune console. |
Click Create. The web app is published in your Managed Google Play catalog and syncs back to Intune within a few minutes.
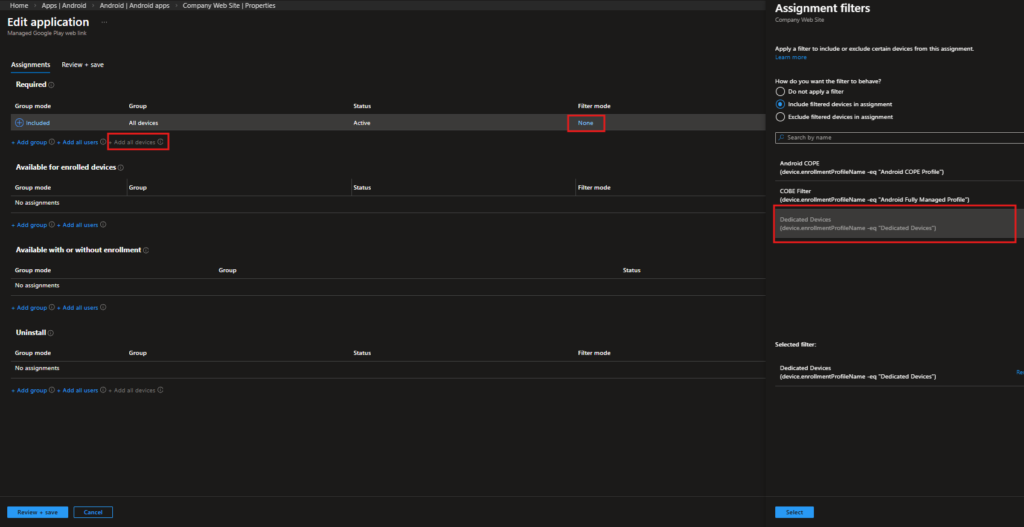
Assign the App to Dedicated Devices
Once the web app syncs to Intune, open its Properties, navigate to Assignments, and click Edit. Under the Required section, click + Add all devices. Then apply the Dedicated Devices Assignment Filter.
It is important to use Required assignment rather than Available. In a dedicated device context, there is no user to open a Company Portal and choose to install an app. Available deployment is functionally equivalent to not deploying the app at all in Single App Kiosk mode, Company Portal is inaccessible anyway. Required is the only deployment intent that is meaningful in a userless context.
DEVICE ENROLLMENT EXPERIENCE
With the policies and app deployment in place, the next step is enrolling the device using the QR code generated from the Dedicated Devices enrollment profile.
Below is the full enrollment flow as it appears on the device from the initial setup screen to a fully locked kiosk configuration.
Important: The device must be factory reset. QR code enrollment for Dedicated Devices is only available during the initial Android setup. If the device has already been set up, reset it before starting the process.
The On-Device Enrollment Experience
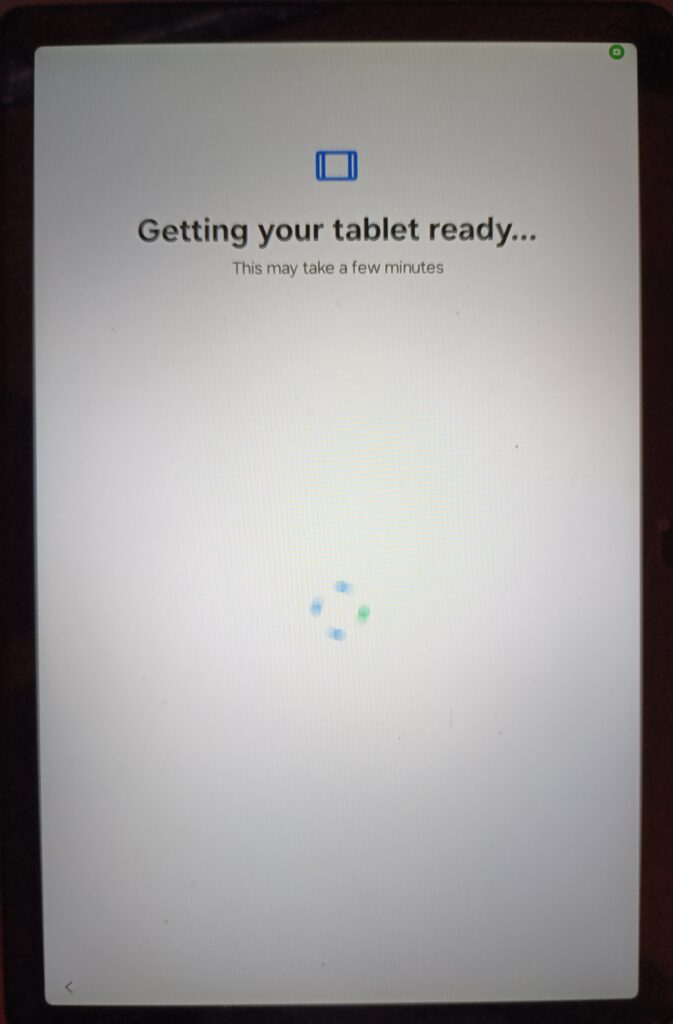
Stage 1: Getting the Tablet Ready
After scanning the QR code during the Android setup wizard (tap the screen seven times to open the QR scanner), the device starts the managed provisioning process.
The screen shows “Getting your tablet ready…” while Android Device Policy installs in the background. During this stage, the device is being set to Device Owner mode, which enables full corporate management.
Once provisioning completes, the device is fully managed and ready to receive policies and required apps from Intune.
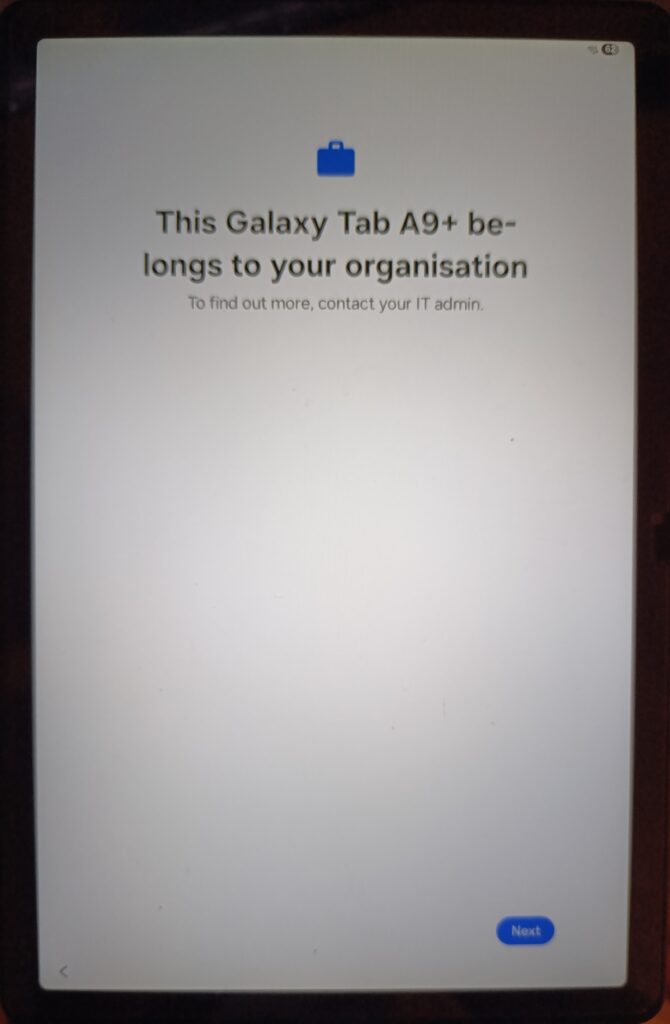
Stage 2: Corporate Ownership Declaration
The device displays a message stating that it belongs to your organization. This is Android’s standard corporate ownership screen, informing anyone handling the device that it is managed by an organization.
Tap Next to continue the setup process.
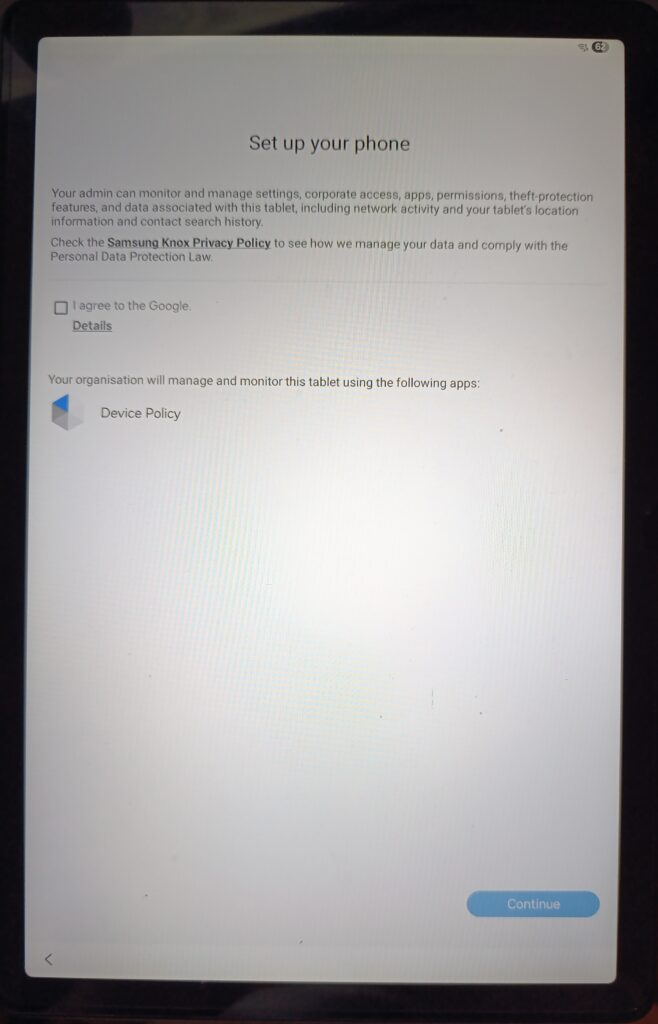
Stage 3: Management Disclosure and Consent
The Set up your screen discloses exactly what the admin can monitor and manage: settings, corporate access, apps, permissions, theft-protection features, network activity, and device location. It also identifies Android Device Policy as the application responsible for managing the device. On Samsung devices, a reference to the Samsung Knox Privacy Policy also appears, as Knox layer management is active. The person performing the enrollment accepts the Google agreement and taps Continue.
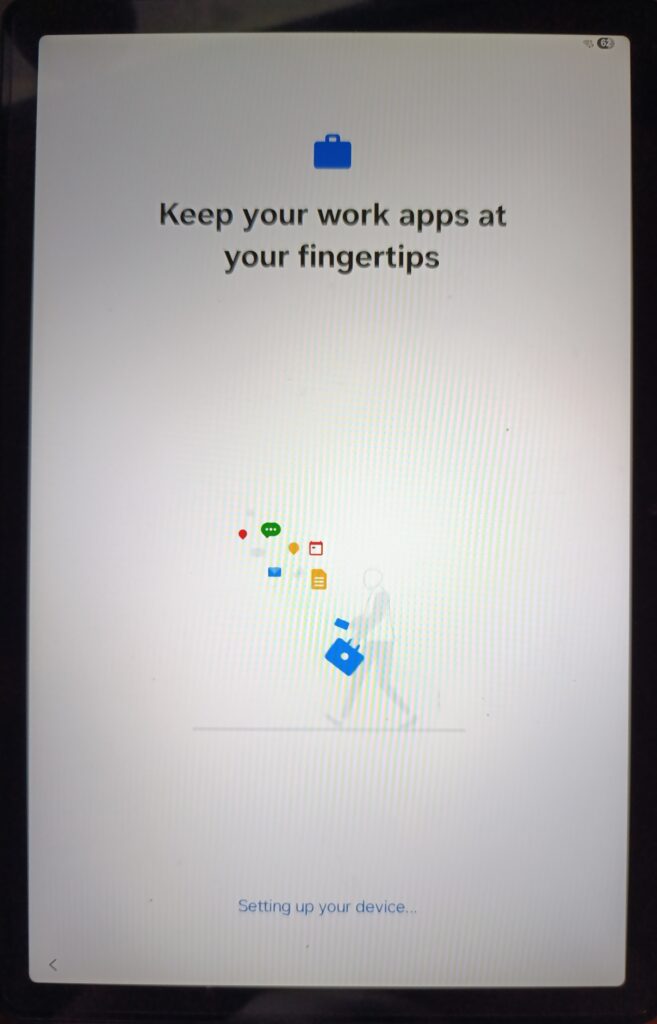
Stage 4: Setting Up Your Device
The provisioning engine continues setting up the device. During this phase, Intune is establishing the management channel, downloading policies, and beginning the app deployment queue.
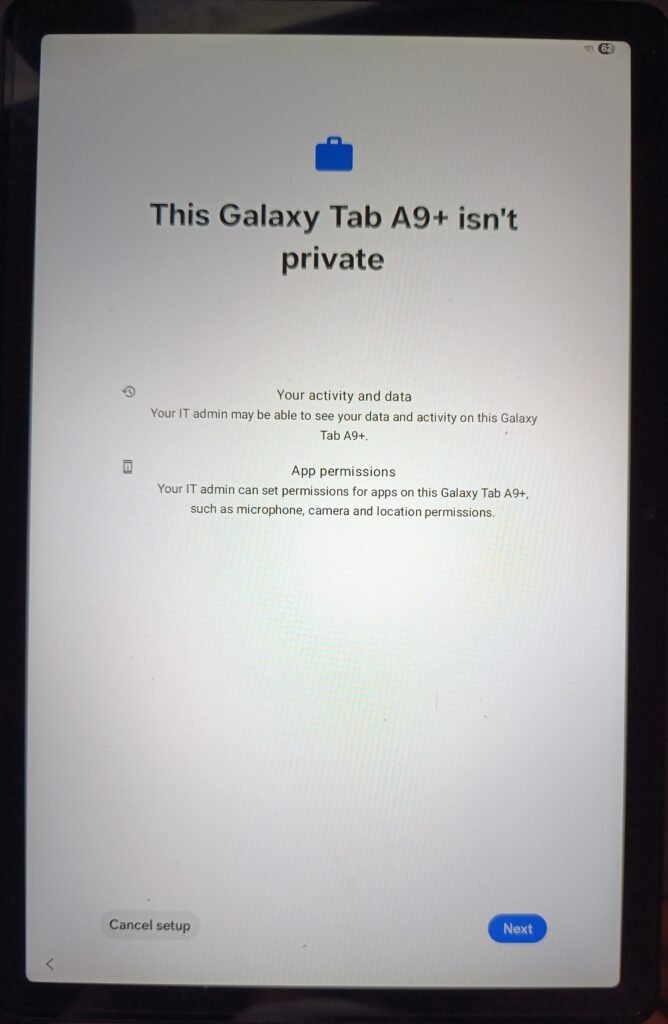
Stage 5: Privacy Disclosure
Android Enterprise requires an explicit privacy disclosure before enrollment completes on corporate-owned devices. The screen This Galaxy Tab A9+ isn’t private clearly states that the IT admin may be able to see data and activity on this device, and that the IT admin can set permissions for apps on this device. For a dedicated device without a personal user, this screen is largely procedural but it is a required part of the Android Enterprise enrollment flow.
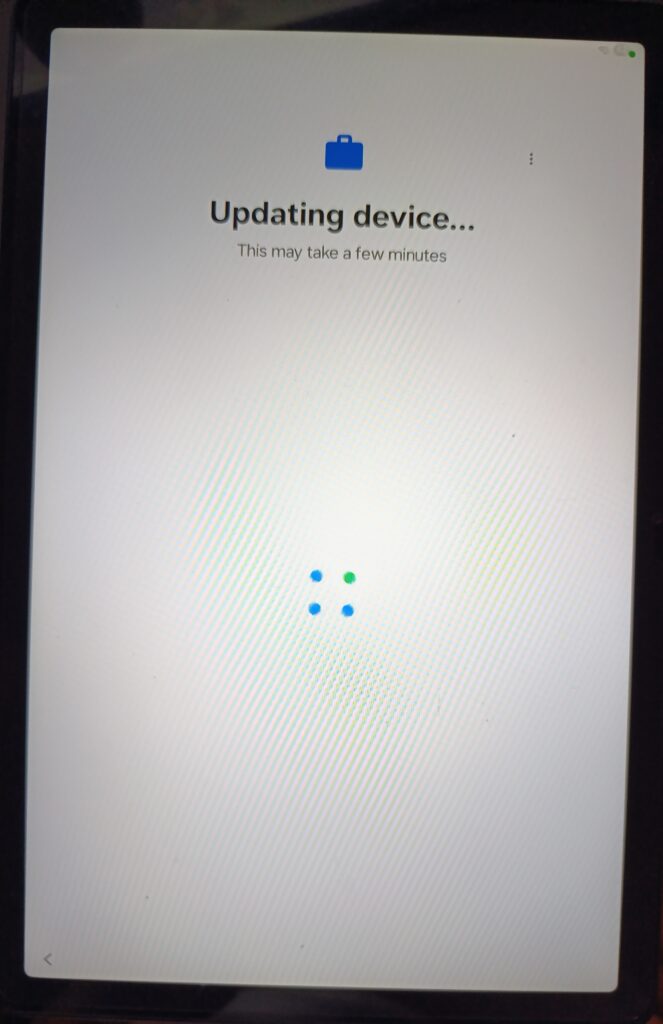
Stage 6: Updating Device Policy
The “Updating device…” screen appears as Android Device Policy downloads and applies the latest policies from Intune. This is where device restrictions, kiosk mode settings, and compliance requirements begin to take effect on the device. Depending on network speed and policy complexity, this stage can take one to five minutes.
Stage 7: Install Work Apps
This screen confirms that everything is wired up correctly. The device displays the list of apps queued for installation, divided by assignment type:
| Required apps (2) | Microsoft Intune, Company Web Site assigned as Required with the Dedicated Devices filter. |
| Additional apps (2) | Intune Company Portal, Google Chrome supporting apps that are part of the broader managed environment. |
The presence of Company Web Site in the Required apps list confirms that the Managed Google Play web app, the kiosk Device experience configuration, and the Required app assignment are working as intended. The device begins downloading and installing these apps automatically.
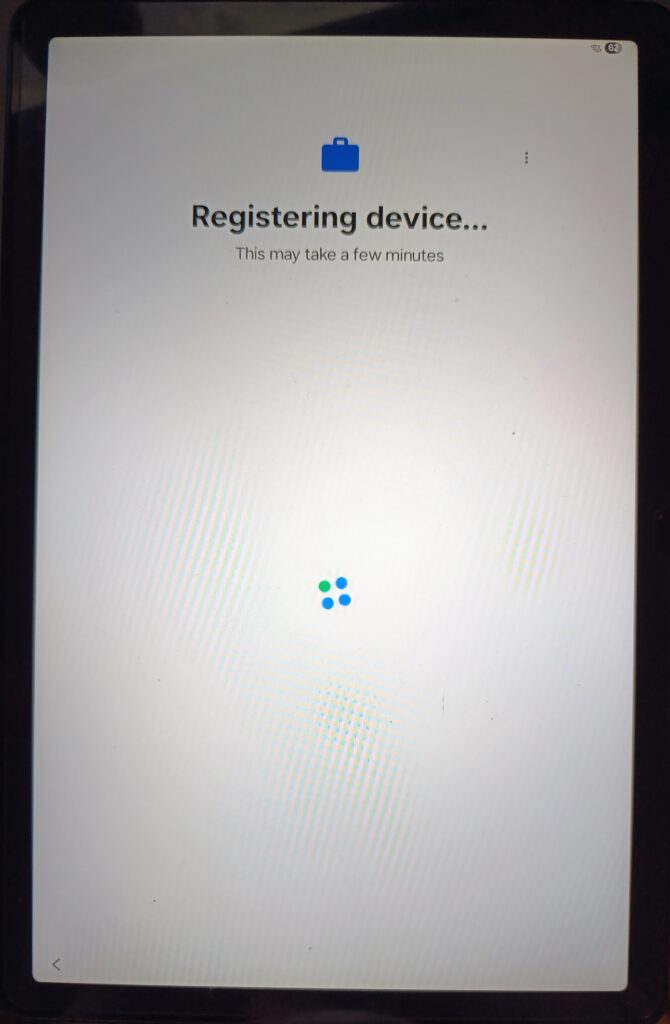
Stage 8: Registering the Device
After apps are queued for installation, the device registers with the Intune service. The “Registering device…” screen indicates the device is completing its MDM registration creating the device record in Intune with its hardware identifiers, enrollment profile association, and initial compliance state.
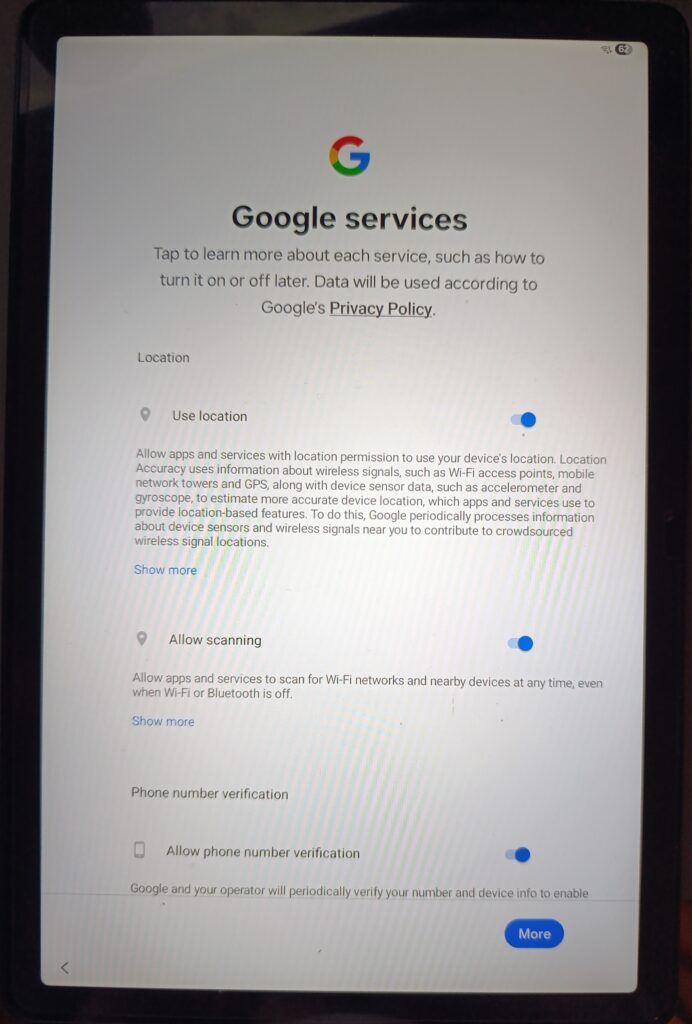
Stage 9: Google Services Configuration
The Google services configuration screen appears. For dedicated devices, these settings are typically pre-configured by policy, but the enrollment wizard may still present this screen depending on the device manufacturer and Android version. In a kiosk deployment, location services are left enabled if the device is used for asset tracking, or disabled if privacy is the priority.
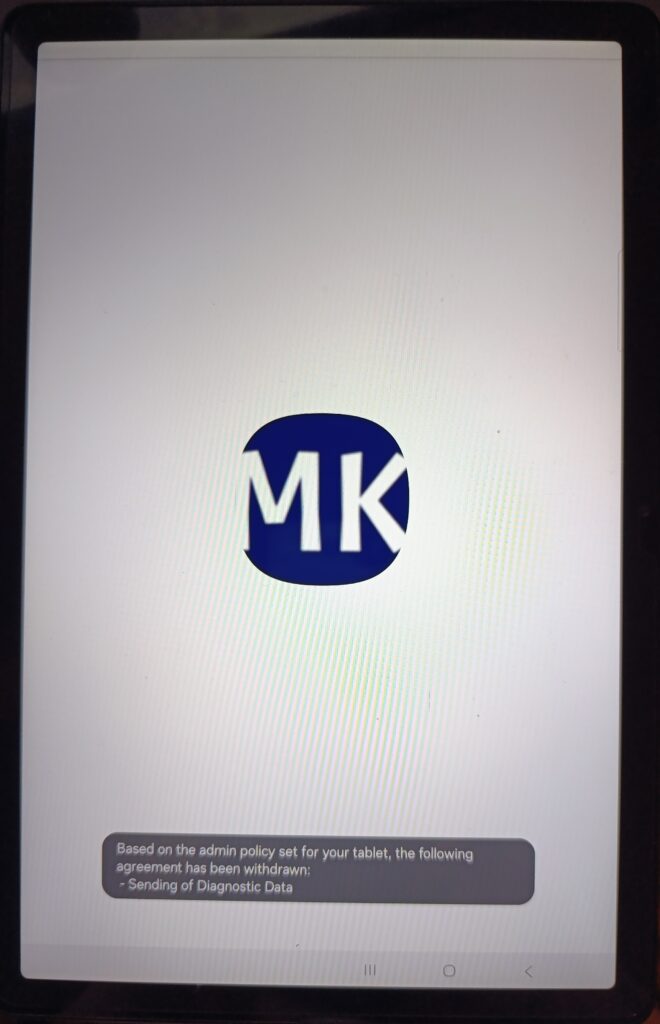
Stage 10: Admin Policy Applied / Kiosk App Launches
The enrollment is complete. The device now displays the company logo as the kiosk app launches for the first time. Note the system notification: Based on the admin policy set for your tablet, the following agreement has been withdrawn: Sending of Diagnostic Data.
This is the device restrictions policy taking effect in real time the admin policy has automatically revoked the diagnostic data sharing agreement that was set during the Google services step. This is the kind of automatic policy enforcement that makes Android Enterprise powerful: the administrator’s intent is enforced without any user action required.
Stage 11: Kiosk App Running / End State
The device is now fully enrolled and in kiosk mode. The Company Web Site app is running full screen. The following behaviors confirm that device restrictions are enforced at the Device Owner level:
| No status bar | Blocked by device restriction. No Wi-Fi indicator, no notifications, no quick settings access. |
| No navigation bar | The back button, home button, and recents button are suppressed in kiosk mode. |
| Full screen web experience | The Managed Google Play web app with Full screen display mode renders the website without any browser chrome. |
| No way out | The end user cannot navigate away, open another app, or access device settings. The device is completely locked to this single application. |
Verifying Enrollment in Intune
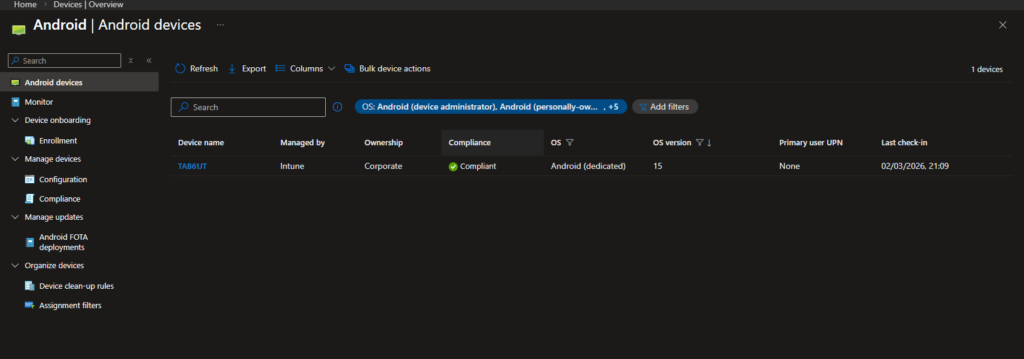
Navigation: Devices › Android › Android devices
In the Intune admin center, the freshly enrolled tablet appears in the device list with the following attributes:
| Device name | TAB61JT automatically generated by the TAB{{SERIALAST4DIGITS}} template. Last 4 digits of the serial number. |
| Managed by | Intune confirms Android Enterprise Device Owner management, not legacy Device Admin. |
| Ownership | Corporate set automatically by the Corporate-owned dedicated devices enrollment profile. |
| Compliance | Compliant the Dedicated Devices Compliance policy has been evaluated and all conditions are met. |
| OS | Android (dedicated) the OS type confirms kiosk/dedicated enrollment, distinguishing it from BYOD, COPE, and COBO entries in the same list. |
| Primary user UPN | None the defining characteristic of Dedicated Device enrollment. No user identity, no user affinity. This device is managed at the device level only. |
This is the confirmation that everything worked exactly as designed. A compliant, corporate-owned, Intune-managed dedicated device with no user running a single locked application, ready to deploy in a production environment.
Intune Configuration Summary
At this stage, the Intune-side configuration for Dedicated Device (Kiosk) deployment is complete.
| Order | Component | Location | Assignment |
| 1 | Enrollment Profile | Devices › Android › Enrollment | QR code based |
| 2 | Device Configuration Profile | Devices › Android › Configuration | All Devices with filter |
| 3 | Compliance Policy | Devices › Android › Compliance | All Devices with filter |
| 4 | Kiosk Application | Apps › Android | All Devices with filter (Required) |
Android Enterprise Management Modes Quick Comparison
| Feature | BYOD | COPE | COBO | Dedicated |
| User identity | Required | Required | Required | Not required |
| Personal space | Yes | Yes | No | No |
| Kiosk mode | No | No | No | Yes |
| App deployment | Work profile only | Work + Personal | Full device | Full device |
| Primary user | Employee | Employee | Employee | None (device-based) |
| Best for | Personal phones | Company phones + personal use | Corporate-only phones | Task devices, kiosks, shared tablets |
Wrapping Up the Series
Dedicated Device is simply the most locked-down model in Android Enterprise.
Throughout this series, we looked at different enrollment types and where they make sense. BYOD works when users bring their own phones. COPE fits when you want corporate ownership but still allow some personal use. COBO removes that personal layer. Dedicated Device removes the user entirely.
There’s no perfect model. It always depends on the scenario. A warehouse tablet doesn’t need the same setup as a sales manager’s phone. A shared kiosk doesn’t need user sign-in. Once you understand that, choosing the right model becomes straightforward.
The good thing is that all of these options live inside the same Intune framework. The same Managed Google Play connection, the same policy engine, the same assignment logic. Once you get comfortable with that structure, moving between models isn’t complicated.
If you’ve gone through the whole series, you now know how each enrollment type behaves in practice not just in theory. And that’s usually what makes the difference when you’re deploying in a real environment.
References
- Microsoft Learn – Android Enterprise enrollment guide
https://learn.microsoft.com/en-us/intune/intune-service/fundamentals/deployment-guide-enrollment-android