Migrate Windows 10 to 11 with SCCM: A Complete Deployment Guide
Upgrading your organization’s devices from Windows 10 to Windows 11 25H2 may sound challenging, but with Microsoft Endpoint Configuration Manager (SCCM), the process is entirely manageable and automatable.
This guide walks you through the entire in-place upgrade process, showing exactly how to prepare, create, and deploy the task sequence complete with screenshots and best practices.
Understanding Windows 11 Migration Methods
Before starting, let’s quickly look at the three common upgrade approaches in enterprise environments:
- Servicing Plans (Feature Updates) – Ideal for small environments. Quick to configure, but limited control and error visibility.
- Task Sequence-based In-Place Upgrade – Offers flexibility, prechecks, custom actions, and full monitoring. Recommended for large-scale upgrades.
- Bare-Metal Deployment (Wipe & Load) – Used for new or re-imaged devices. All data and apps are removed.
For this guide, we’ll use the Task Sequence method. It provides maximum reliability and control, allowing administrators to automate pre-upgrade checks and ensure compliance with Windows 11 hardware requirements (TPM 2.0, UEFI, Secure Boot).
Why Choose an In-Place Upgrade?
Unlike a clean install, an in-place upgrade preserves:
- User data, profiles, and documents
- Installed applications and drivers
- Network and domain settings
This minimizes user downtime and simplifies deployment at scale users can resume work immediately after the upgrade.
Prerequisites
Before you begin:
- Functional SCCM/MECM infrastructure
- Extracted Windows 11 25H2 ISO on a network share
- Proper Windows 11 licensing (KMS or AAD activation)
- Administrative rights in SCCM Console
- Target devices meeting hardware compatibility
Step 1: Adding the Windows 11 Upgrade Package
First things first, we need to get the Windows 11 installation files into SCCM.Open your SCCM console and navigate to Software Library → Operating Systems → Operating System Upgrade Packages.Right-click in the empty space and select Add Operating System Upgrade Package.
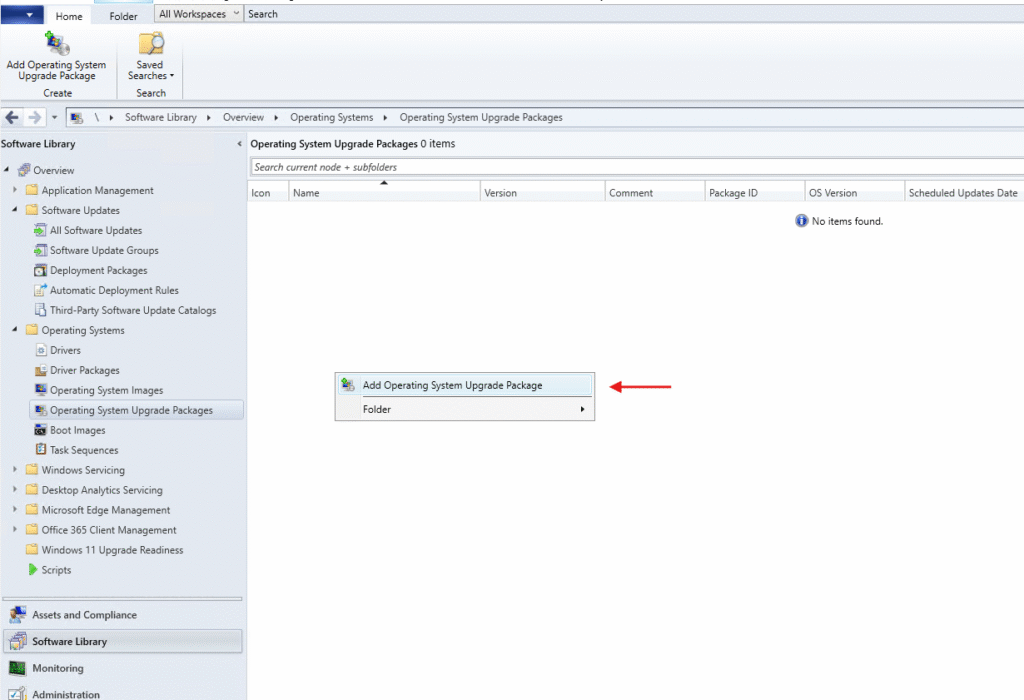
Make sure you’ve already extracted your Windows 11 ISO to a network share that SCCM can access. In this example, the path is \\sccm\e$\Deployments\Windows 11 Migration.
Important: Check that license agreement box. This confirms you have the proper licensing for deploying Windows 11.
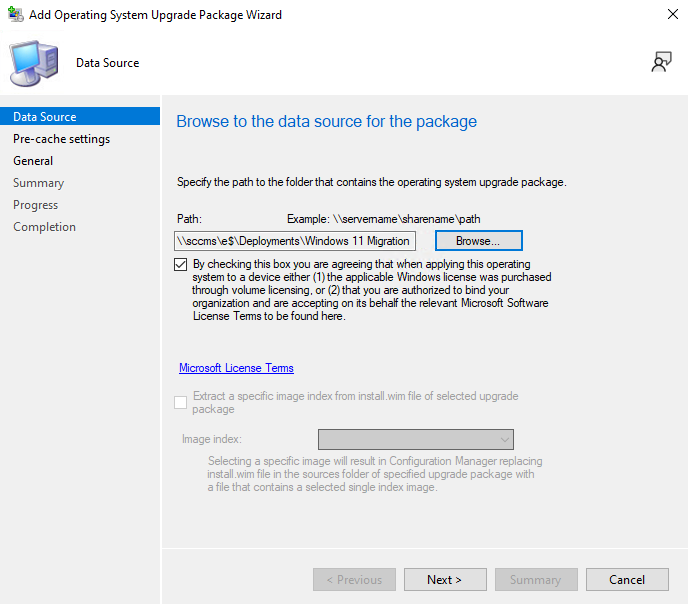
Select x64, amd64 for the architecture and choose your language – in this example, it’s English (United Kingdom).
Pre-caching feature that lets client devices download the upgrade package in advance, so when it’s time to actually upgrade, everything’s already local and the process is much faster.
Give your package a clear name and version

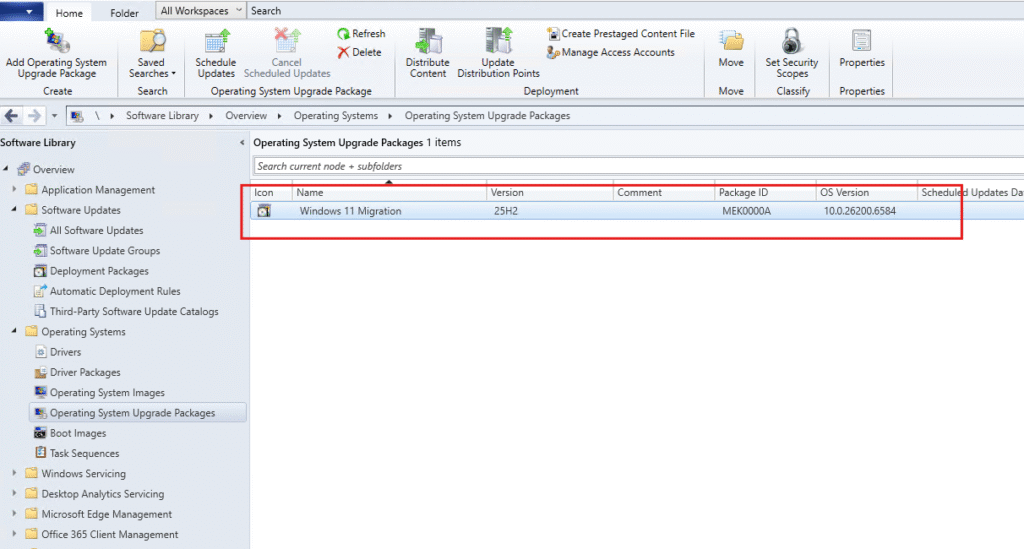
Once the wizard completes, you’ll see your new Windows 11 upgrade package in the list. Notice it shows the version (25H2), package ID, and OS version (10.0.26200.6584). Now you need to distribute this content to your distribution points so it’s available across your network.
Right-click on the package and select Distribute Content to push it to your distribution points. Depending on your network and the size of the package, this might take a while.
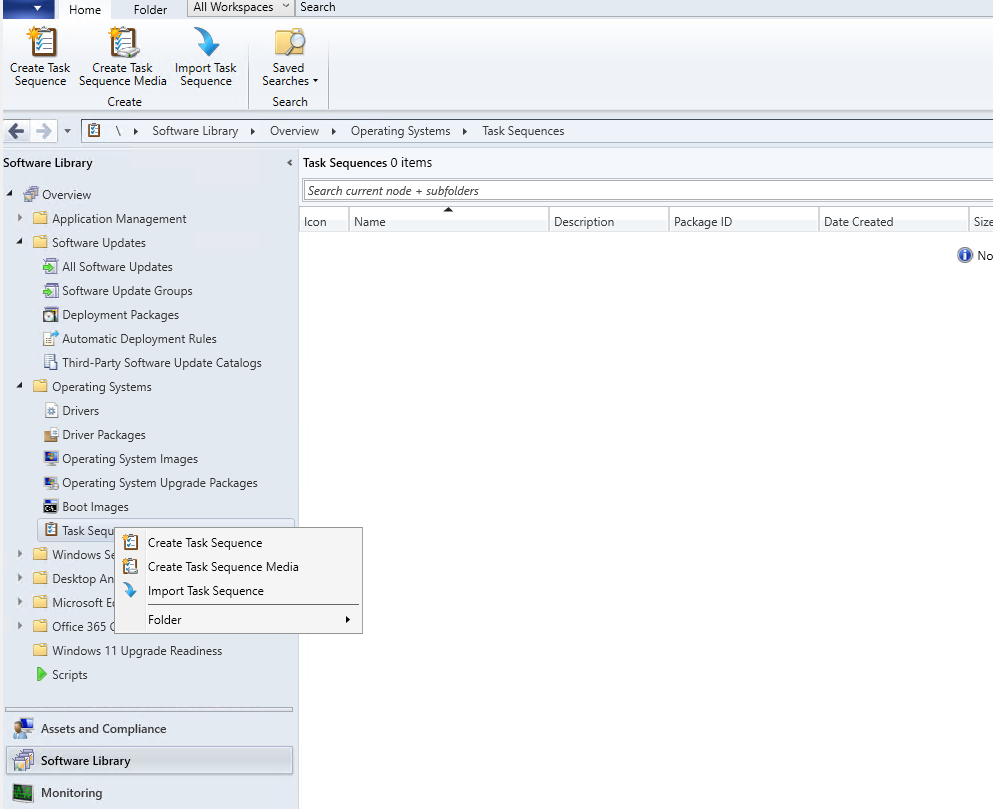
Step 2: Creating the Upgrade Task Sequence
Now that we have the upgrade package ready, let’s create the task sequence that will actually perform the upgrade.Navigate to Task Sequences under Operating Systems. Right-click and select Create Task Sequence.
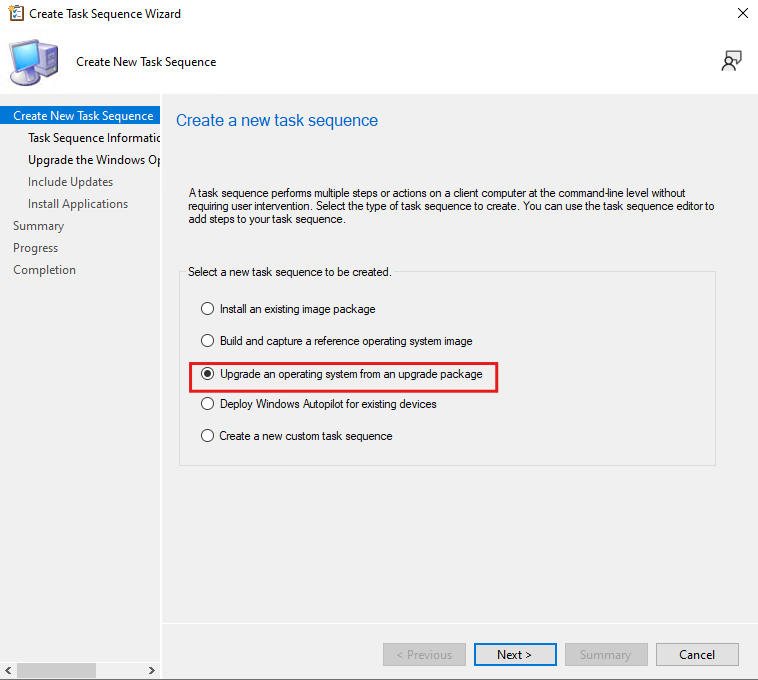
Select Upgrade an operating system from an upgrade package. This option is specifically designed for in-place upgrades and handles all the complexity for you.
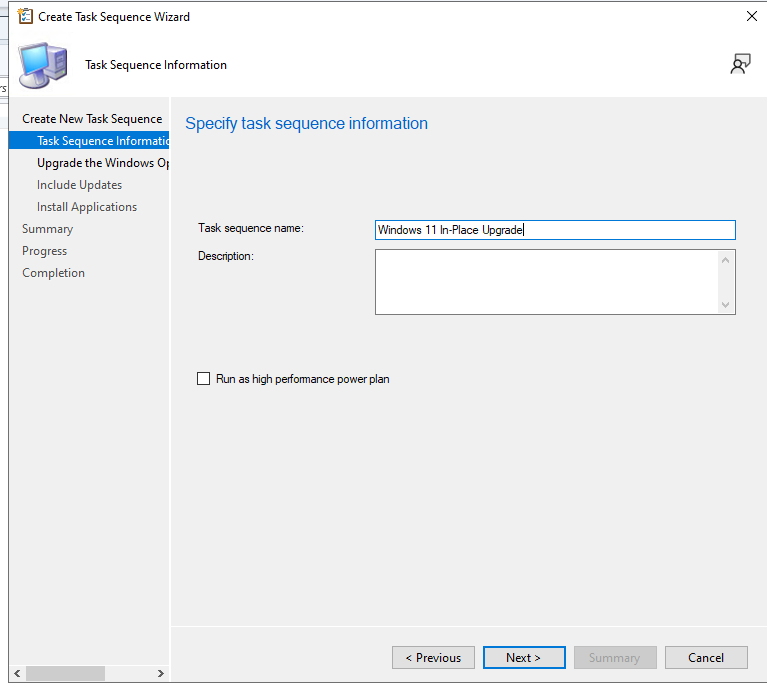
Give your task sequence a descriptive name. I’ve called this one “Windows 11 In-Place Upgrade”.
Now select the Windows 11 upgrade package you created earlier. Click Browse and you’ll see your “Windows 11 Migration 25H2 en-GB” package. Select it and click OK.
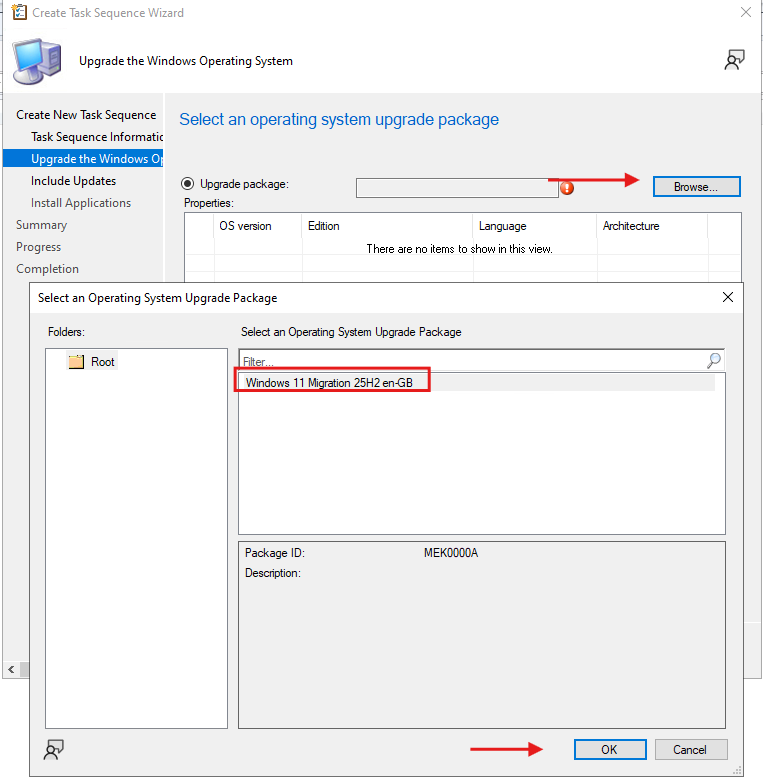
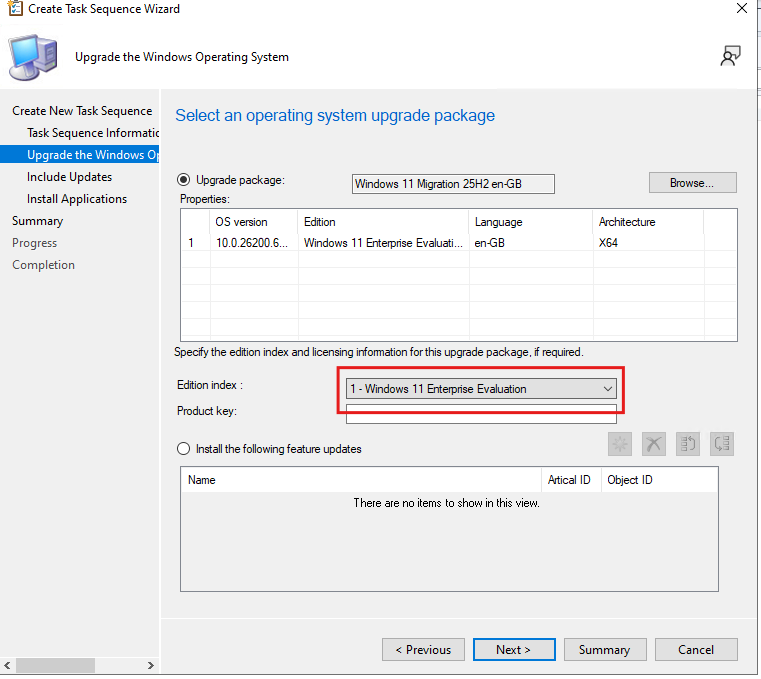
Here you’ll specify which edition of Windows 11 you’re upgrading to. In most enterprise environments, this will be Windows 11 Enterprise. The wizard shows you the available editions from your upgrade package.
Leave the product key field empty if you’re using KMS or Active Directory-based activation
I typically select Do not install any software updates here.Because you want the upgrade to be as fast and predictable as possible. You can always install updates afterward through your normal patching process.

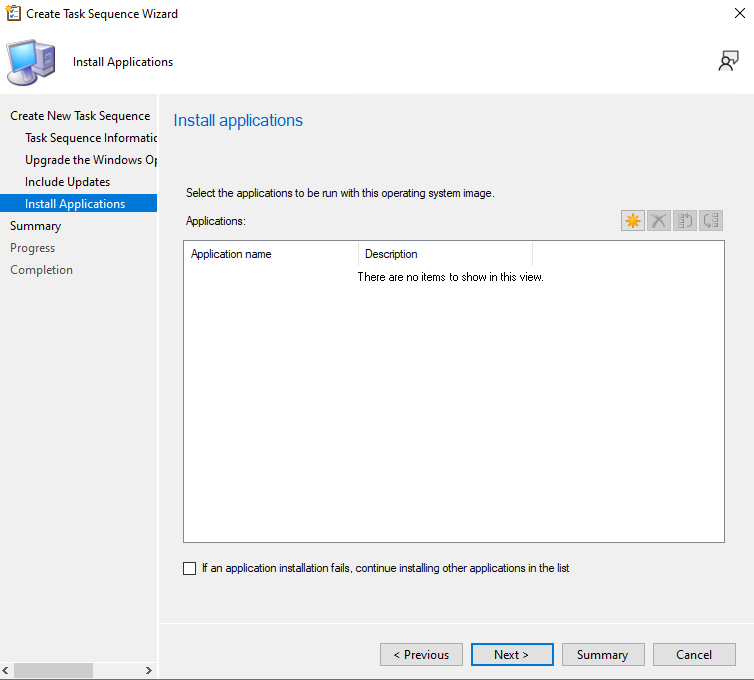
Finally, you can choose to install specific applications during the upgrade. For most scenarios, I leave this empty. Your existing applications will be preserved during the in-place upgrade anyway, so there’s no need to reinstall them.
However, if you have specific applications that need to be installed in a particular order after an OS upgrade, this is where you’d add them.
Step 3: Customizing the Task Sequence
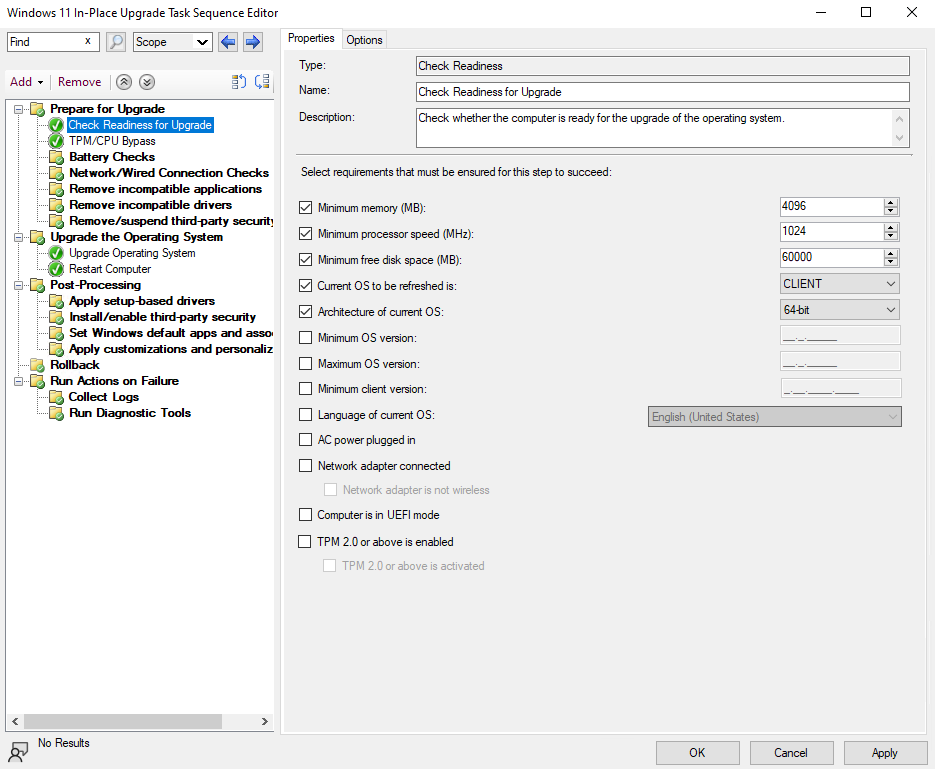
Now comes the important part – fine-tuning the task sequence to ensure smooth upgrades.Right-click on your newly created task sequence and select Edit. This opens the Task Sequence Editor where you can add pre-checks and customize the upgrade process.

The wizard automatically creates a “Check Readiness for Upgrade” step, which is crucial. This step verifies that devices meet Windows 11 requirements before attempting the upgrade. You can see it checks:
- Minimum memory: 4096 MB (4 GB)
- Minimum processor speed: 1024 MHz (1 GHz)
- Minimum free disk space: 60000 MB (60 GB)
- Current OS architecture: 64-bit
- And importantly, UEFI mode and TPM 2.0
If any device fails these checks, the upgrade won’t proceed, saving you from failed installations
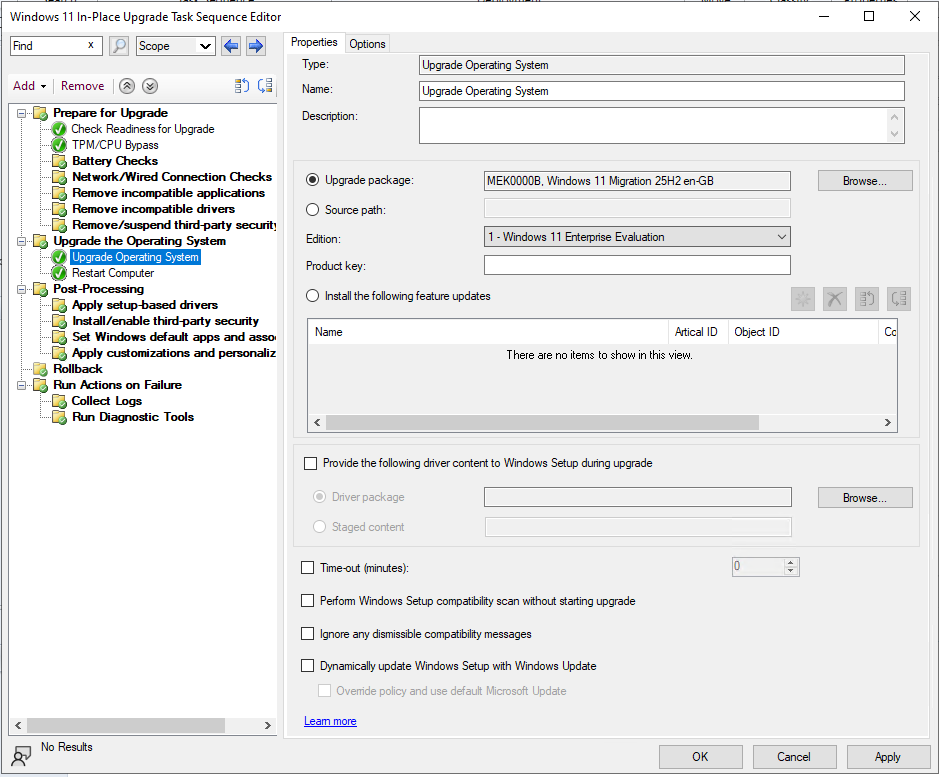
The Upgrade Operating System step is the core of your task sequence. Here you can see it’s configured with:
- The upgrade package we created earlier ( Windows 11 Migration 25H2)
- Edition selection: Windows 11 Enterprise Evaluation
- Product key field (left empty for KMS activation)
There’s also an option to provide driver content during the upgrade if you have specific driver packages that need to be injected.
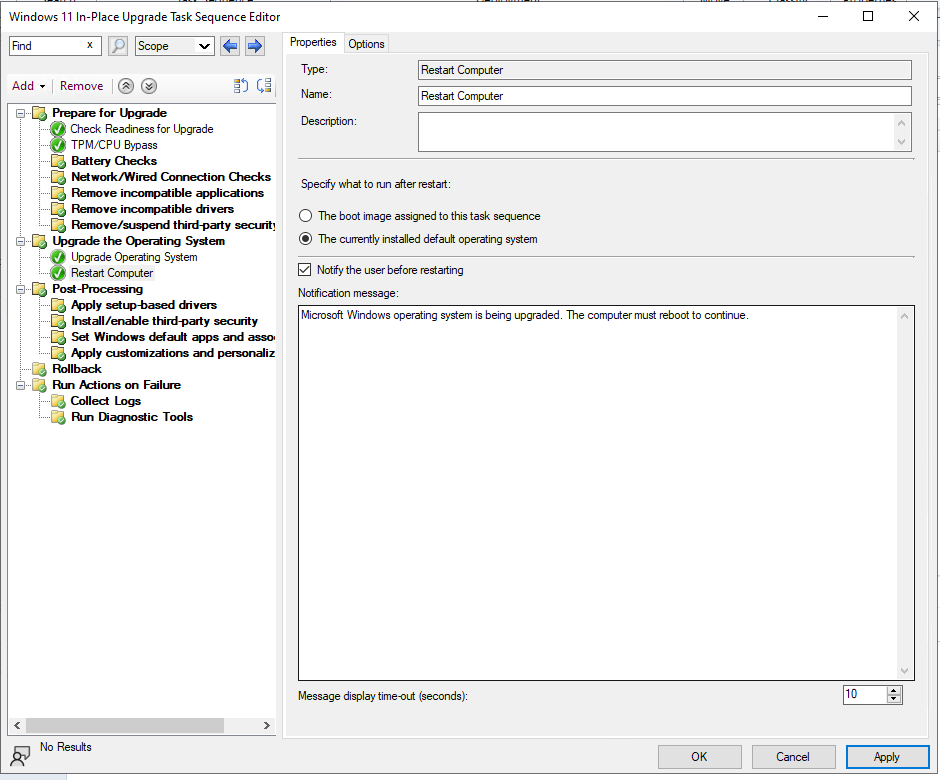
After the upgrade completes, the task sequence includes a Restart Computer step. Notice it’s set to boot into “The currently installed default operating system” which will be Windows 11 after the upgrade.There’s also a notification message that will be shown to users: “Microsoft Windows operating system is being upgraded. The computer must reboot to continue.”
You can adjust the message display timeout (10 seconds by default) based on your preference.
Step 4: Deploying the Task Sequence
Time to make this available to your devices.Right-click on your task sequence and select Deploy. The deployment wizard opens and asks you to select a target collection. Click Browse to choose your collection.
In this example, I’m deploying to a test collection called “TempWin10Devices” which has 1 member. Always start with a small pilot group!

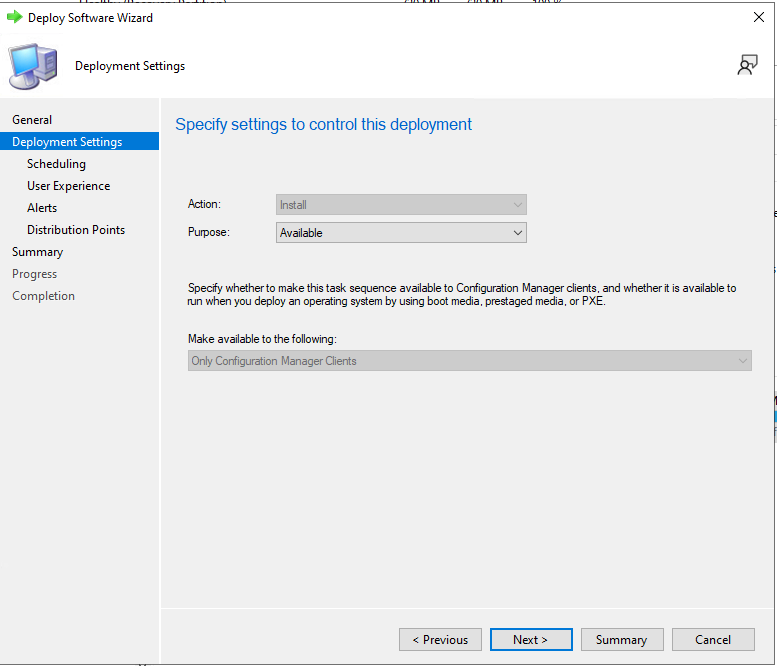
Configure the deployment settings:
- Action: Install
- Purpose: Available
- Make available to: Only Configuration Manager Clients
Setting the purpose to “Available” means users will see the upgrade in Software Center but won’t be forced to install it immediately. This is perfect for pilot testing. Later, you can create a “Required” deployment with a deadline for production rollout.
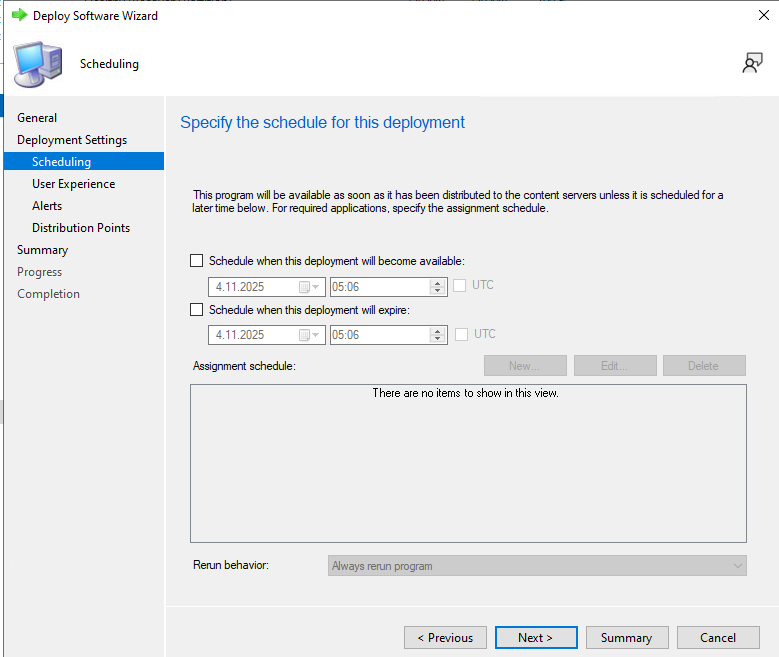
On the scheduling page, you can set when the deployment becomes available and when it expires. For pilot testing, I typically don’t set a schedule – just make it available immediately. The Rerun behavior is set to “Always rerun program” which means if the upgrade fails, users can try again.
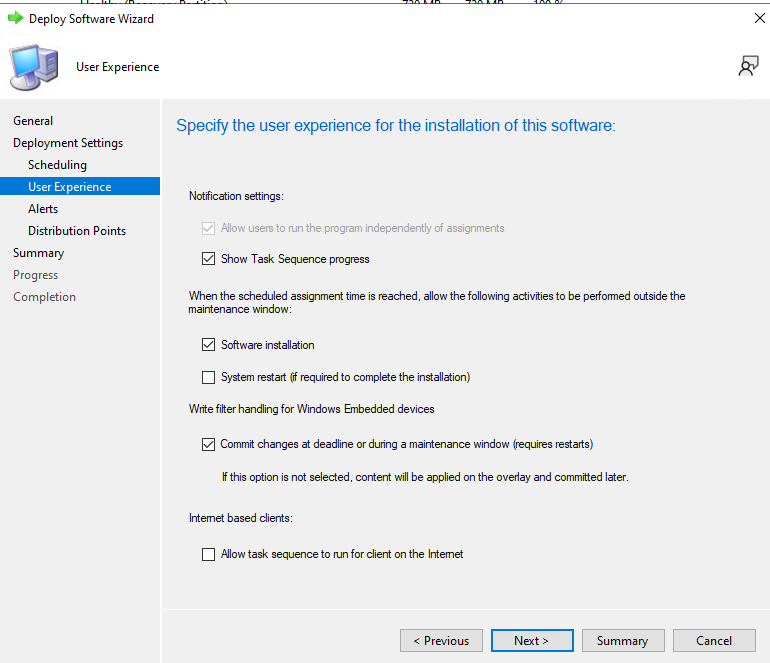
Configure the user experience:
- Show Task Sequence progress: Checked – users will see what’s happening
- Software installation: Checked – allows installation outside maintenance windows
- Commit changes at deadline or during maintenance window: Checked
These settings ensure users have visibility into the upgrade process and aren’t left wondering what’s going on.
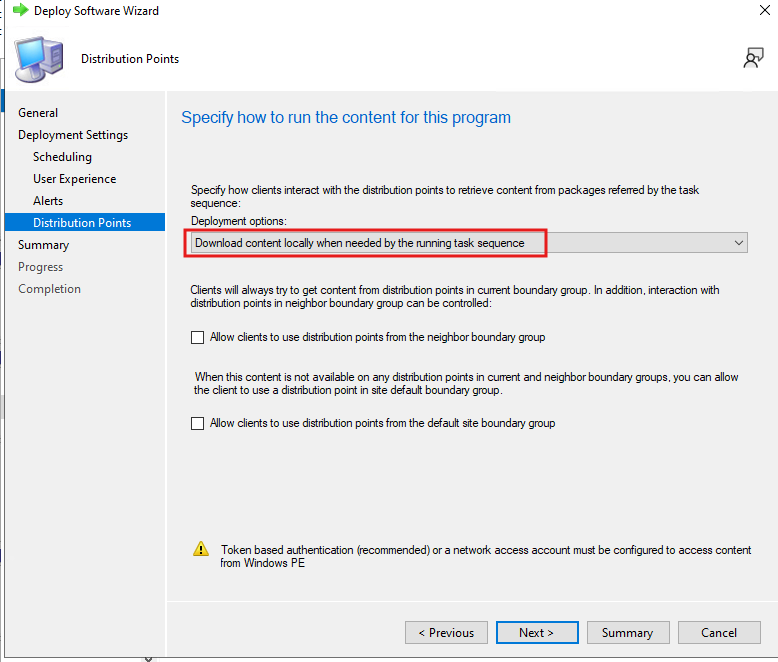
This is important: Set the deployment option to Download content locally when needed by the running task sequence. This tells clients to download the Windows 11 files from distribution points in their boundary group before starting the upgrade.
The upgrade will run faster and more reliably when everything is local.
Step 5: User Experience
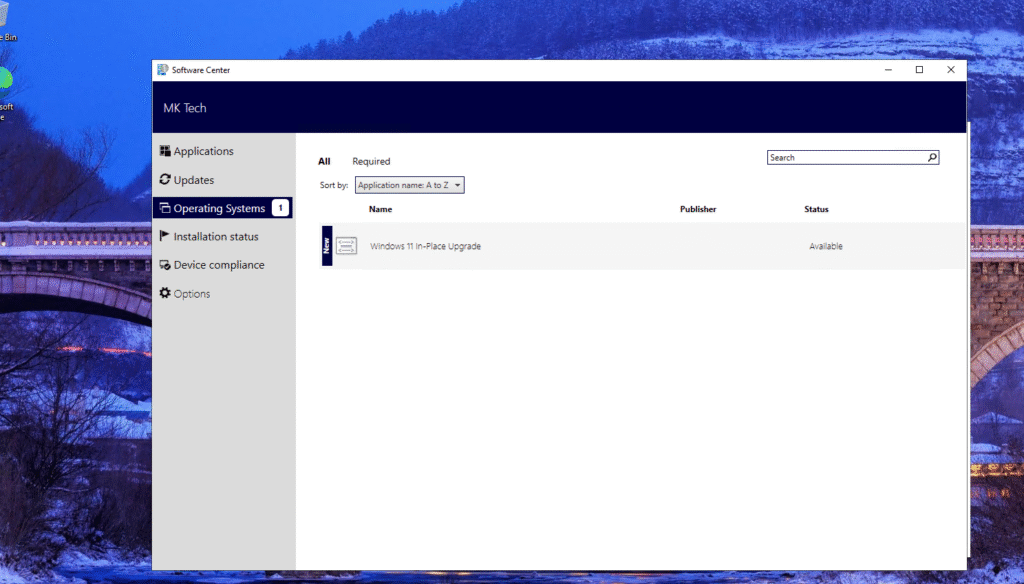
Once deployed, users will see “Windows 11 In-Place Upgrade” appear in Software Center under Operating Systems. The status shows “Available” which means they can click on it to start the upgrade at their convenience.
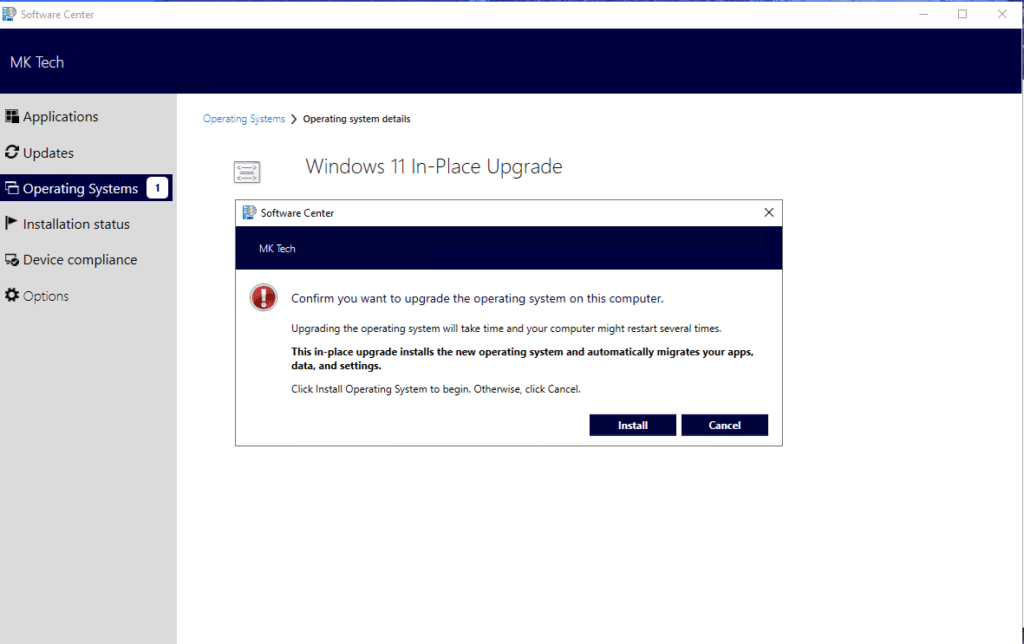
When a user clicks on the upgrade, they’ll see this confirmation dialog explaining what will happen:
“Upgrading the operating system will take time and your computer might restart several times.”
“This in-place upgrade installs the new operating system and automatically migrates your apps, data, and settings.”
Clear communication is key. Users know exactly what to expect before clicking Install.
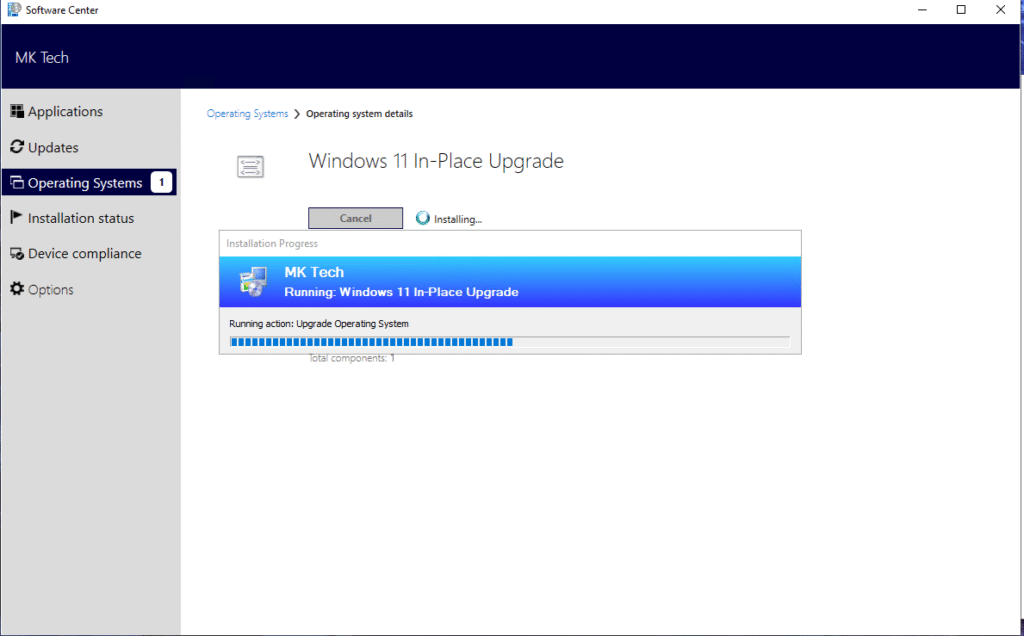
During the upgrade, users see a progress window showing “Running: Windows 11 In-Place Upgrade” with the current action: “Upgrade Operating System”. There’s a progress bar so they can track how far along the process is. The upgrade typically takes 15-45 minutes depending on the hardware and the number of applications installed.
Best Practices and Recommendations
- Start with a pilot group: Don’t deploy to everyone at once. Choose 10-50 devices from different departments and test thoroughly.
- Communicate clearly: Let users know when the upgrade is available, how long it takes, and what they need to do (save work, stay connected to power, etc.).
- Schedule wisely: For required deployments, avoid end-of-month, busy periods, or right before holidays.
- Test applications first: Run application compatibility testing on Windows 11 before starting OS upgrades.
- Have a rollback plan: Windows keeps the old OS files for 10 days in C:\Windows.old, allowing users to roll back if needed.
- Monitor distribution point capacity: Windows 11 installation files are large (4-5 GB). Ensure your distribution points can handle the load.
In-place migration from Windows 10 to Windows 11 via SCCM is a reliable, efficient way to upgrade your enterprise devices. By following these steps – preparing the upgrade package, creating a well-configured task sequence, deploying to pilot groups first, and monitoring the process – you can ensure a smooth transition for your organization.
The key is taking it step by step, testing thoroughly, and being responsive to user feedback. With SCCM handling the heavy lifting, you can upgrade hundreds or thousands of devices while maintaining user productivity and preserving their work environment.