How to Upgrade Configuration Manager to Version 2509: Complete Guide
Configuration Manager just got a fresh update! Microsoft has released version 2509, and today I’m walking you through the entire upgrade process using the early update ring feature. This isn’t just a minor version bump – there are some important changes coming that you need to know about.
What You Need to Know Before Upgrading
Version 2509 isn’t just another number change. Microsoft is accelerating their plans to remove some legacy features, and with version 2603, several deprecated features will be completely gone. So it’s worth paying attention during this upgrade.
What’s Changing?
Microsoft is finally retiring some site system roles that have been on the chopping block for a while:
- Enrollment Point and Enrollment Point Proxy roles are no longer actively used
- Device Management Point role is sharing the same fate
- These roles will be completely removed in version 2603
If you still have these roles active in your environment, now’s the time to act. Microsoft’s recommendation is clear: remove these roles and migrate to modern management approaches like Intune and co-management.
Why This Matters
During the prerequisite check, you’ll see a warning about deprecated site system roles. This isn’t something you can ignore – it’s a heads up that your environment needs some housekeeping before these features disappear entirely.
The warning specifically mentions:
- Enrollment point
- Enrollment point proxy
- Device management point roles
Microsoft’s documentation points to their removal timeline, and 2603 is the cutoff. Start planning your migration strategy now if you haven’t already.
Step-by-Step: Upgrading to 2509
Step 1: Enable Early Update Ring
First things first – you need to download the early update ring script from Microsoft. You can use this link and grab the PowerShell script.
Once downloaded, right-click on PowerShell and select “Run as Administrator”. Navigate to the folder where you saved the script and run it:
.\enableearlyupdatering2509.ps1
The script will prompt you to enter your site server name. Type in your FQDN (for example, sccms.mk.com) and hit enter. The script does its magic, communicates with your Configuration Manager site, and enables the early update ring feature. You’ll see a confirmation message once it’s done successfully.

Step 2: Check for Updates
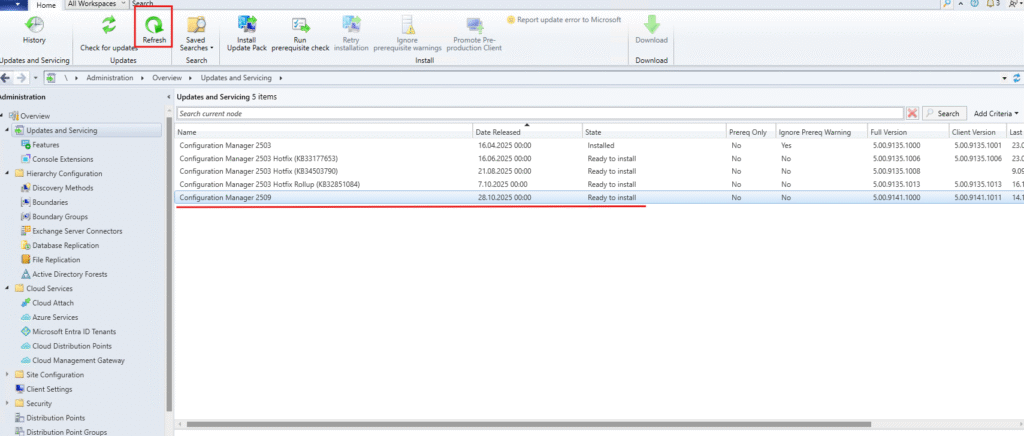
Now head over to your Configuration Manager console. Navigate to Administration > Overview > Updates and Servicing and hit that Refresh button.
After a moment, you’ll see Configuration Manager 2509 appear in the list with a “Ready to install” status. You’ll notice there are actually multiple items including the main update and several hotfixes (with KB numbers in parentheses). Don’t worry about the hotfixes showing separately – they’re part of the update package.
Step 3: Review Installation Status
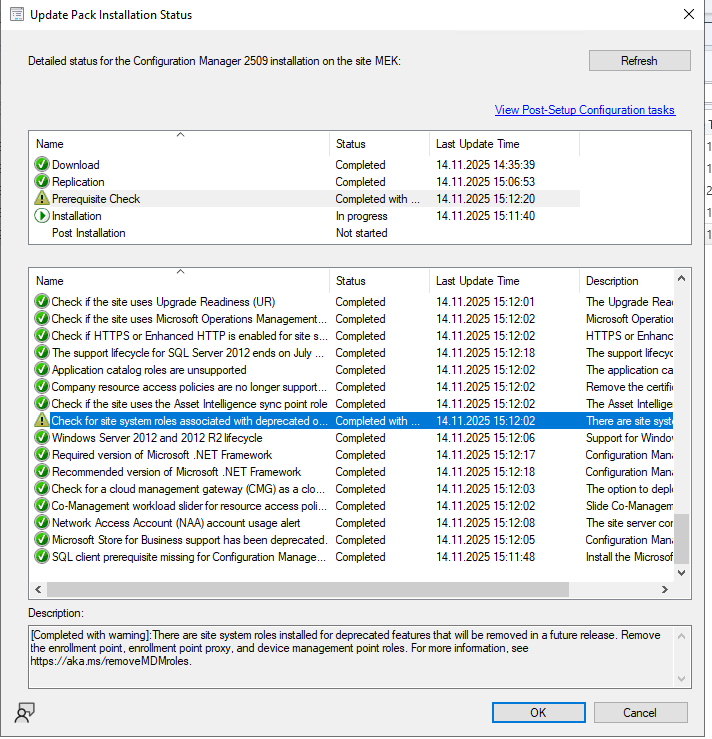
Before starting the installation, click on the update to see its detailed status. This is where you’ll see that prerequisite check warning I mentioned earlier about deprecated features.
Key things to notice:
- Download: Completed
- Replication: Completed
- Prerequisite Check: Completed with warnings
- Installation: In progress
The warning about site system roles is right there. You can click “View Post-Setup Configuration tasks” to see what actions you’ll need to take after the update completes.

Step 4: Run the Update Wizard
Right-click on Configuration Manager 2509 and select “Install Update Pack” to launch the wizard.
This update includes:
- Configuration Manager site server updates
- Configuration Manager console updates
- Configuration Manager client updates
- Fixes for known issues
- New features
Notice the checkbox at the bottom: “Ignore any prerequisite check warnings and install this update regardless of missing requirements.”
For this upgrade, since we know the warning is about deprecated features that we’re planning to remove anyway, it’s safe to check this box and proceed.

Step 5: Configure Client Update Options
This is an important decision point. You have two choices:
Option 1: Upgrade without validating
- Immediately overwrites your current client package with the new version
- All new client installations and upgrades will use this new client update
- Faster rollout, but no testing phase
Option 2: Validate in pre-production collection
- Tests the client update on a subset of devices first
- Keeps your production client package intact initially
- You can overwrite production later using Client Update Options in the console
- Safer approach for large environments
Choose the option that best fits your environment and risk tolerance.In this case, I went with Option 1 since this is a lab environment and I wanted to get the new client version deployed immediately without the extra testing phase.

Step 6: Accept License Terms
You need to check the box that says “I accept these License Terms and Privacy Statement” before you can proceed.
The page includes links to:
- Microsoft Configuration Manager License Terms
- Microsoft Connected Cache License Terms
- Microsoft Edge WebView2 Runtime License Terms
- Privacy Statement
You can also set your Software Assurance expiration date if needed (must be after 1.10.2016).

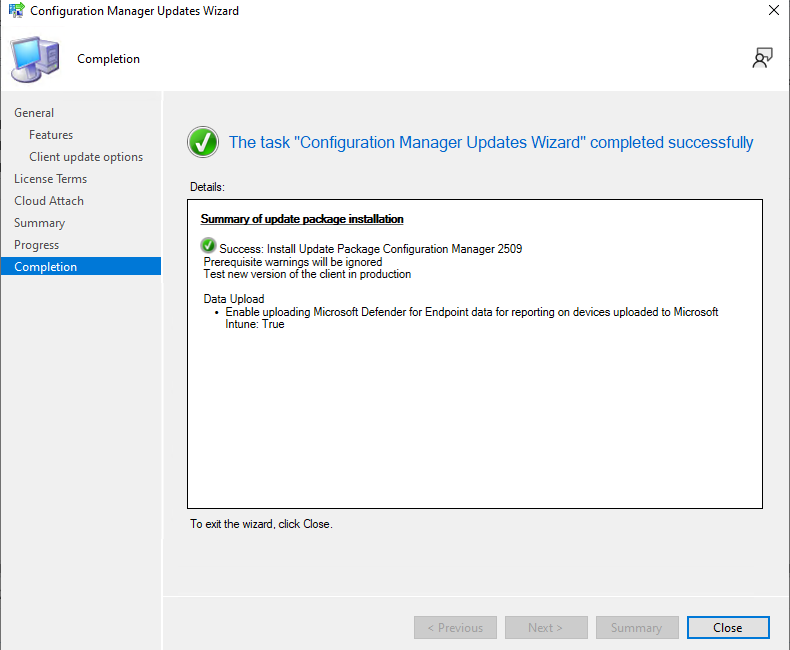
Step 7: Installation Complete
The wizard confirms:
- Success: Install Update Package Configuration Manager 2509
- Prerequisite warnings were ignored
- Test new version of the client in production
Details shown:
- Data Upload enabled: Microsoft Defender for Endpoint data reporting on uploaded devices is now enabled
Note: This Data Upload setting appears because this is a co-managed environment. If you’re using co-management with Intune and Defender for Endpoint, this allows Configuration Manager to upload device data to Microsoft for enhanced security reporting.
Click “Close” to exit the wizard.
Step 8: Download New Console Progress
During the update process, you’ll see this brief “Downloading files…” progress window as Configuration Manager downloads necessary components for console. It’s usually pretty quick depending on your internet connection.
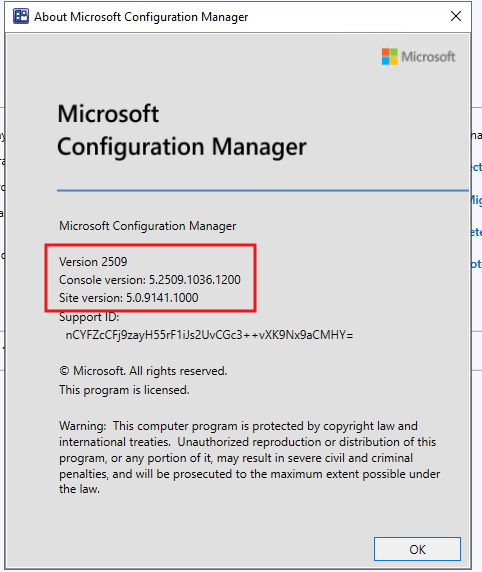
Step 9: Verify the Update
Time to confirm everything worked! Open the “About Microsoft Configuration Manager” dialog to verify the upgrade.
Check these version numbers:
- Version: 2509
- Console version: 5.2509.1036.1200
- Site version: 5.0.9141.1000
If your numbers match (or are close), congratulations – you’ve successfully upgraded to 2509!
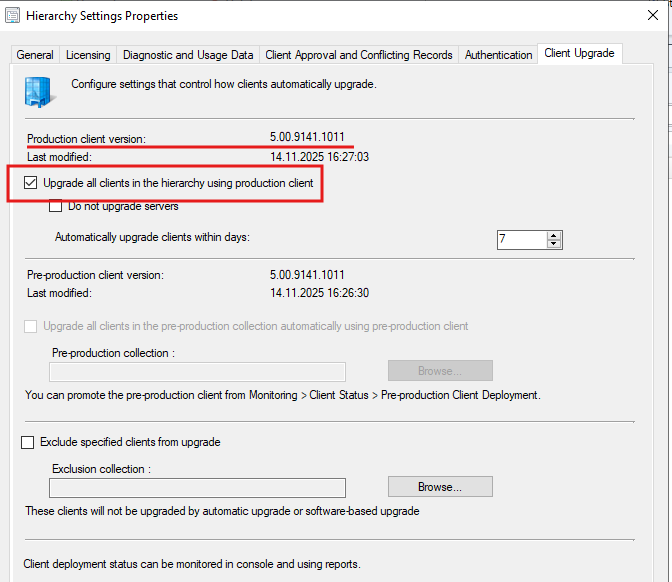
Step 10: Configure Client Auto-Upgrade
Navigate to Administration > Site Configuration > Sites → Right-click your site → Hierarchy Settings → Client Upgrade tab
Key settings visible:
- Production client version: 5.00.9141.1011
- Upgrade all clients in the hierarchy using production client: Checked
- Do not upgrade servers: Available option
- Automatically upgrade clients within days: 7 (configurable)
This ensures all your clients will automatically upgrade to the new version within your specified timeframe. The 7-day window gives you some breathing room to monitor the rollout.
Post-Upgrade: What’s Next?
Now that you’re running 2509, here are some things you should do:
1. Remove Deprecated Roles
Remember that warning? Time to act on it. If you have any of these roles:
- Enrollment Point
- Enrollment Point Proxy
- Device Management Point
Start planning their removal. You have until version 2603, but why wait?
2. Check the New Features
Version 2509 comes with some nice improvements:
- Enhanced cloud management gateway capabilities
- Improved co-management reporting
- Updates to the client health dashboard
- Better support for Windows 11
Take some time to explore what’s new and see how these features can benefit your environment.
3. Monitor Client Upgrades
Keep an eye on the client upgrade progress through the built-in reports and monitoring views. Make sure devices are checking in with the new version without issues.
4. Test Your Critical Workflows
Don’t assume everything works perfectly just because the upgrade succeeded. Test your:
- Application deployments
- Software updates
- OS deployments
- Compliance policies
- Reporting
Final Thoughts
Upgrading to Configuration Manager 2509 is straightforward if you follow the wizard and pay attention to the warnings. The deprecation of enrollment-related roles is the biggest change to watch out for, and if you’re still using those features, start your migration planning now.
The update process itself has gotten pretty polished over the years. Microsoft has done a good job making these upgrades less scary than they used to be. Still, always have a backup and a rollback plan – this is production infrastructure we’re talking about.
Quick Reference Links: