
Android Enterprise COPE with Intune: A Practical Step-by-Step Deployment Guide
What Is COPE and When Should You Use It?
Android Enterprise provides multiple management models, and choosing the right one directly impacts both security and user experience. One of the most balanced models in modern enterprise environments is Corporate-Owned with Work Profile (COPE).
With COPE, the device is owned by the organization and enrolled in Android Enterprise as a corporate asset. However, unlike Fully Managed devices, users are still allowed to have a separate personal space on the same phone. The key principle is simple: corporate ownership with logical separation.
Technically, COPE enrolls the device in Device Owner mode, which allows full device-level management. At the same time, Android creates a separate work profile container where corporate applications and policies are isolated. Work apps live inside that container, and personal apps remain outside of it.
This makes COPE particularly valuable in real-world deployments where:
- Devices are company-owned and assigned to individual employees
- Security and compliance must be enforced at the device level
- Users expect to use the device as their primary phone
- IT needs stronger control than BYOD, but without removing personal usage entirely
In practice, COPE is often the most practical compromise between strict control and user acceptance.
How COPE Fits into the Android Enterprise Models
To better understand COPE, it helps to see how it compares to the other Android Enterprise management modes:
| Android Enterprise Mode | Device Ownership | Personal Space | Management Scope | Typical Use Case |
|---|---|---|---|---|
| BYOD (Work Profile) | Employee | Yes | Work profile only | Personal devices accessing corporate apps |
| COPE | Company | Yes | Full device + work profile isolation | Corporate phones assigned to users |
| Fully Managed | Company | No | Full device control | High-security corporate-only devices |
| Dedicated (Kiosk) | Company | No | Restricted device mode | Shared or single-purpose devices |
COPE exists because many organizations need something in between BYOD and Fully Managed. It allows IT to enforce device compliance, apply restrictions, and control corporate data while still giving users a personal environment on the same device.
In the following sections, we’ll walk through how to implement COPE in Microsoft Intune, step by step, and how to validate that the deployment behaves as expected.
Before You Start: COPE Deployment Architecture in Intune
Before jumping into configuration, it’s important to understand how COPE is structured inside Microsoft Intune.
A successful COPE deployment is not just about creating an enrollment profile. It typically involves four core components working together:
- Enrollment Profile – Defines how the device is provisioned (Corporate-Owned with Work Profile).
- Assignment Strategy (Filters or Groups) – Controls which devices receive which policies.
- Configuration Profiles – Enforce device restrictions and work profile behavior.
- Compliance Policies – Define the security baseline and integrate with Conditional Access.
If these components are not aligned, you may end up with:
- Devices enrolling correctly but not receiving restrictions
- Compliance showing as non-compliant due to misaligned password policies
- Policies applying to the wrong Android management type
For this reason, we’ll structure the implementation in a logical order starting from enrollment design and moving toward policy enforcement and validation.
Configuring the COPE Enrollment Profile
Once the design is clear, the next step is to create the COPE enrollment profile in Intune.
You’ll find it under:
Devices → Android → Enrollment → Corporate-owned devices with work profile
This section defines how the device will be provisioned during the initial setup process. In other words, it determines the management model the device will follow from the moment it enrolls.
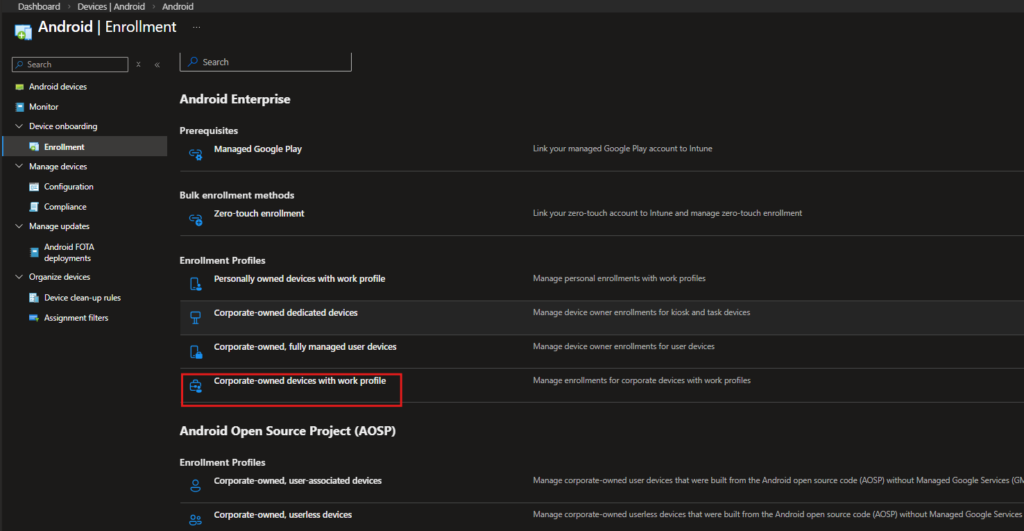
That’s the only option we need here everything else builds on top of this choice.Once this profile is created, Intune generates an enrollment token that will be used during device provisioning (QR code, zero-touch, or other supported methods).
In the next step, we’ll define how devices enrolled through this profile will be identified and targeted inside Intune. That’s where naming conventions and assignment strategy start to matter.
Creating the COPE Enrollment Profile
On this page, select -> Create Policy
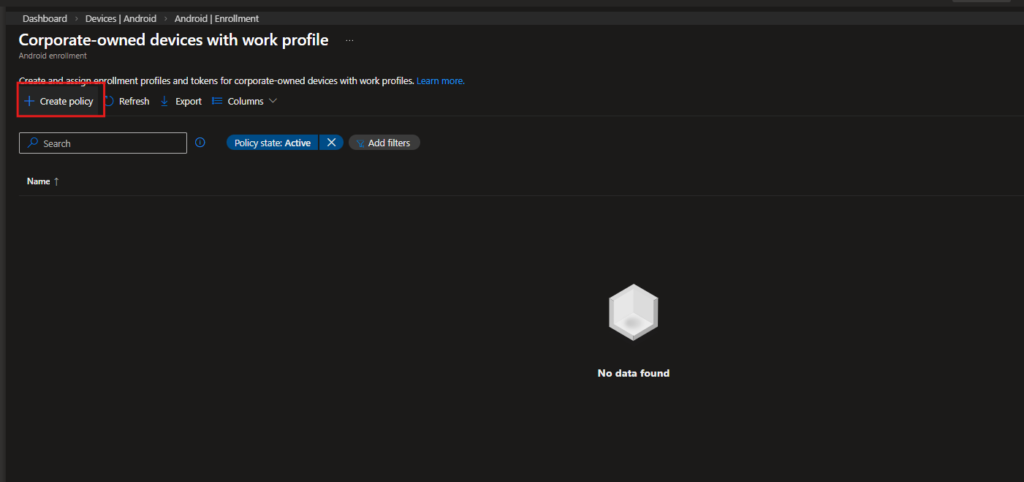
This is where the COPE enrollment profile is created. From here, we’ll define the basic configuration that will be used during device provisioning.
Profile Basics
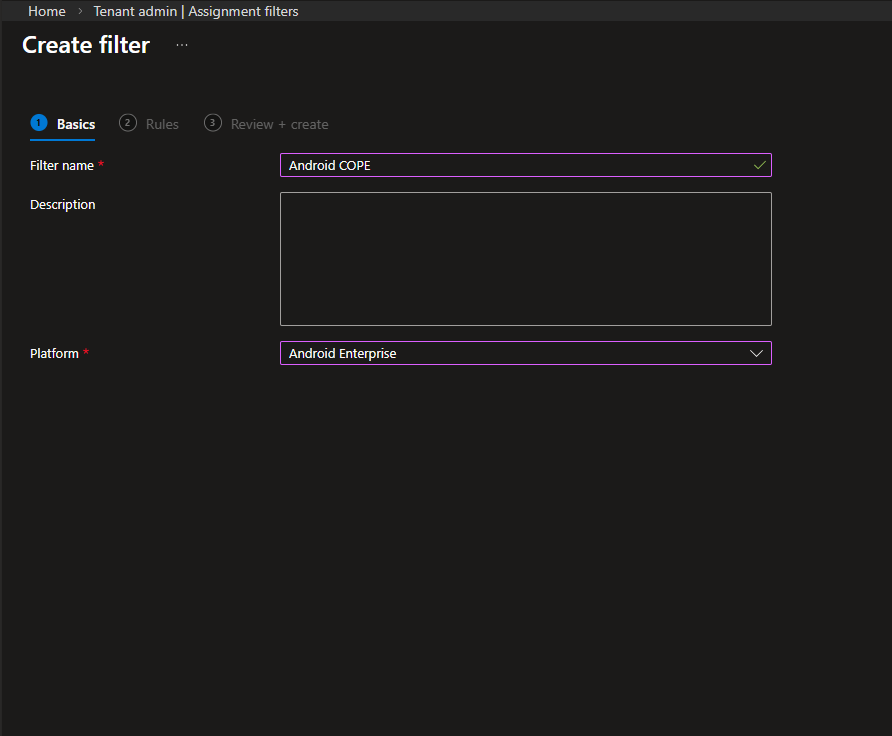
On the Basics tab, define the core settings of the enrollment profile.
- Name: Android COPE Profile
- Description: Optional, but useful for clarity
- Token type: Corporate-owned with work profile (default)
The token type should remain as the default option, since this is the enrollment method required for COPE devices.
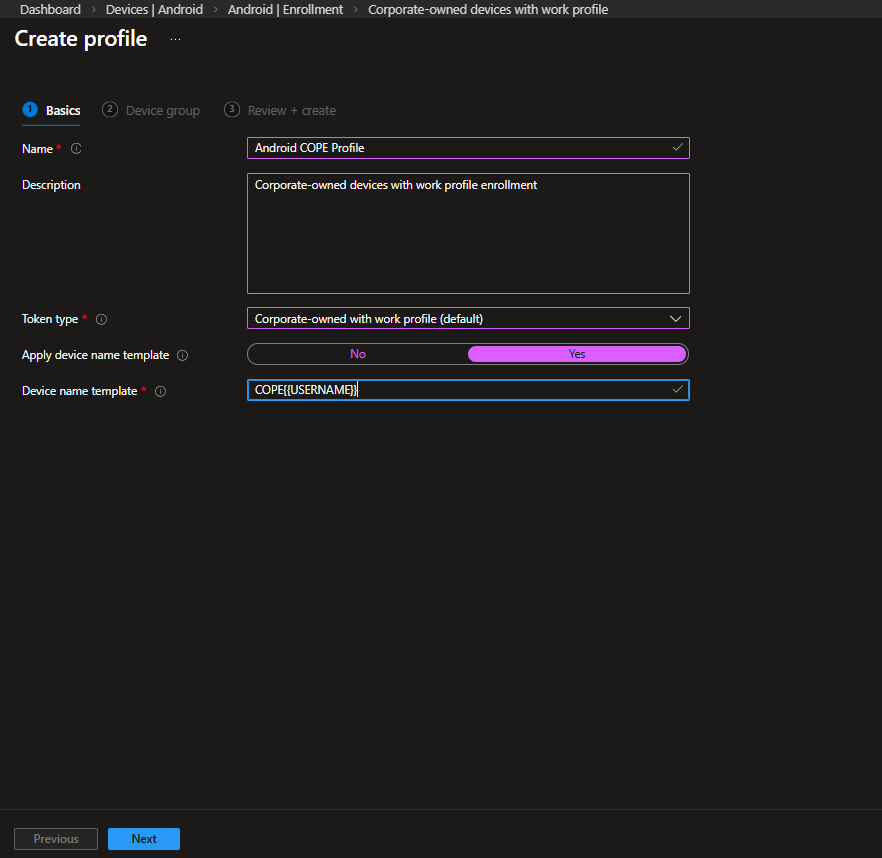
If you want devices to follow a naming convention during enrollment, enable: Apply device name template
In this example, the template is set to: COPE-{USERNAME}
This determines how the device will appear in Intune once provisioning completes. Adjust the format based on your internal naming standards if needed.
After completing these fields, select Next to continue to the device group configuration step
Device Group
In the Device group step, you can choose whether newly enrolled devices should automatically be added to a specific Microsoft Entra security group.
In this configuration, the selection is: None
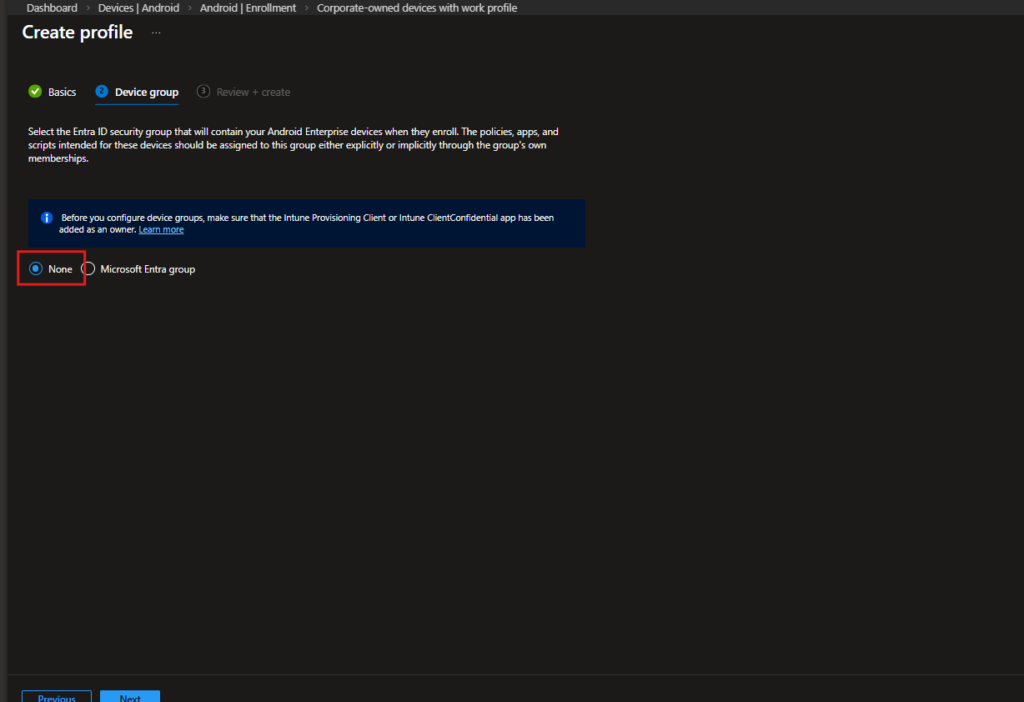
Instead of assigning devices to a group at enrollment time, policy targeting will be handled separately. This approach provides more flexibility, especially in environments where multiple Android enrollment types coexist.
After confirming the selection, proceed to the final review and create the profile.
Assignment Filter for COPE
The enrollment profile is ready. The next step is deciding how COPE devices will be targeted inside Intune.
Rather than linking enrollment directly to a device group, I prefer using an Assignment Filter. It keeps things simpler and avoids mixing different Android management types in the same scope.
The idea is straightforward: Policies can be assigned broadly, and the filter ensures they only apply to devices enrolled through the COPE profile.

Tenant admin → Assignment filters
Select Create.
- Filter name: Android COPE
- Platform: Android Enterprise
Select Next.
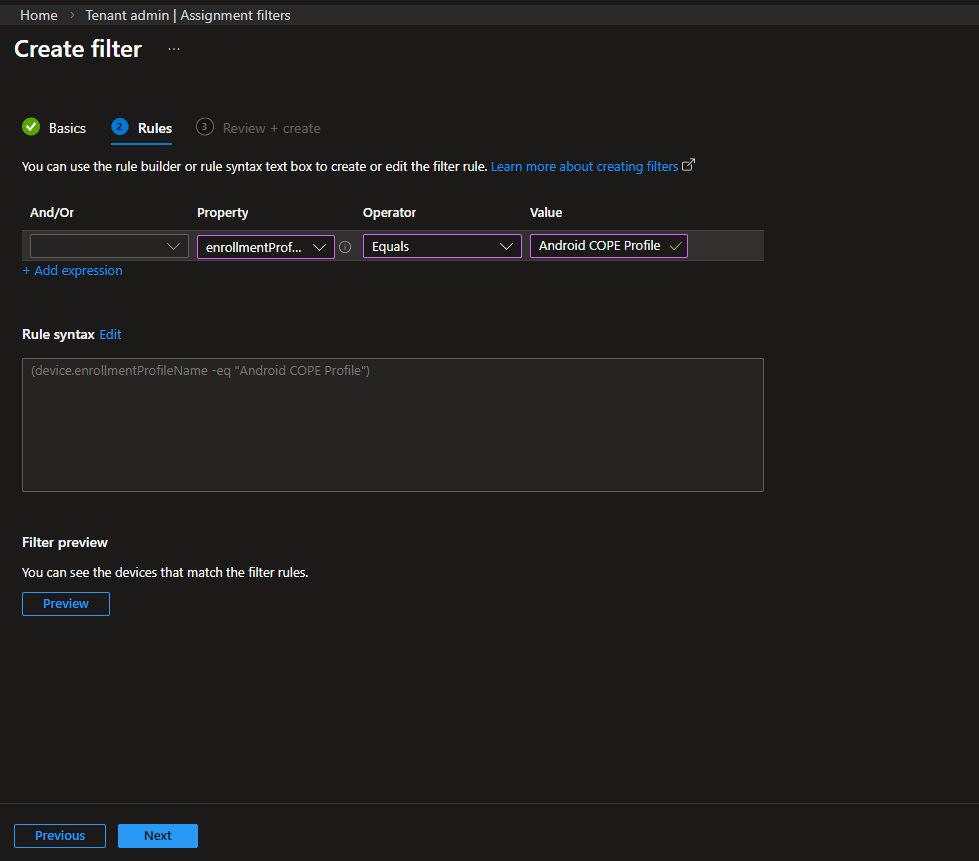
Define the rule:
- Property: enrollmentProfileName
- Operator: Equals
- Value: Android COPE Profile
The rule syntax will appear as:
(device.enrollmentProfileName -eq "Android COPE Profile")
That’s all we need here.
Complete the review and create the filter. With this in place, COPE devices can now be scoped cleanly when assigning configuration or compliance policies.
Configuring Device Restrictions for COPE
With enrollment and scoping in place, we can now define the actual behavior of COPE devices.
Navigate to:
Devices → Android → Configuration → Create

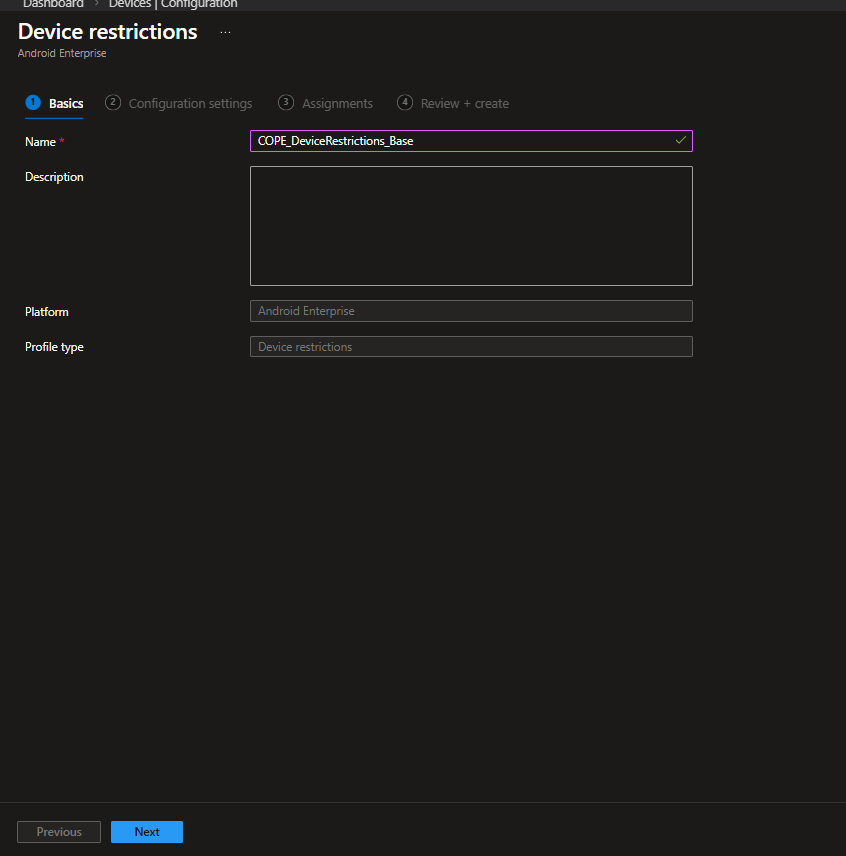
Configure:
- Platform: Android Enterprise
- Profile type: Templates
- Template: Fully Managed, Dedicated, and Corporate-Owned Work Profile → Device restrictions
This template applies to COPE devices because they are provisioned in Device Owner mode.
Profile Basics
Profile name used here: COPE_DeviceRestrictions_Base
The naming simply reflects that this is the base restriction policy for COPE devices.You can adapt it to your own structure.
Configuration Settings
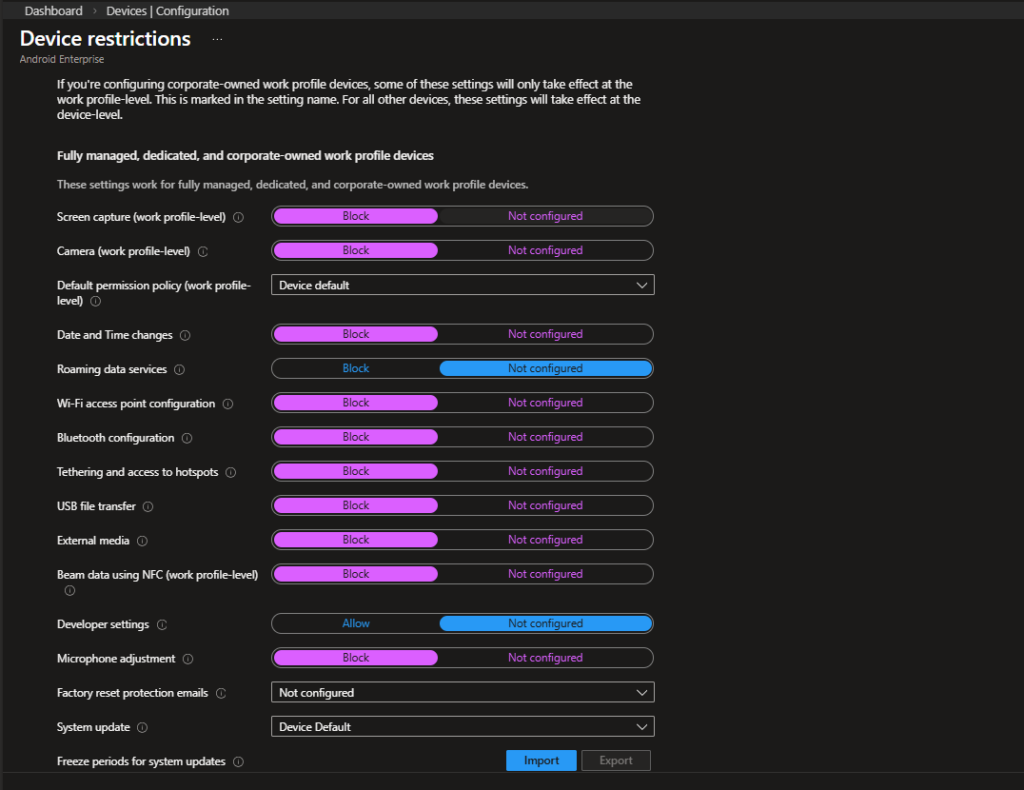
This is where COPE behavior is actually defined. For corporate-owned work profile devices, some settings apply at the work profile level, while others apply at the device level. This distinction matters.
Work Profile & Device-Level Restrictions
| Setting | Configuration | Reasoning |
|---|---|---|
| Screen capture (work profile-level) | Block | Prevent data leakage from corporate apps |
| Camera (work profile-level) | Block | Restrict camera usage inside work profile only |
| Default permission policy | Device default | Avoid aggressive permission overrides |
| Date and time changes | Block | Prevent user manipulation affecting logs/compliance |
| Roaming data services | Block | Control unexpected roaming usage |
| Wi-Fi access point configuration | Block | Prevent unauthorized hotspot creation |
| Bluetooth configuration | Block | Limit external device pairing risks |
| Tethering and hotspot access | Block | Prevent data sharing via personal hotspot |
| USB file transfer | Block | Reduce risk of unmanaged data transfer |
| External media | Block | Prevent use of removable storage |
| Beam data using NFC | Block | Minimize proximity-based data transfer |
| Developer settings | Allow | Avoid breaking advanced troubleshooting scenarios |
| Microphone adjustment | Block | Limit hardware-level manipulation |
These settings establish a controlled baseline while still allowing the device to function normally for the end user.
Password Policy Configuration
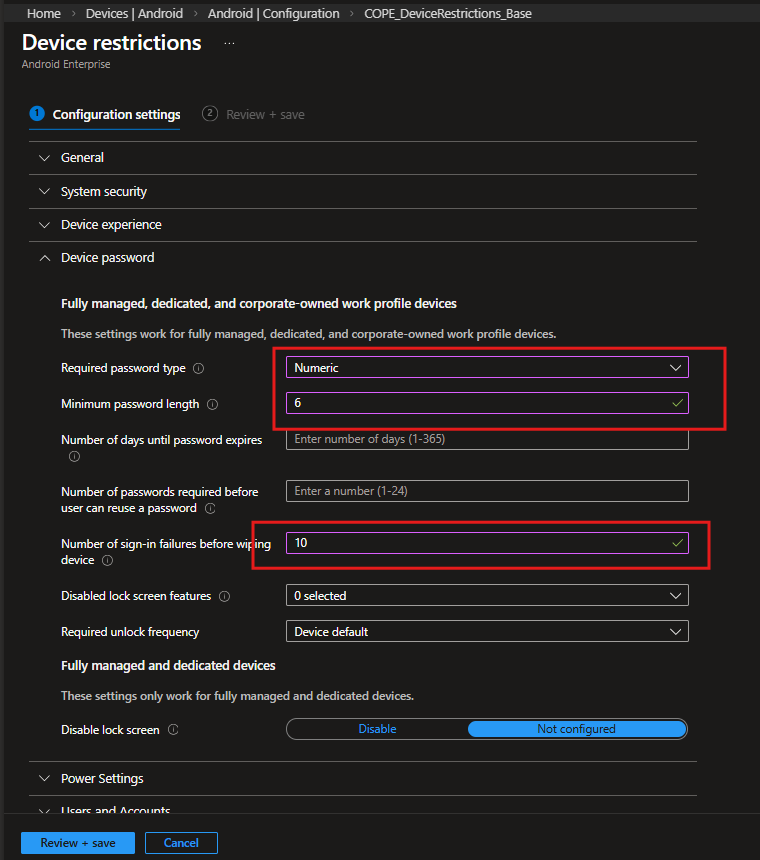
Under Device password, configure:
| Setting | Value | Reason |
|---|---|---|
| Required password type | Numeric | Balanced usability vs security |
| Minimum password length | 6 | Basic enterprise baseline |
| Number of sign-in failures before wipe | 10 | Protect against brute-force attempts |
This ensures:
- The device is protected
- The experience remains usable
- Security requirements are enforceable via compliance policies
Assignments
For assignment:
- Include group: All devices
- Select Edit filter
- Choose: Android COPE
- Filter mode: Include filtered devices in assignment
This ensures the policy applies only to devices enrolled using the COPE profile even though the group scope is broad.
This is where the filter created earlier becomes critical.

After confirming assignments, proceed to Review + save.
Why This Baseline Works for COPE
COPE devices are corporate-owned, so a stronger baseline makes sense.
However, they are also user-assigned primary devices, so the configuration should not be overly restrictive.
This balance is key:
- Restrict data movement channels
- Enforce password standards
- Maintain usability
From here, additional policies (Wi-Fi, VPN, certificates, compliance, app protection) can be layered on top.
Creating a Compliance Policy for COPE Devices
Device restrictions define behavior. Compliance policies define security posture.
Navigate to:
Devices → Android → Compliance → Create policy
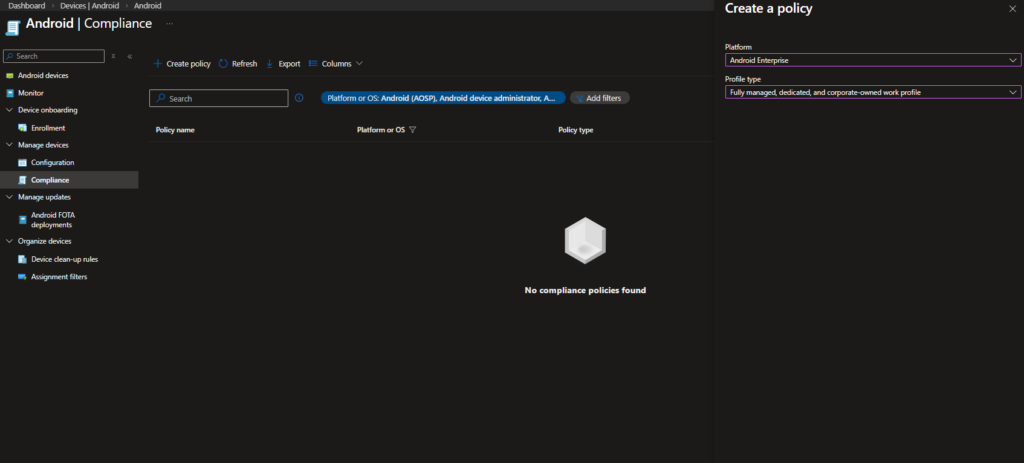
Configure:
- Platform: Android Enterprise
- Profile type: Fully managed, dedicated, and corporate-owned work profile
This ensures the policy applies to COPE devices.
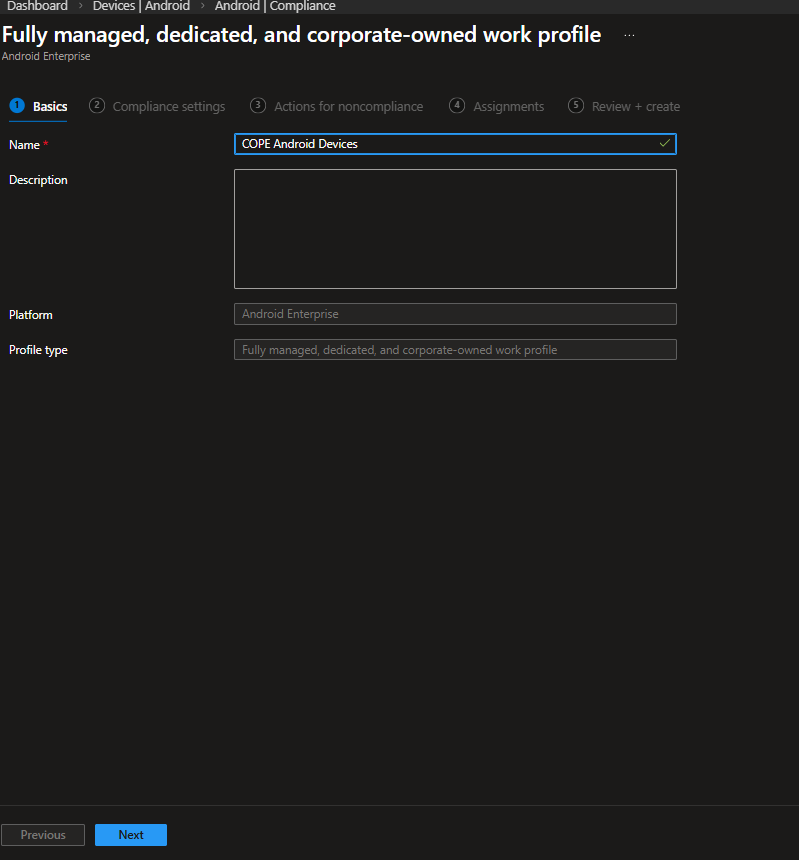
Basics
Profile name used here:
COPE Android Devices
Naming should clearly reflect scope. This helps later when integrating with Conditional Access.
Select Next.
Compliance Settings
This is where the actual security baseline is enforced.
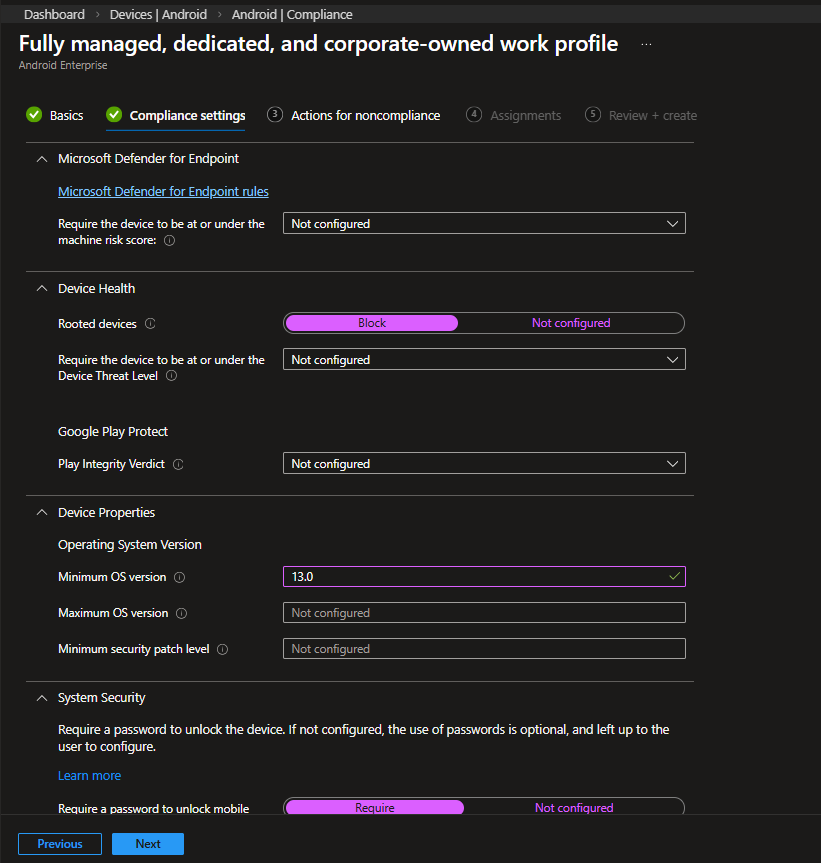
Device Health
| Setting | Configuration | Explanation |
|---|---|---|
| Rooted devices | Block | Rooted devices bypass platform security controls |
| Play Integrity Verdict | Not configured | Optional depending on security posture |
Blocking rooted devices is standard in corporate environments.
Operating System Version
| Setting | Value | Explanation |
|---|---|---|
| Minimum OS version | 13.0 | Ensures modern Android baseline |
| Maximum OS version | Not configured | Avoid blocking future updates |
| Minimum security patch level | Not configured | Can be defined if strict patch enforcement is required |
Setting a minimum OS version ensures devices remain within a supported lifecycle.
System Security
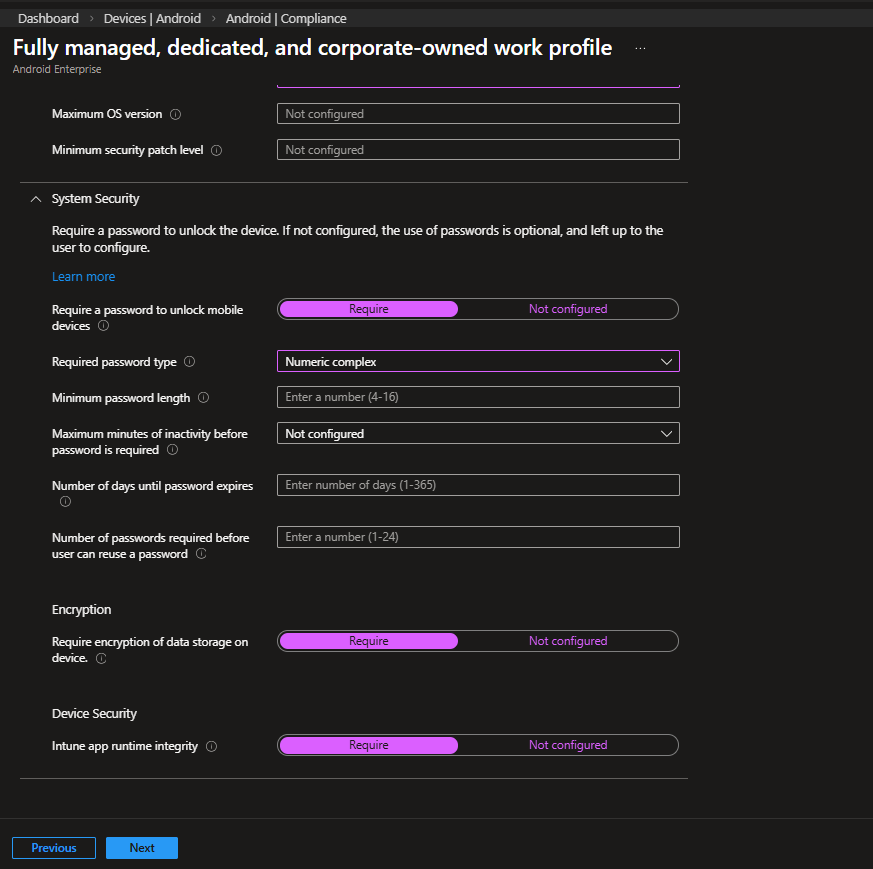
Password Requirements
| Setting | Value | Explanation |
|---|---|---|
| Require password | Require | Enforces device lock |
| Required password type | Numeric complex | Stronger than simple numeric |
| Minimum password length | Defined via device policy or here | Avoid duplication |
| Maximum inactivity before password | Not configured | Optional depending on policy |
| Password expiration | Not configured | Often avoided on mobile devices |
Important note:
You may define password complexity either in:
- Device Restrictions (Configuration profile)
- Compliance policy
Avoid configuring the same requirement in both unless intentional.
Encryption & Integrity
| Setting | Value | Explanation |
|---|---|---|
| Require encryption of data storage | Require | Mandatory for corporate-owned devices |
| Intune app runtime integrity | Require | Ensures device integrity |
Encryption should always be required on COPE devices.
Actions for Noncompliance
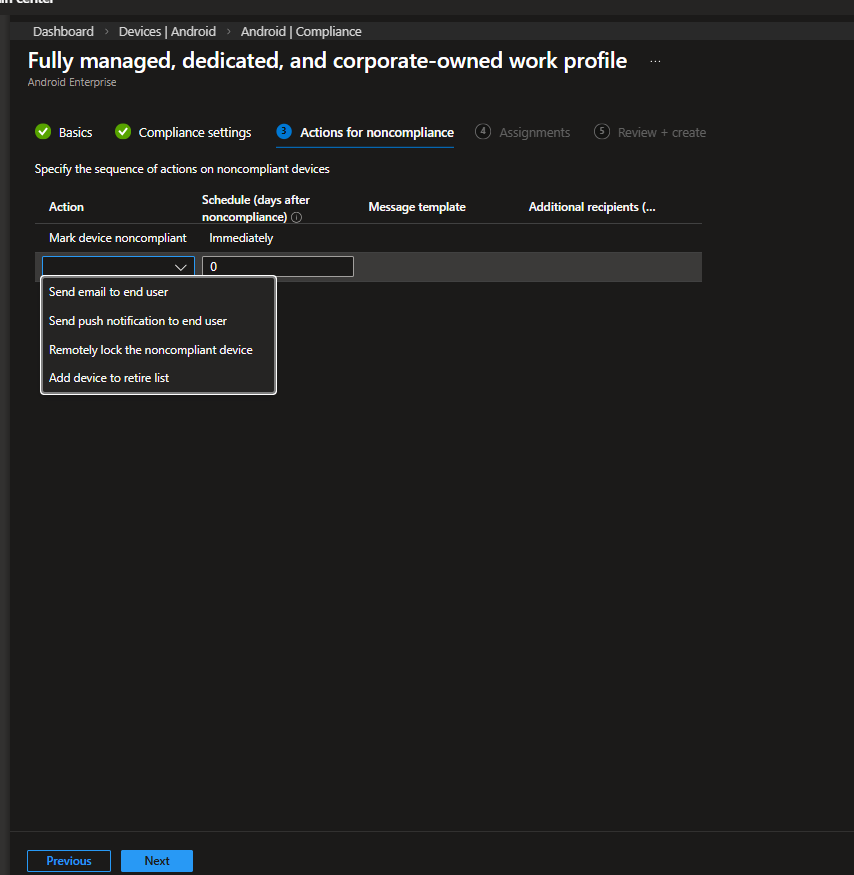
By default:
- Mark device noncompliant: Immediately
Additional actions can be configured, such as:
- Send email to end user
- Send push notification
- Remotely lock device
- Add device to retire list
In this configuration, marking the device noncompliant immediately is sufficient, especially when integrated with Conditional Access.
Assignments
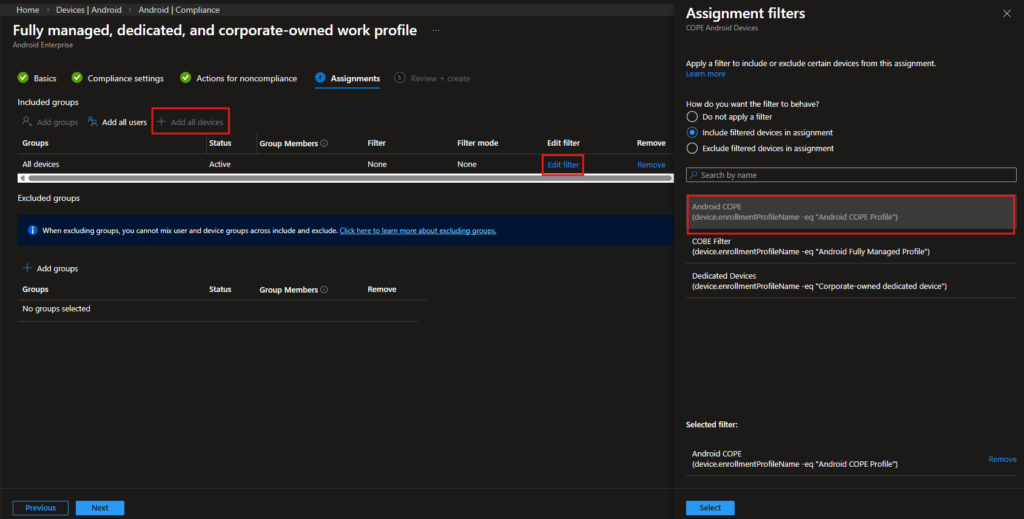
For assignment:
- Include: All devices
- Select Edit filter
- Choose: Android COPE
- Filter mode: Include filtered devices in assignment
This ensures the compliance policy applies only to COPE devices.
Why Separate Compliance from Configuration?
Configuration policies control device behavior.
Compliance policies determine whether a device is trusted.
In a production environment:
- Configuration enforces settings
- Compliance integrates with Conditional Access
- Non-compliant devices lose access to corporate resources
This separation keeps policy design structured and scalable.
User Experience
After scanning the QR code on the welcome screen (tap 6 times), connecting to Wi-Fi, and starting the corporate enrollment flow, the device does not behave like a standard personal Android setup anymore. From this point, the user is clearly inside a managed provisioning process.
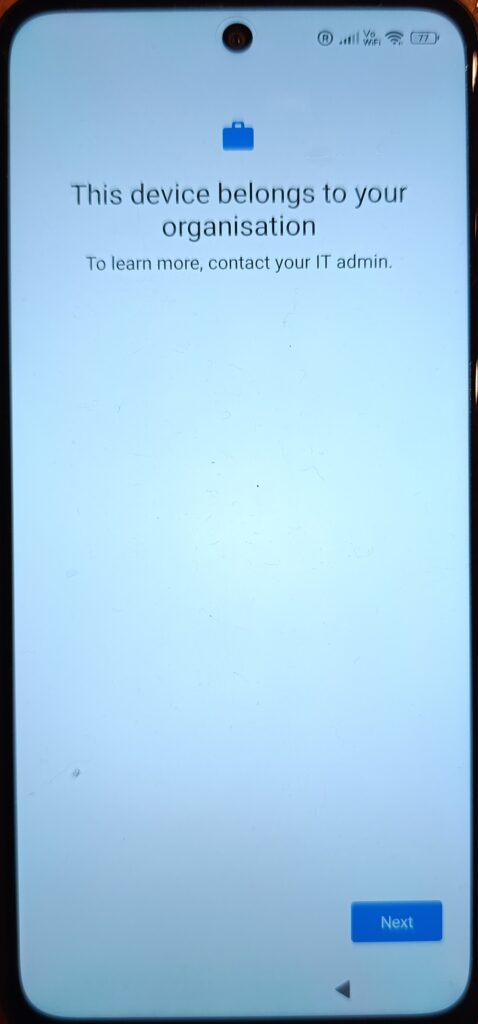
The first screen makes it explicit: this is a corporate-managed device. In a COPE scenario, this is expected because the device is enrolled in Device Owner mode.
The user simply taps Next to continue.
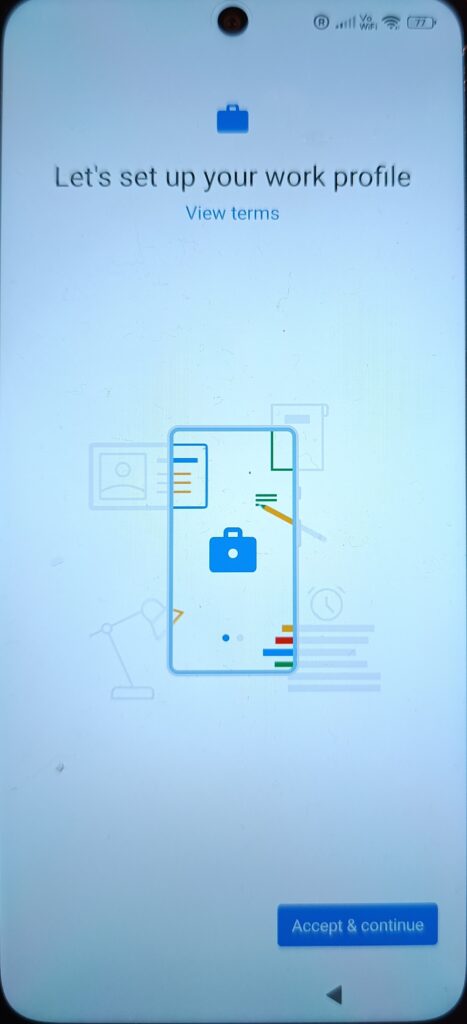
At this stage, Android prepares the work profile container.Even though the device is corporate-owned, Android still creates a logical separation for work apps.This is the key moment where the work profile is actually generated on the device.
The user selects Accept & continue.
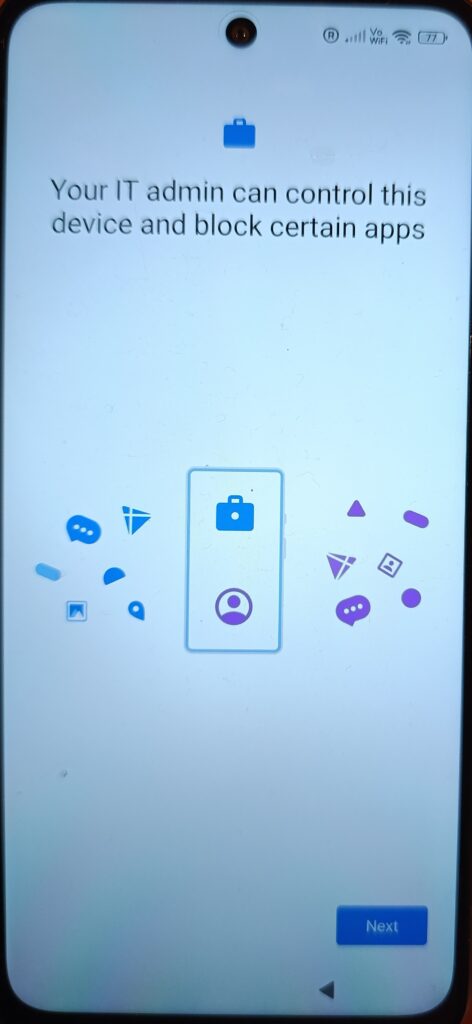
Here Android clarifies the management scope. Since this is a corporate-owned device, IT has device-level control. This is not a light-touch BYOD scenario.The message is informational no configuration happens here.
The user proceeds with Next.
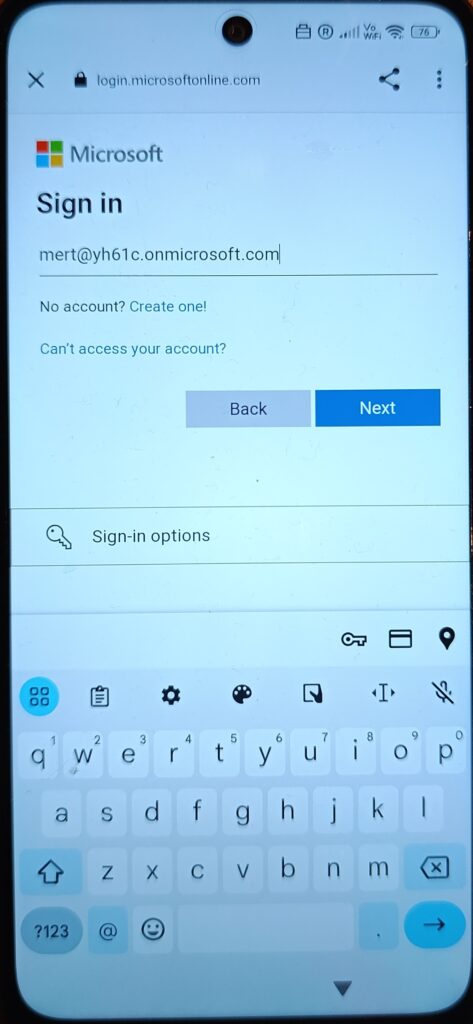
Now the device binds to the user identity.
The Entra ID sign-in determines:
- Primary user assignment
- Application targeting
- Compliance and Conditional Access evaluation
After authentication, enrollment continues automatically.
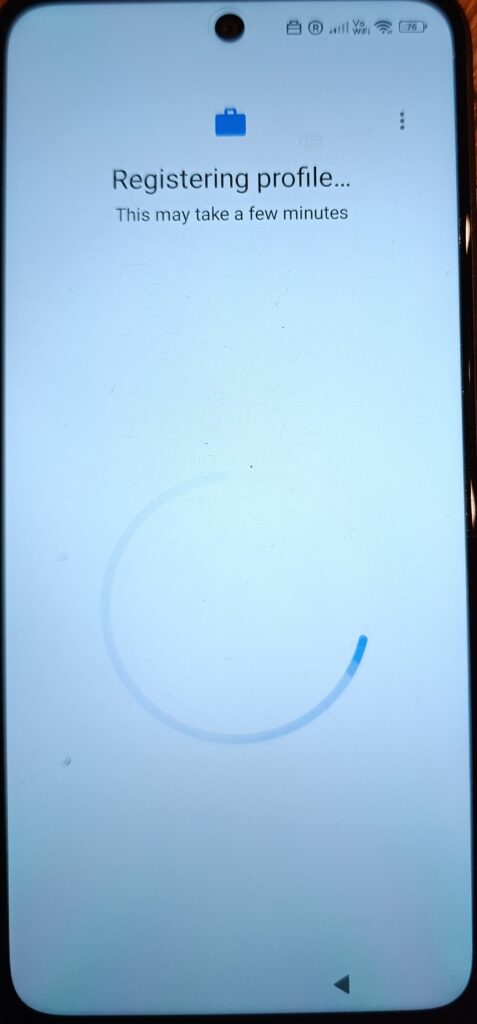
This is where the device completes the registration with Intune.Policies, required apps, and security baselines start applying from this point onward.
After the work profile is created, the device lands on Your work checklist.
This is where the user completes the final three steps — and the order matters:
- Set a screen lock
- Install work apps
- Register your device
This sequence is not random. It’s enforced by the policies we configured earlier.
Set a screen lock
The first action is Set a screen lock.
When the user taps Set up, the PIN screen appears:
Set PIN – Enter 4–16 digits
This is directly driven by the configuration and compliance policies:
- Password required → enforced
- Password type → Numeric / Numeric complex
- Minimum length → defined in policy
- No option to skip
The user cannot continue without setting a compliant PIN.
Once completed, the checklist marks this step as done.
At this point, the device meets the minimum security baseline.
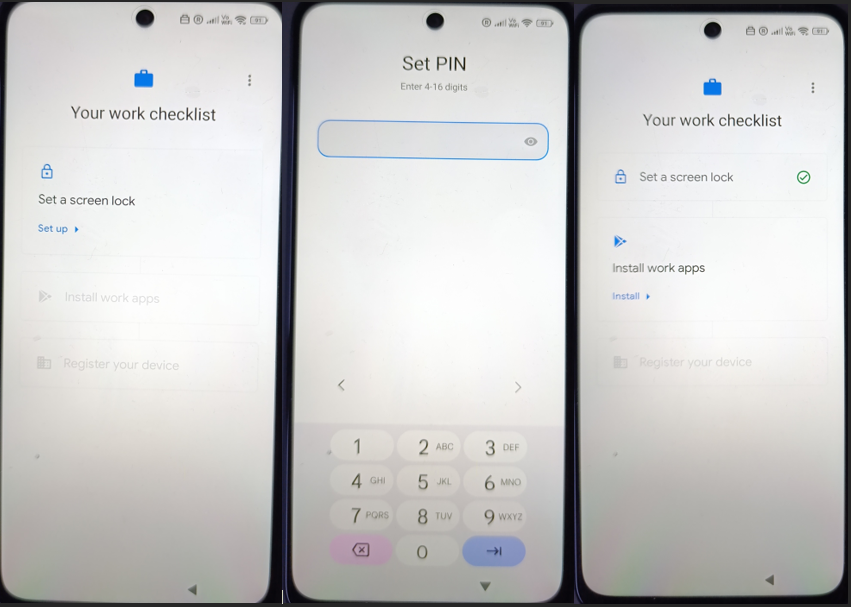
Install work apps
Next step: Install work apps.
When the user selects Install, the required applications for the work profile are displayed. In your case:
- Microsoft Authenticator
- Microsoft Intune
- Microsoft Teams
- Intune Company Portal
- Microsoft Outlook
- Microsoft Edge
Important detail:
These apps are installed inside the work profile container, not the personal profile.
They are managed applications and inherit the compliance and configuration rules defined in Intune.
Required apps install automatically.
Optional apps (if defined) can also appear here.
After installation completes, this step is marked as done in the checklist.

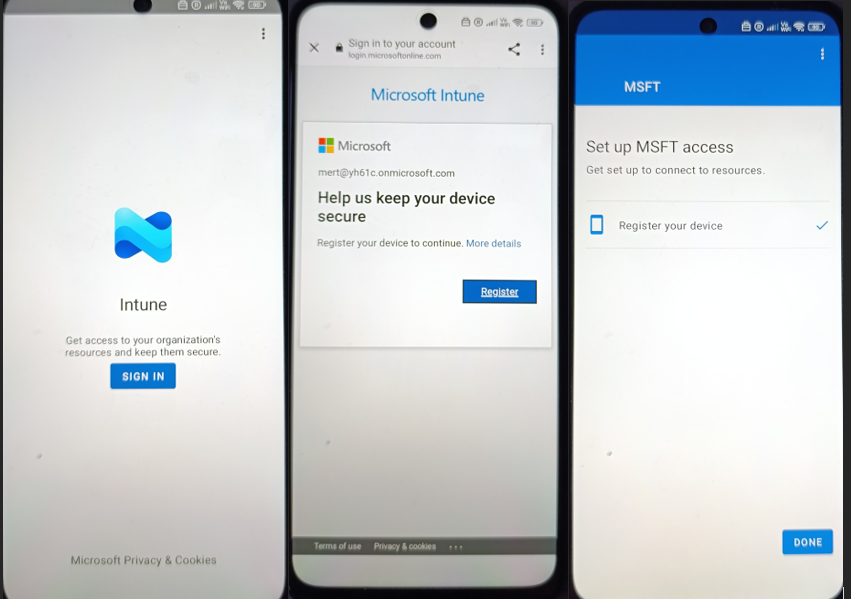
Register your device
The final step is Register your device.
This launches the Microsoft Intune sign-in experience.
The user:
- Signs in with their Entra ID account
- Confirms device registration
- Allows device management
You’ll see the “Help us keep your device secure” screen followed by the registration process.
During this stage:
- The device object is finalized in Entra ID
- Compliance evaluation runs
- Conditional Access policies can now apply
After successful registration, the checklist shows all steps completed.
At this point:
- The device is enrolled
- The work profile is active
- Required apps are deployed
- Compliance policies are enforced
- The device is ready for corporate access
At this point, the enrollment process is completed in the background. The device is now fully provisioned and ready for daily use.
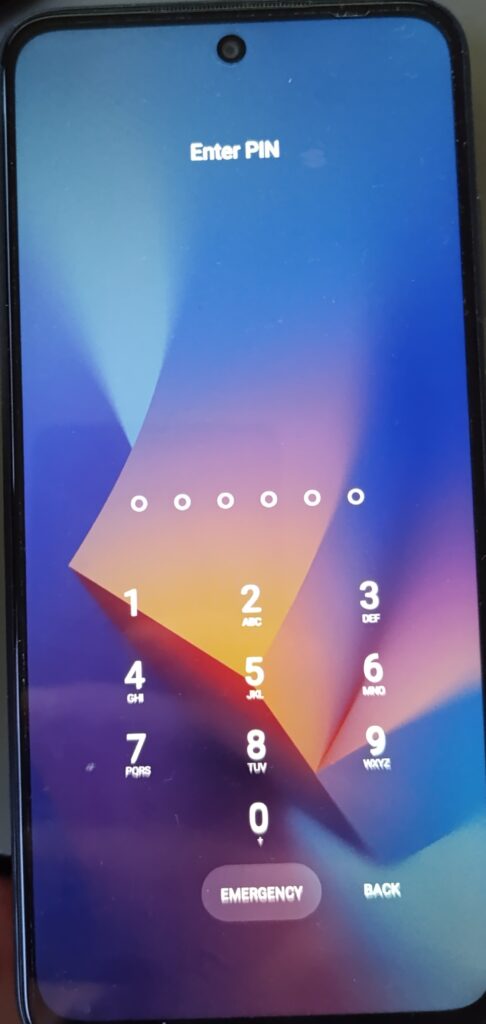
Device unlock
After setup, the device behaves like a standard corporate device. When locked, it is unlocked using the PIN defined during compliance configuration.
This matters because:
- The PIN requirement comes from the compliance policy.
- Password complexity rules are enforced automatically.
- The work profile is protected by this lock method.
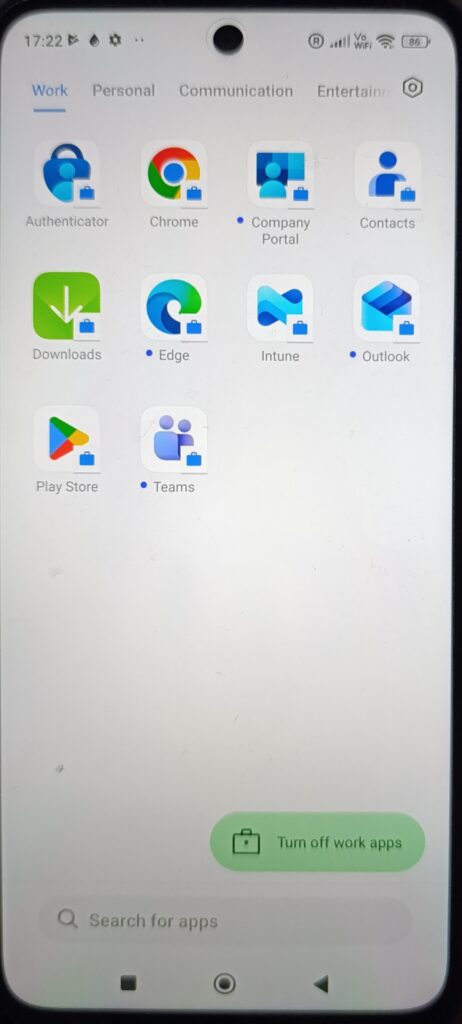
Managed Google Play & required applications
Once connected, required apps install automatically via Managed Google Play.
In the screenshot, you can see apps such as:
- Microsoft Authenticator
- Microsoft Intune
- Microsoft Outlook
- Microsoft Teams
- Company Portal
- Microsoft Edge
These were deployed as Required from Intune.
Work profile separation is visible
After provisioning completes, the work profile becomes clearly visible:
- A separate Work tab in the app drawer
- Apps marked with the briefcase icon
- Option to toggle work apps on/off
This reflects the COPE design:
- Corporate-owned device
- Organization controls the work profile
- Work and personal spaces are separated
Policy enforcement in the work profile
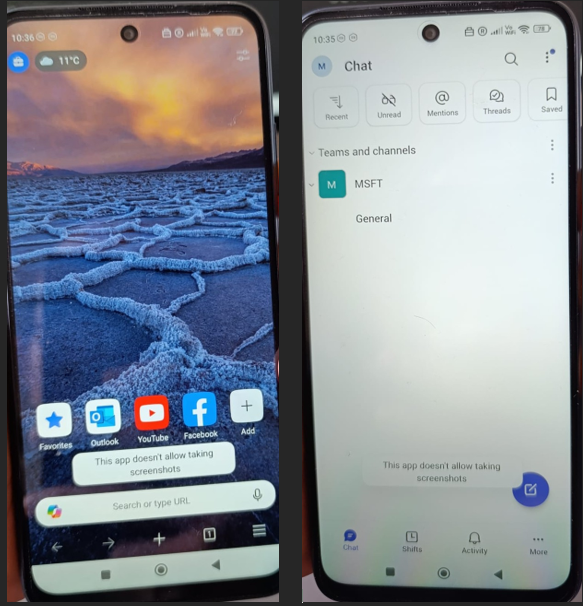
With the device provisioned and applications installed, restriction policies can now be observed in action.
In this configuration, screenshot capture is blocked within work applications. When attempting to take a screenshot inside a managed app, Android prevents the action and displays the standard system message.
This behavior is controlled by the device restriction policy assigned to the work profile.
What this shows is straightforward:
Restrictions defined in Intune are enforced at runtime.
Security boundaries apply specifically to the work container.
Corporate data inside managed apps remains protected.
The device is not only enrolled and compliant it is actively operating under the configured security model.
COPE proves that strong control and user flexibility can coexist on the same device. With the right enrollment design, targeting strategy, and security baseline, corporate-owned Android devices can remain both secure and practical for daily use.
In the next article, we’ll shift to Fully Managed devices and examine how the model changes when personal space is removed and the device is locked down entirely for corporate use.
References
- Microsoft Learn – Android Enterprise enrollment guide
https://learn.microsoft.com/en-us/intune/intune-service/fundamentals/deployment-guide-enrollment-android - Microsoft Learn – Corporate-owned work profile (COPE)
https://learn.microsoft.com/en-us/intune/intune-service/enrollment/android-corporate-owned-work-profile-enroll - Microsoft Learn – Android compliance policies in Intune
https://learn.microsoft.com/en-us/intune/intune-service/protect/compliance-policy-create-android - Microsoft Learn – Android Enterprise device restrictions
https://learn.microsoft.com/en-us/intune/intune-service/configuration/device-restrictions-android